Tag Archives: Quilting

Sashiko Daisies Handbag

Sashiko Daisies Handbag

Hello Dear Friends and Readers,

Today I would like to share with you all a special gift I made for a very special lady.   This project will require some quilting, machine stitching and hand stitching.   It’s seems probable that the origins of this style probably come from origami.  It reminds me of the little folded lollie baskets we had sometimes as children for birthday parties.  Do you remember?  I would like to say at the outset that I have seen this style of bag before in a Japanese pattern, although I am not sure who to credit with the original design.

Some people call it a “Tulip“ or “Petal“ style of bag.   Consult Google to see some other variations.   The crossing over of the bag sides to the base is quite ingenious as this can be used to reinforce the sides of the bag.  For the version I have made, the sides to base will make two extra, secret two way pockets.  And lets face it, we all need extra pockets!

Although this project may not necessarily appear scrappy, I believe in its own way it probably is as some leftover fabric and batting could be used. ‘

The pattern is quite adaptable, it can be made extremely simply with just two layers of fabric, plus or minus a layer of Interfacing, or as I have done, with a layer of batting and then quilting to reinforce the fabric and give some “guts“ to the construction and a much more stylish finish.

I have preceded this post with the quilting of the fabric for the handbag.  You can do the same or choose your own style!

Finished Size approximately

Base width 6″ x 6″

Top width approximately 10″

Height approximately 12″

Sashiko Daisies by Treadle Free Motion

So lets do it!

Draft the pattern as stated.

One large piece of paper  ( I used paper from a flower bouquet)

Requirements for the Sashiko Daisies Handbag

One quilted piece from Sashiko Daisies as in the above link

Approximately 4 yards of 2“ contrasting bias binding

Drafted paper pattern

Purchased clip on or sew on leather handles

purchased bag feet (optional)

Buttons x 2

Drafting the Sashiko Daisies Handbag Pattern

You will need a piece of paper measuring 21” x 30”

I used a florist wrapping paper.  Carefully fold the paper into four.  Orientate the long fold to the right and the short to the base.

From the left base cut out a section 6 1/2” wide and 3 1/2” high.

From the top left round off the corner beginning 6” above the cut out around to the 5” mark from the top edge.

susies-scraps.com
Sashiko Daisies Handbag

.

Constructing the Sashiko Daisies handbag

Open your paper pattern.
susies-scraps.com
Sashiko Daisies Handbag

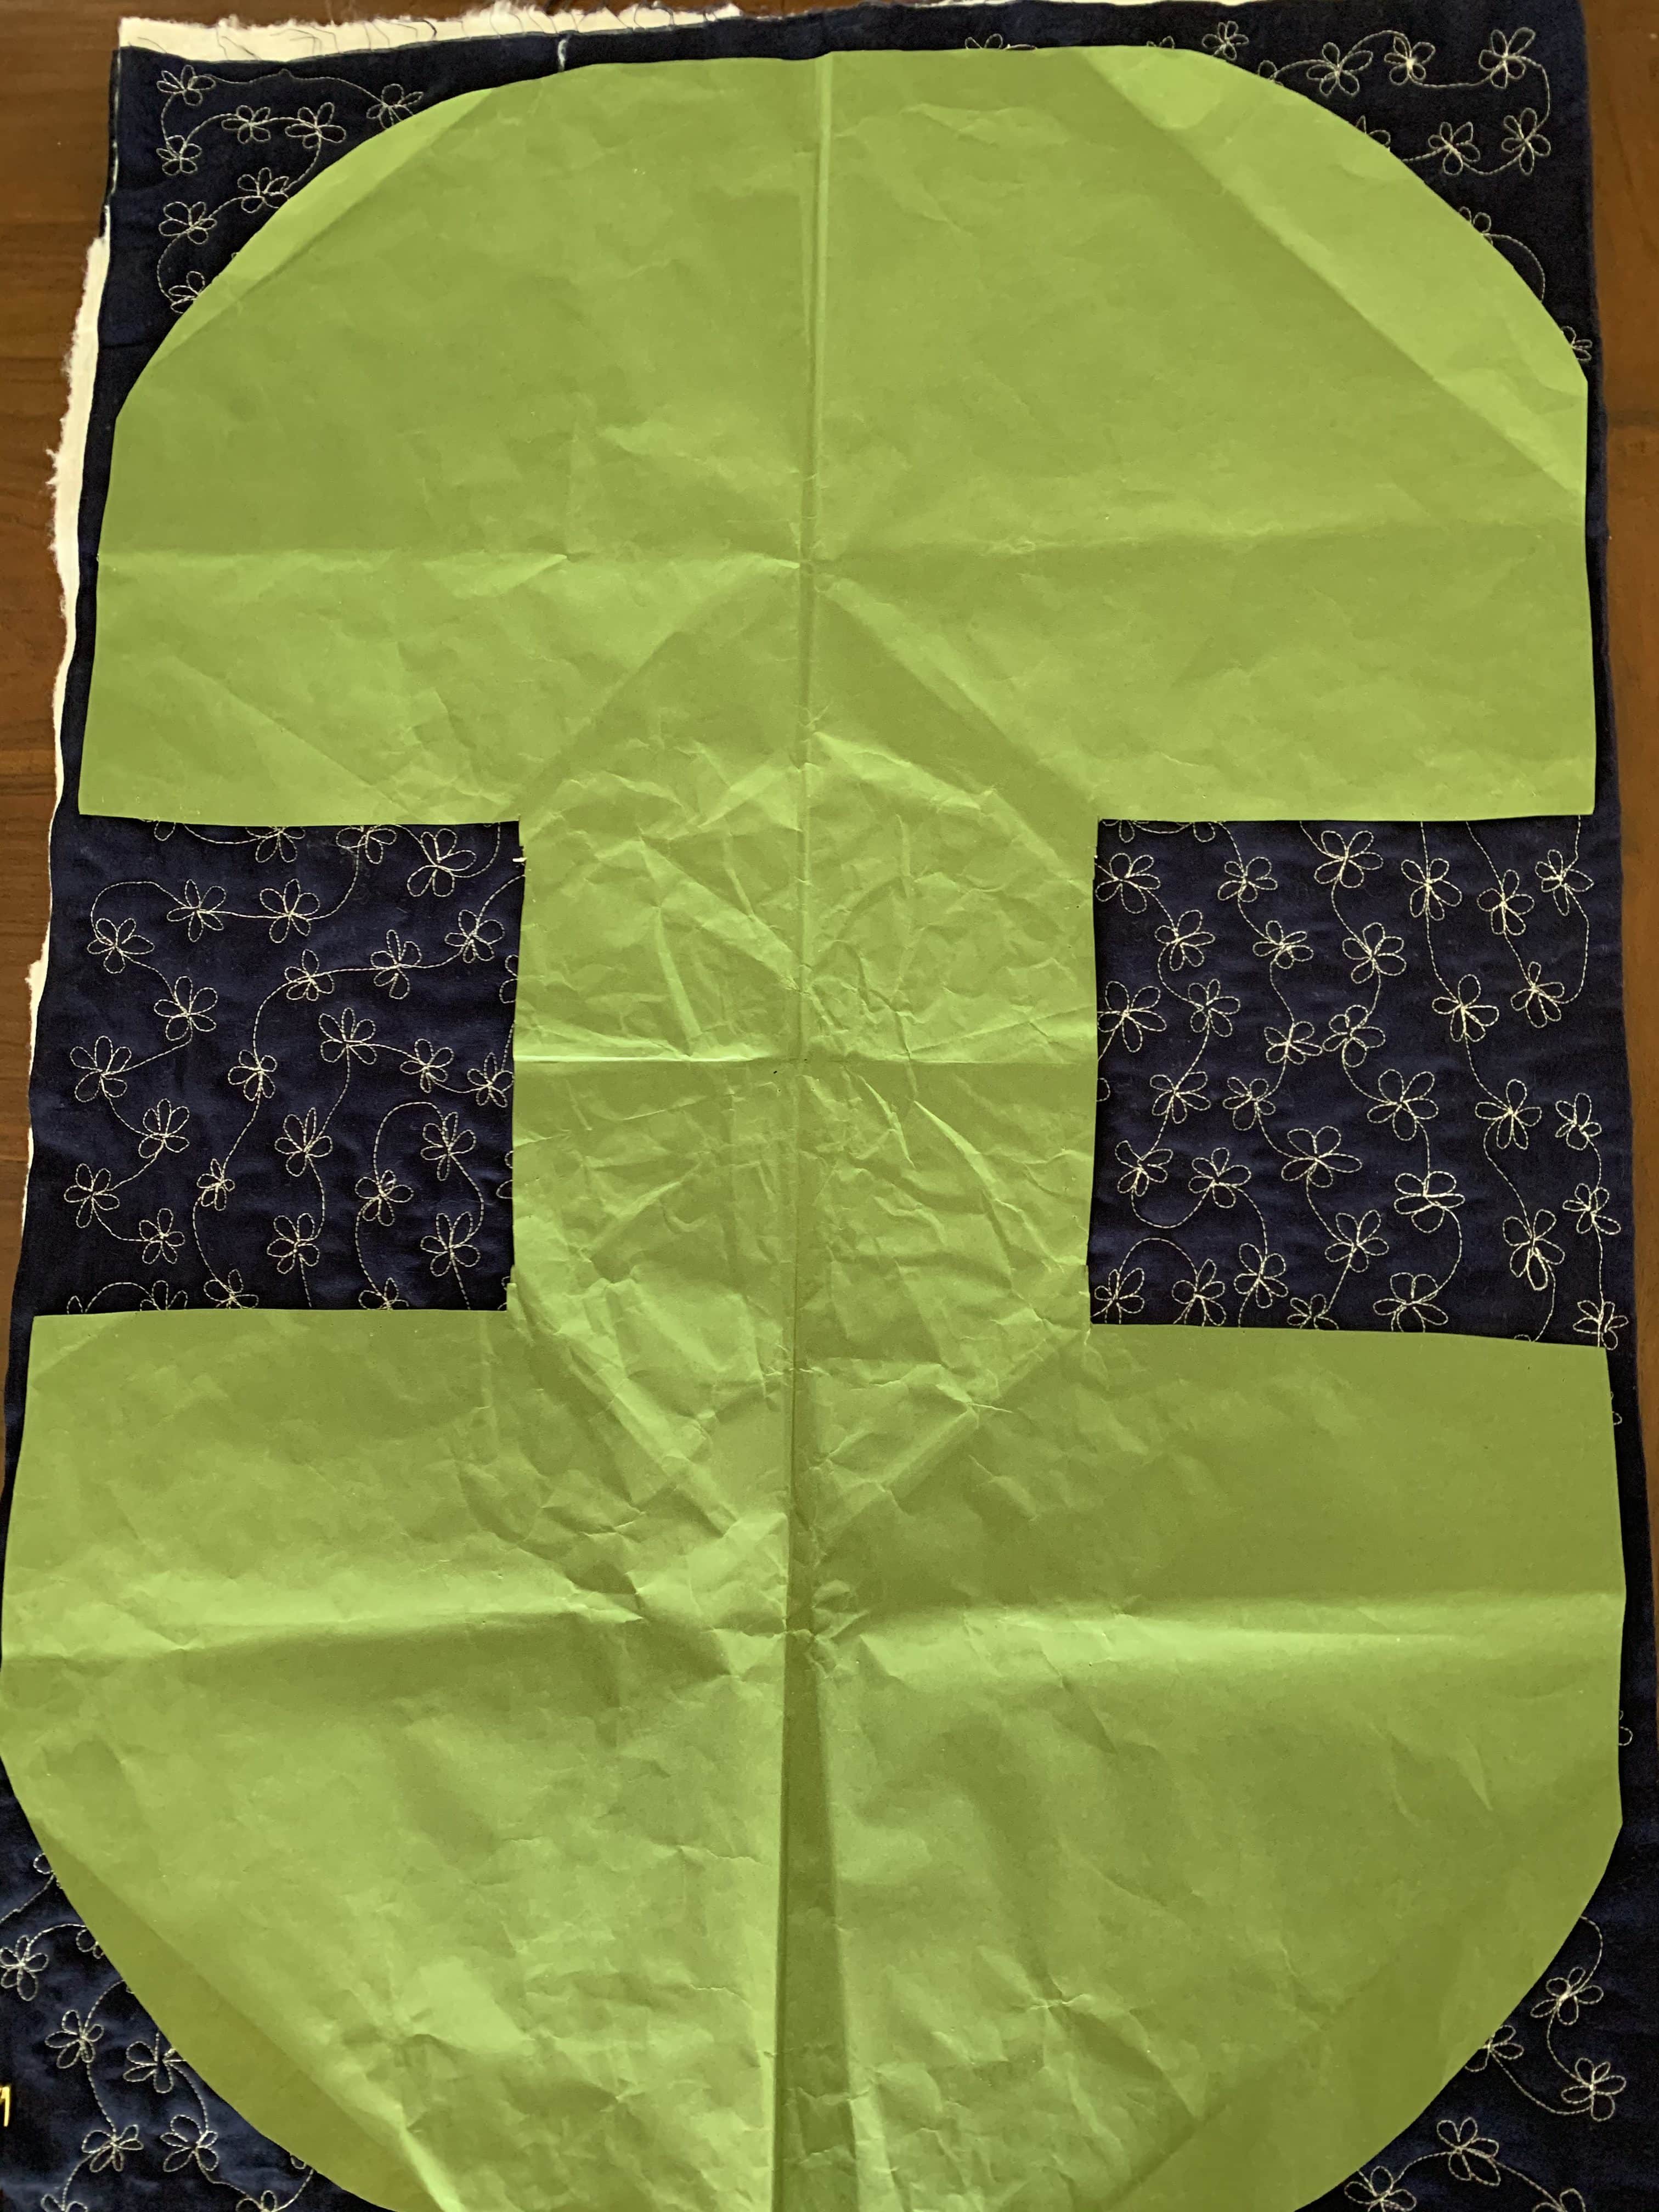
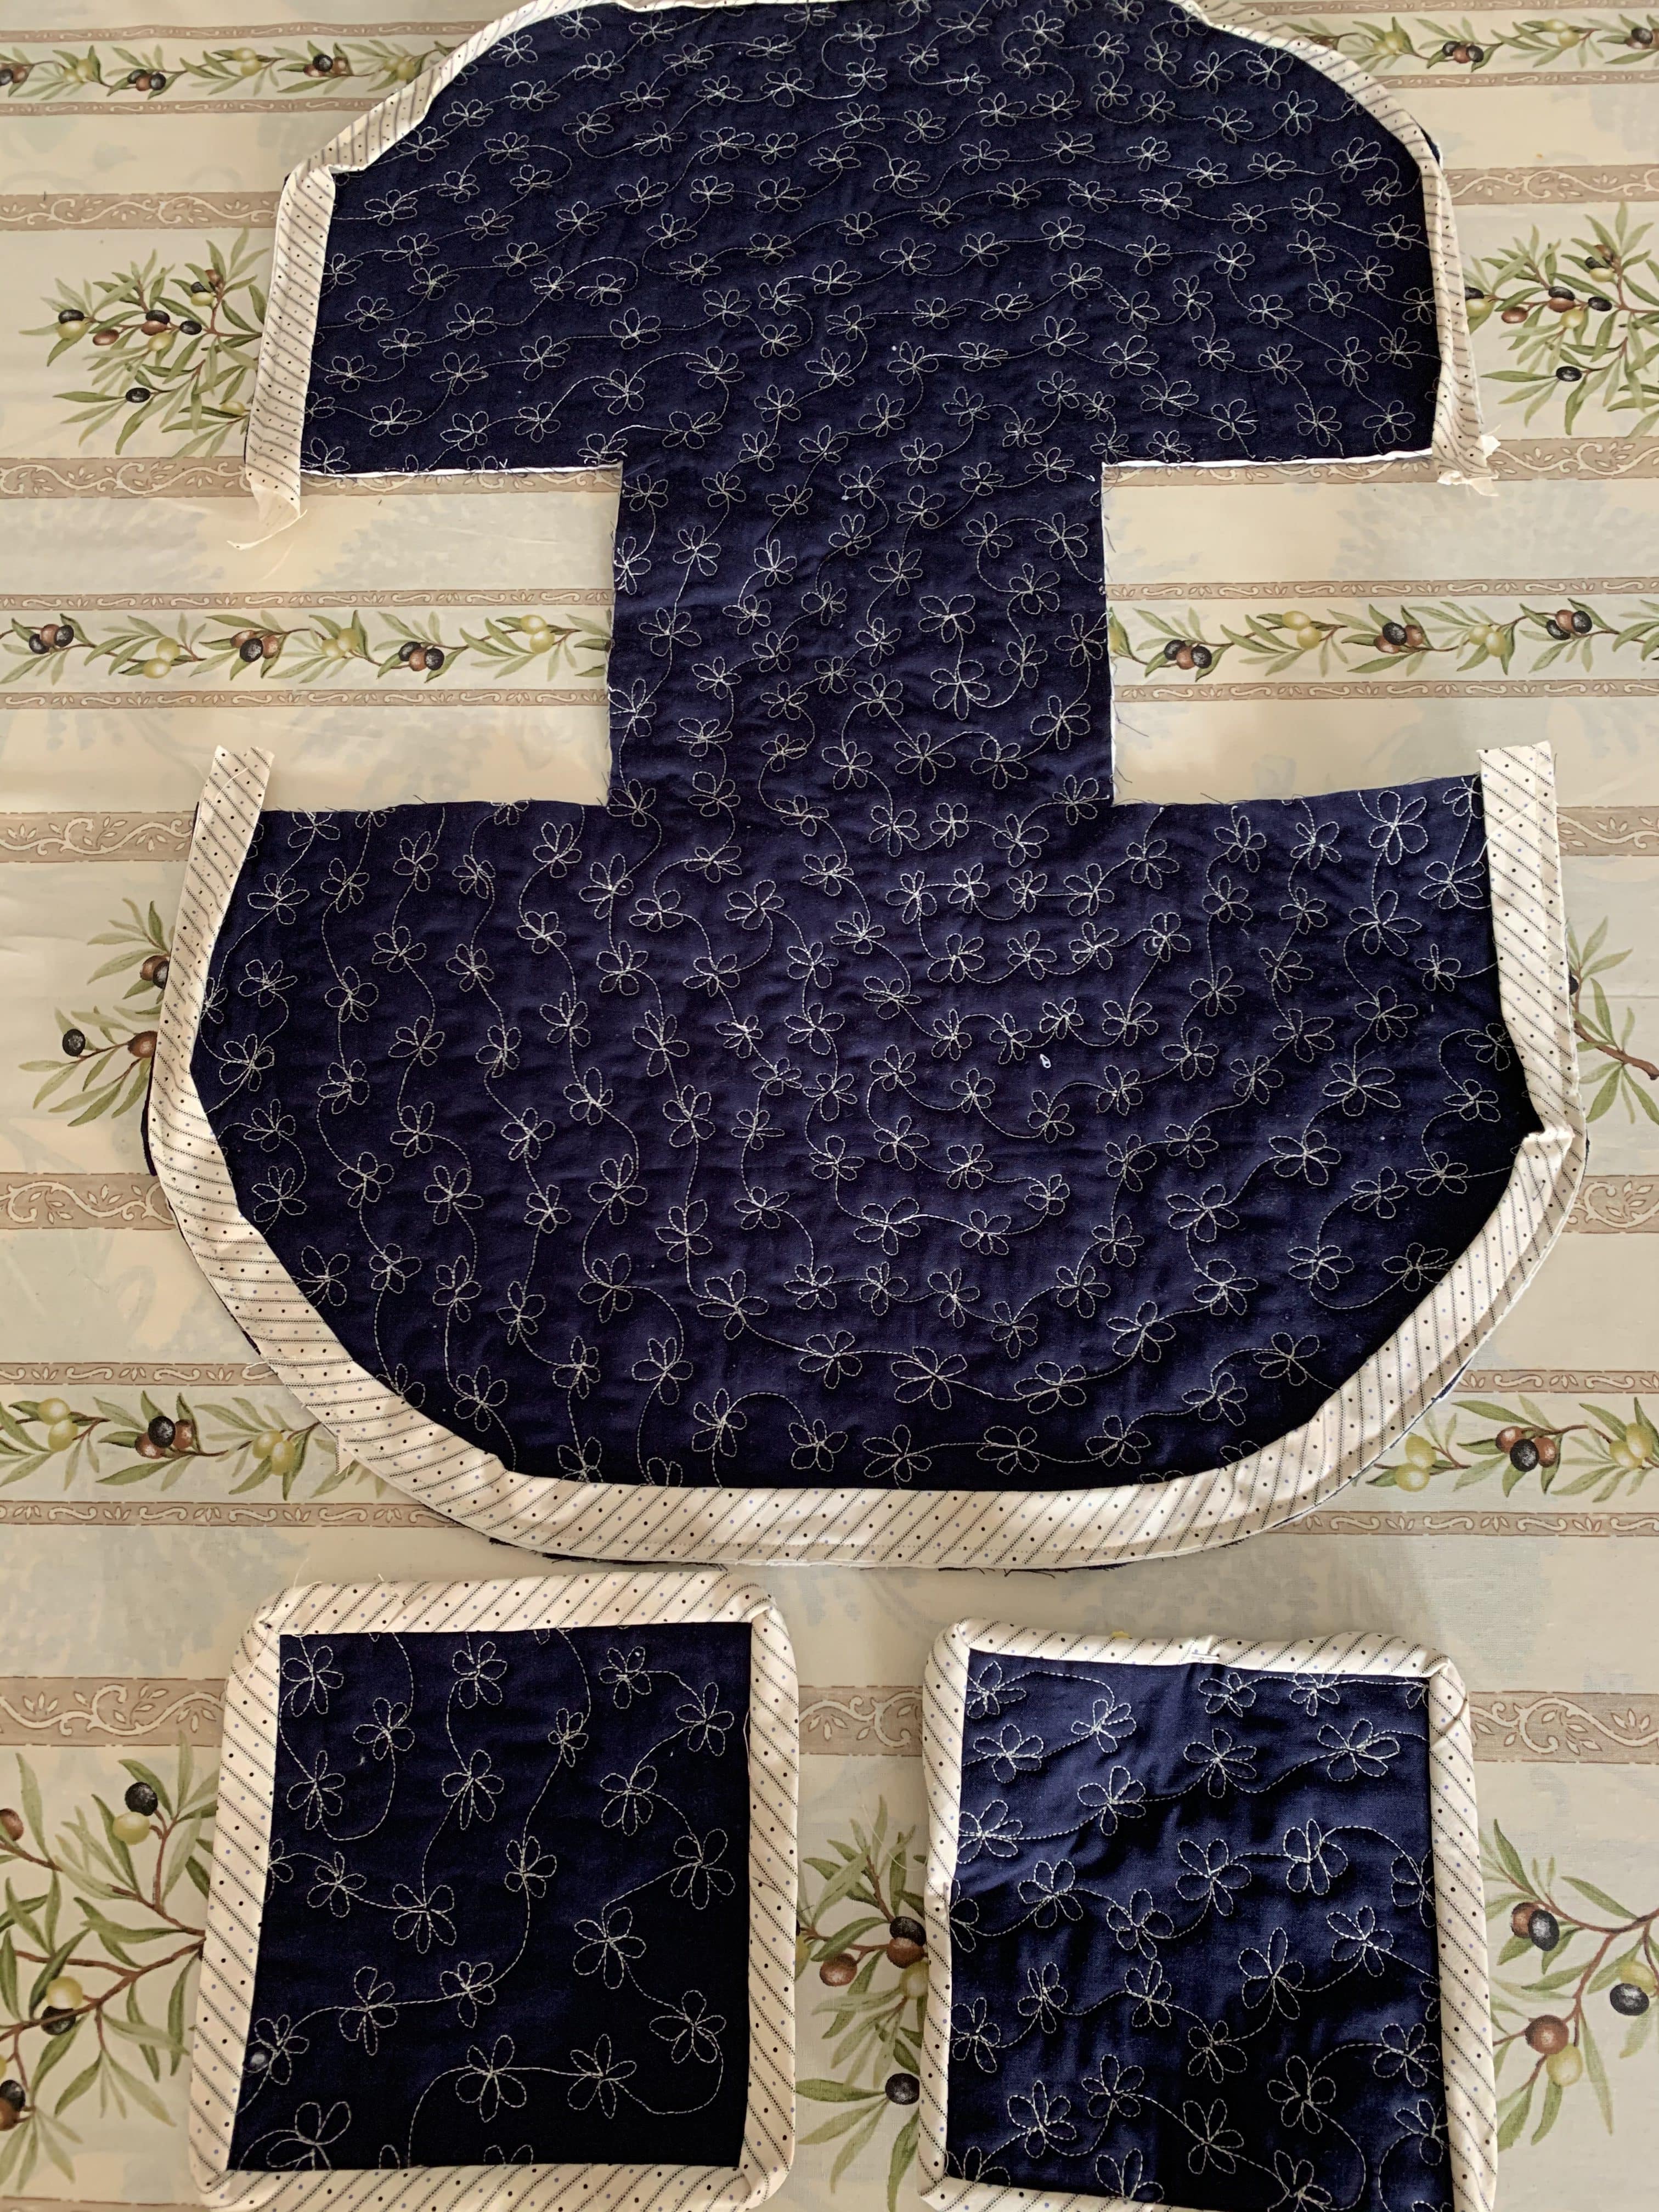
Lay the drafted paper pattern on the quilted fabric.  The square areas will be saved to make extra pockets.

Pin and cut carefully around the patten preserving the two squares either side of the pattern piece to be used for pockets if desired.

Fold the binding strips in half lengthwise and pin to the right side of the round edges of the quilted fabric, raw edges aligned.  Machine stitch 1/4” from the edge.

Do the same for the two square pockets.
susies-scraps.com
Sashiko Daisies Handbag

Turn the binding strips to the wrong side and hand stitch them in place.   Do the same for the pocket bindings.

susies-scraps.com
Sashiko Daisies Handbag

Trim the excess binding from the ends of the round edges.  With the wrong side (inside) facing, lay the wrong side of the pocket pieces at the centre of each side of the bag piece about 1/2” from the base area as pictured.  When you are happy with the placement, pin in place and carefully hand stitch three sides of the pockets to the bag making sure that your stitches do not appear on the outside.  Leave the top edge open to make the pocket.

susies-scraps.com
Sashiko Daisies Handbag

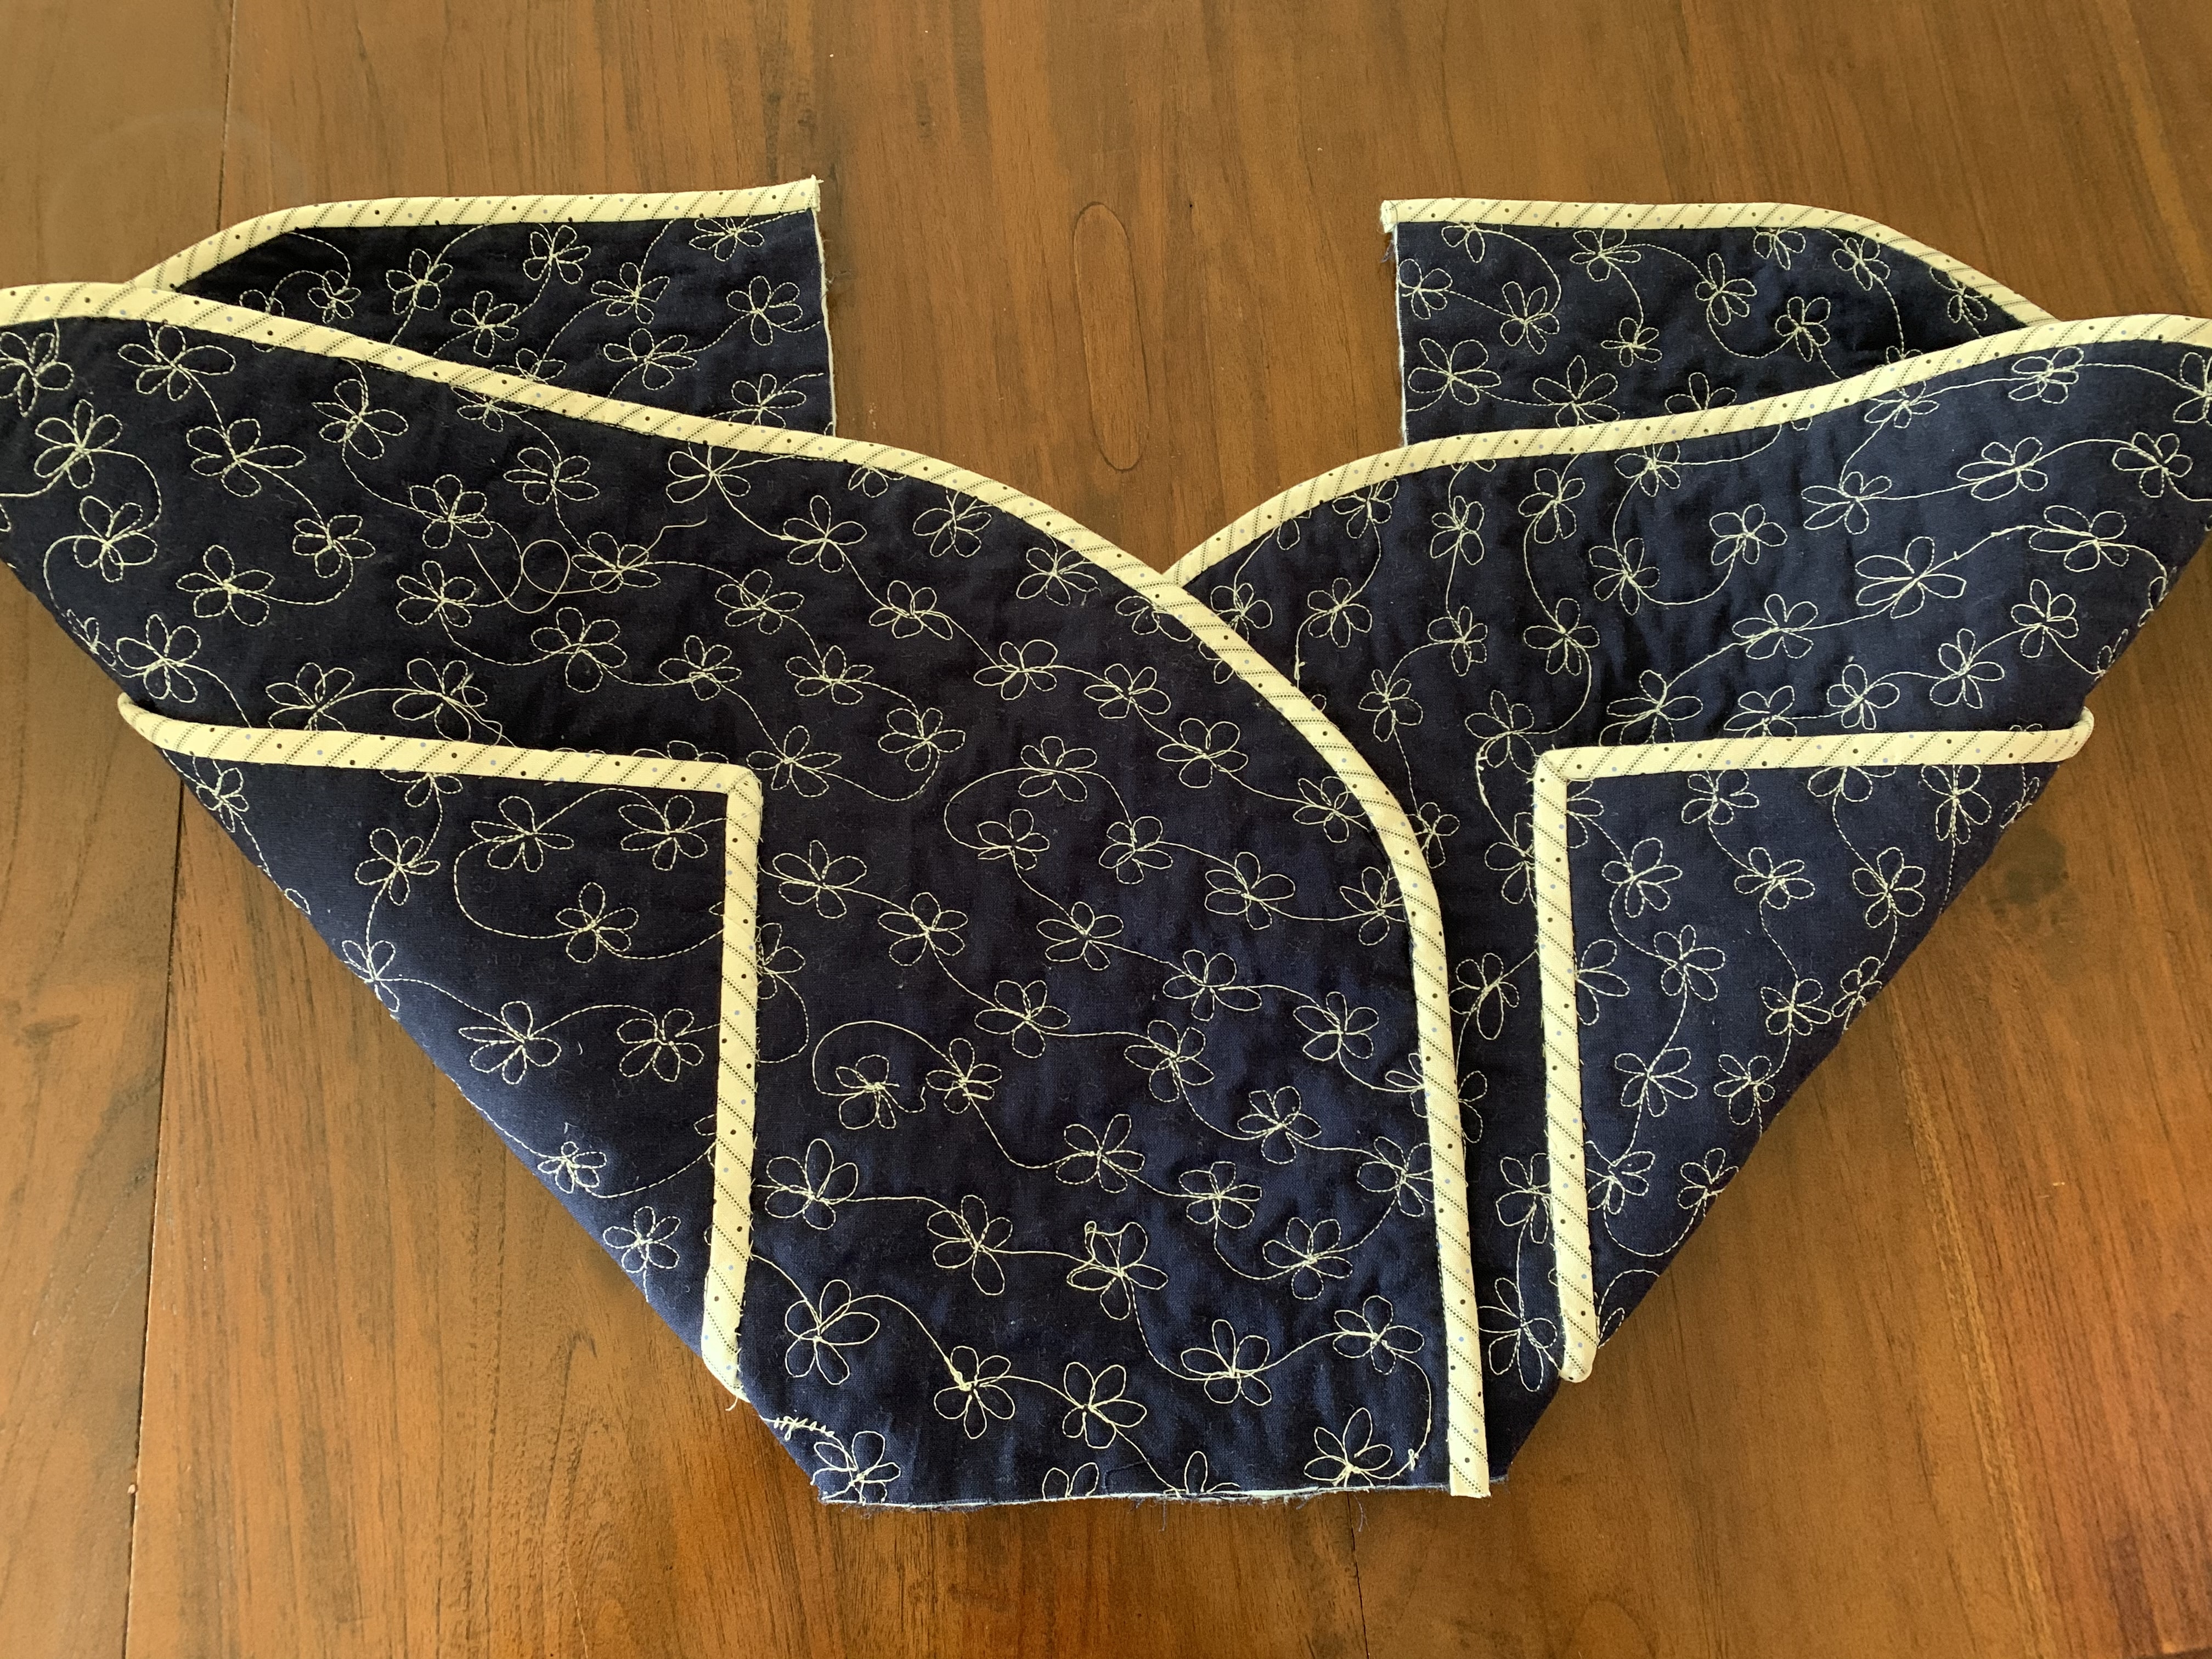
With the wrong side facing, fold the sides down to the lower edge of the base at a 45 degree angle so that the edges are all aligned.

susies-scraps.com
Sashiko Daisies Handbag

Pin to secure.

susies-scraps.com
Sashiko Daisies Handbag

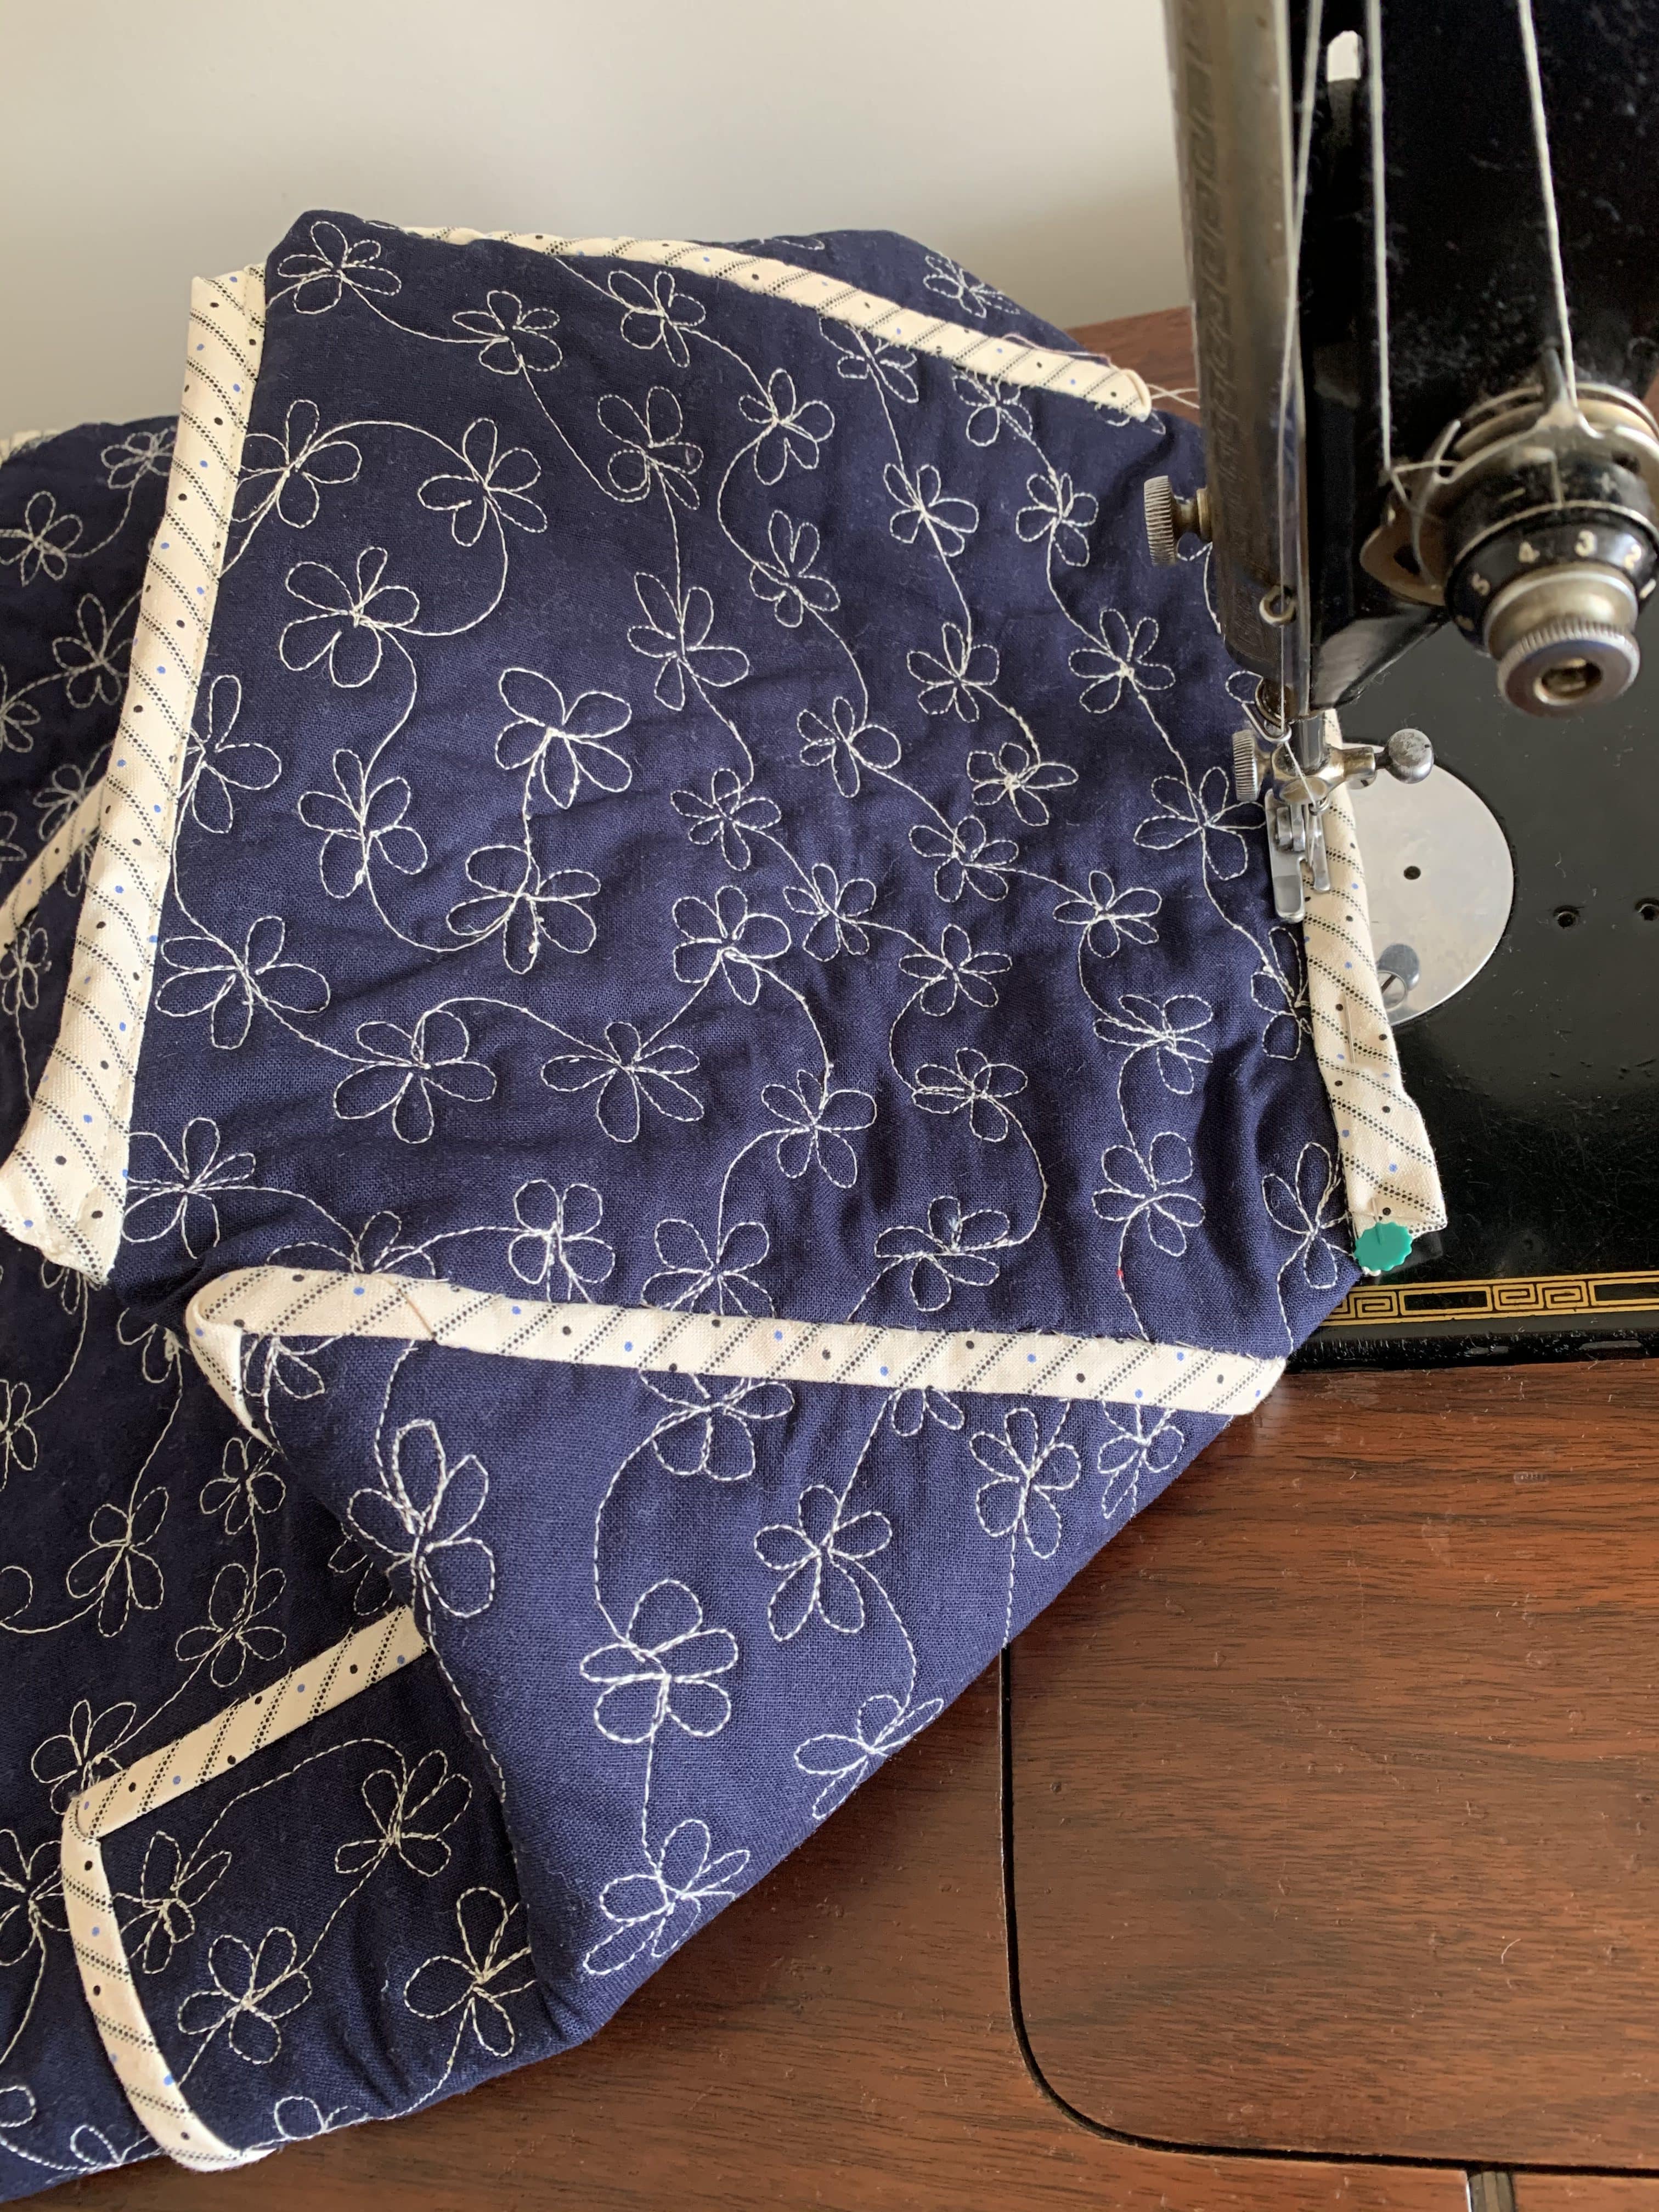
Use a 10” open length of the 2” bias strip right side down, and centre on these edges, all raw edges aligning.  Pin to secure all layers together.  Slowly machine stitch in place 3/8” from the edge.

susies-scraps.com
Sashiko Daisies Handbag

Turn the binding strip to the other side turning under all raw edges and enclosing the seam allowances.  Top strich in place.

Repeat the last three steps for the other side of the bag.
susies-scraps.com
Sashiko Daisies Handbag

Now it should look like this.

susies-scraps.com
Sashiko Daisies Handbag

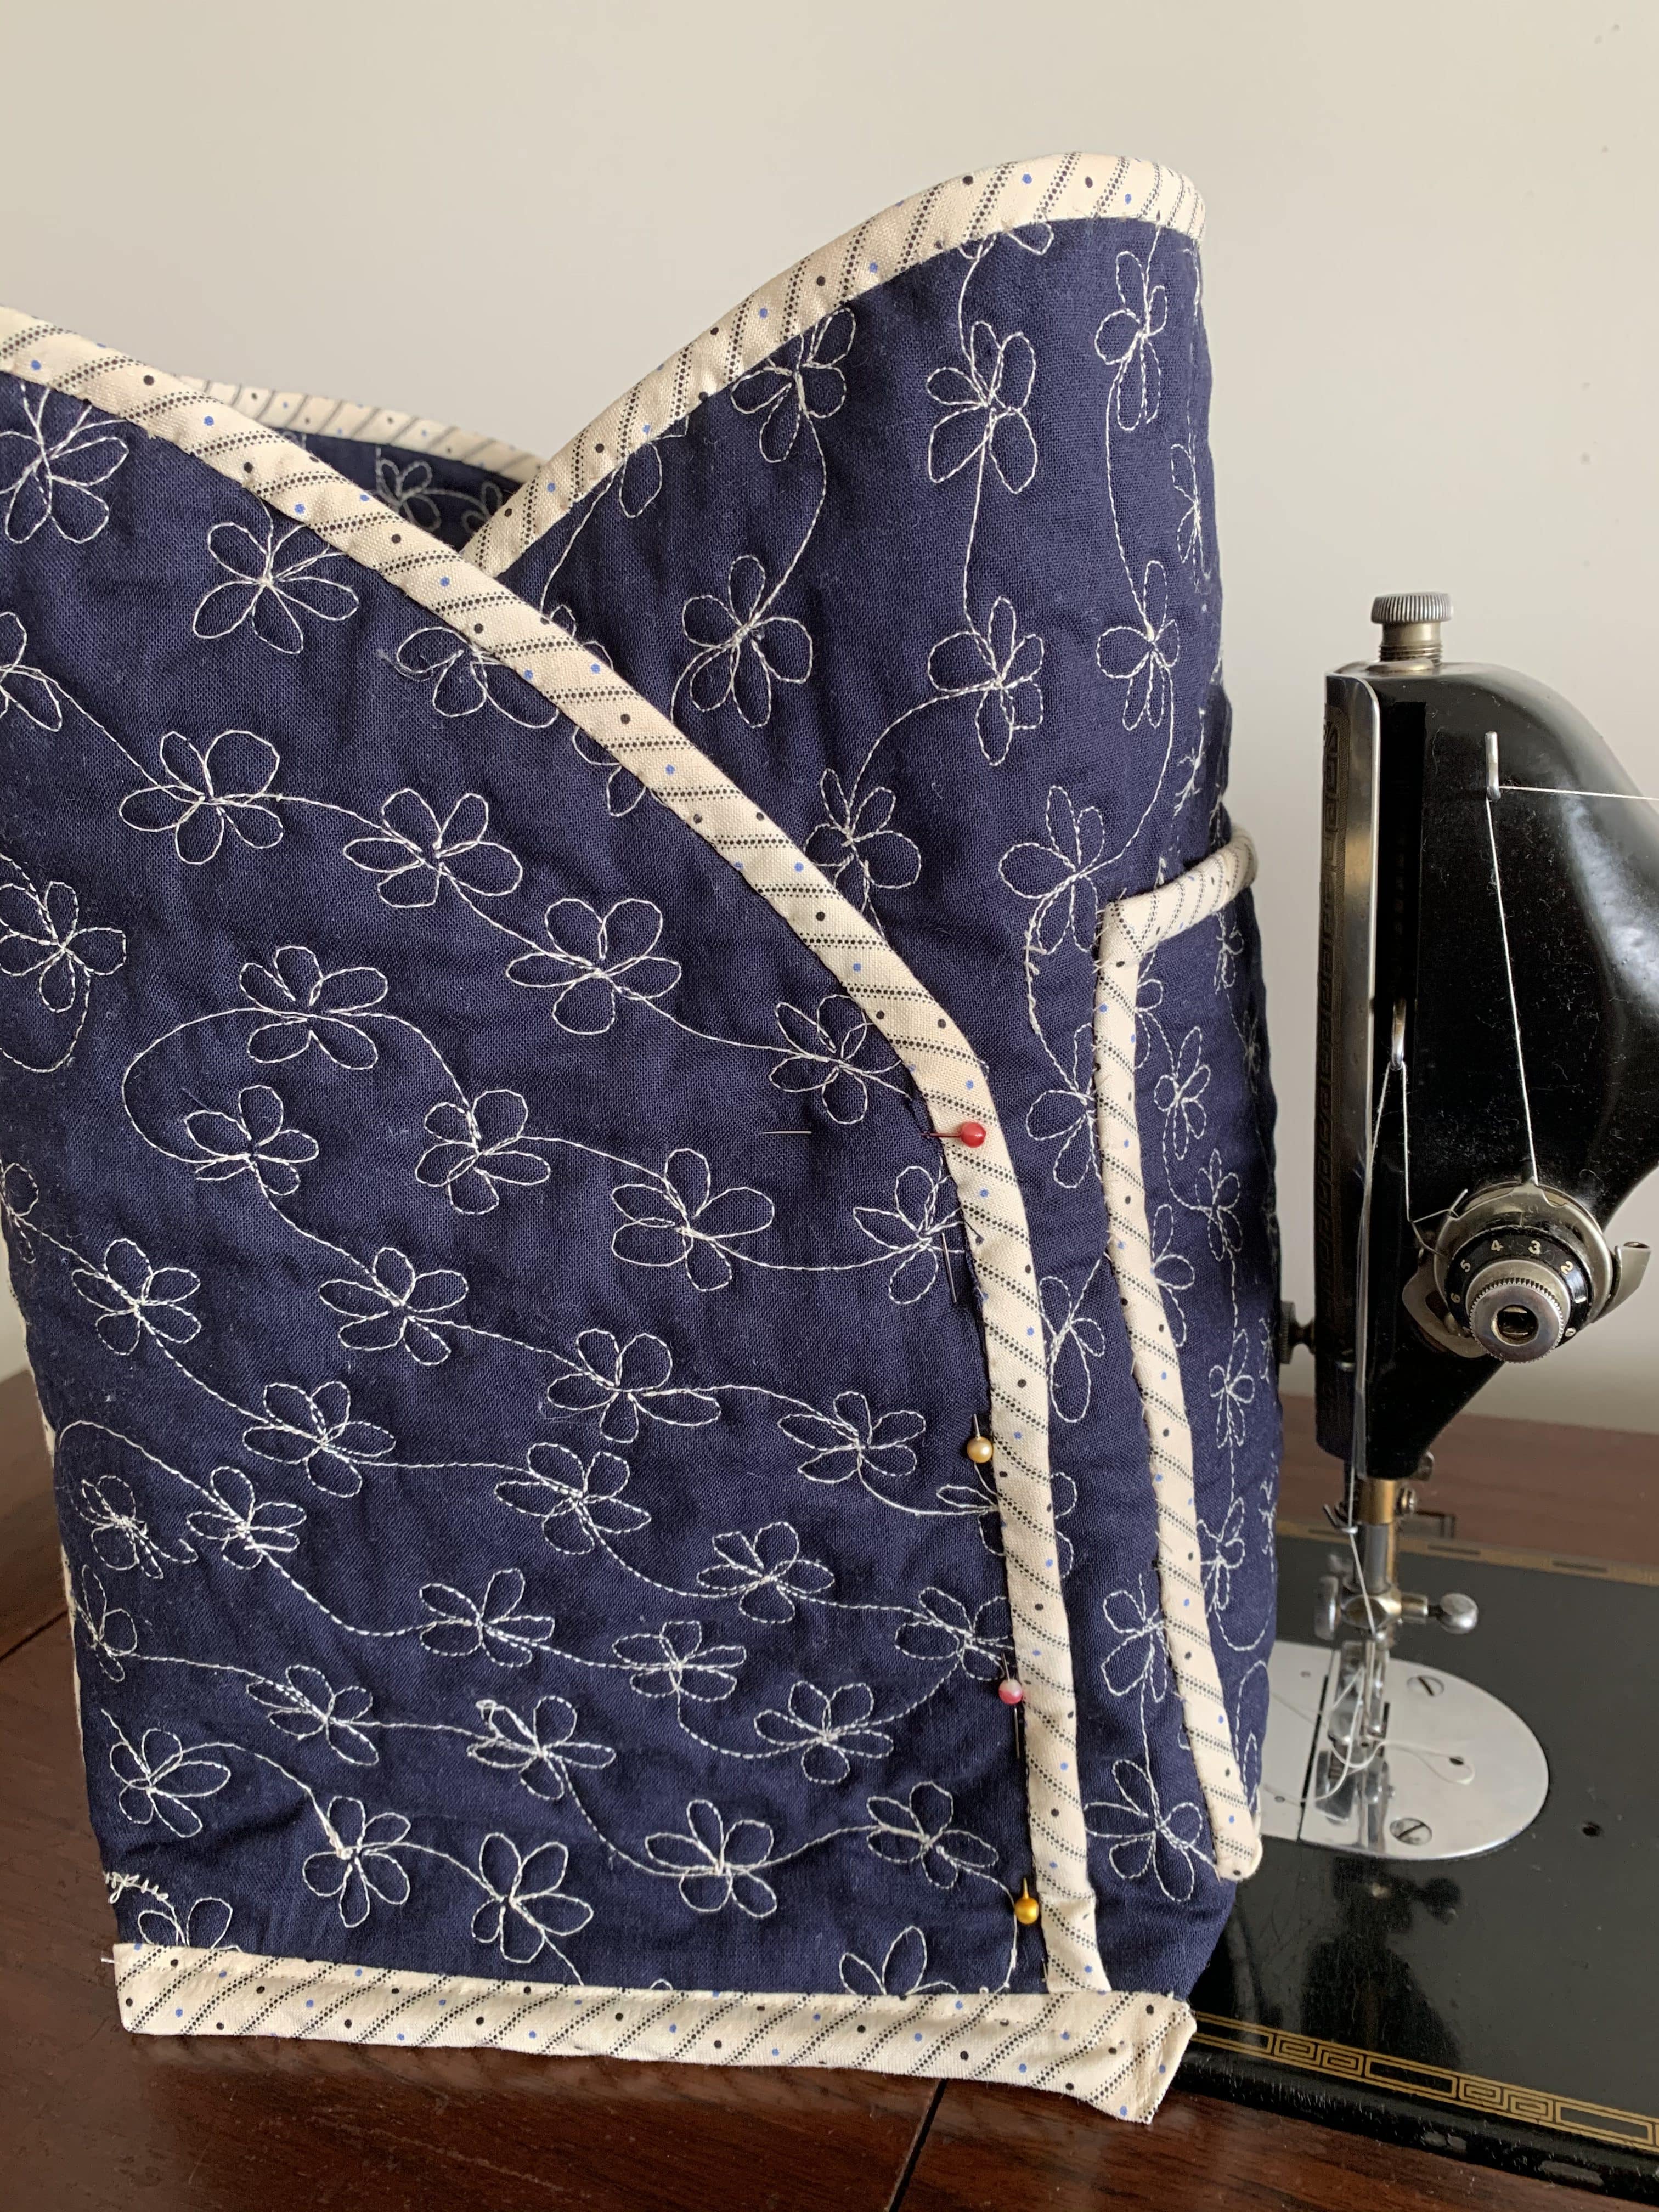
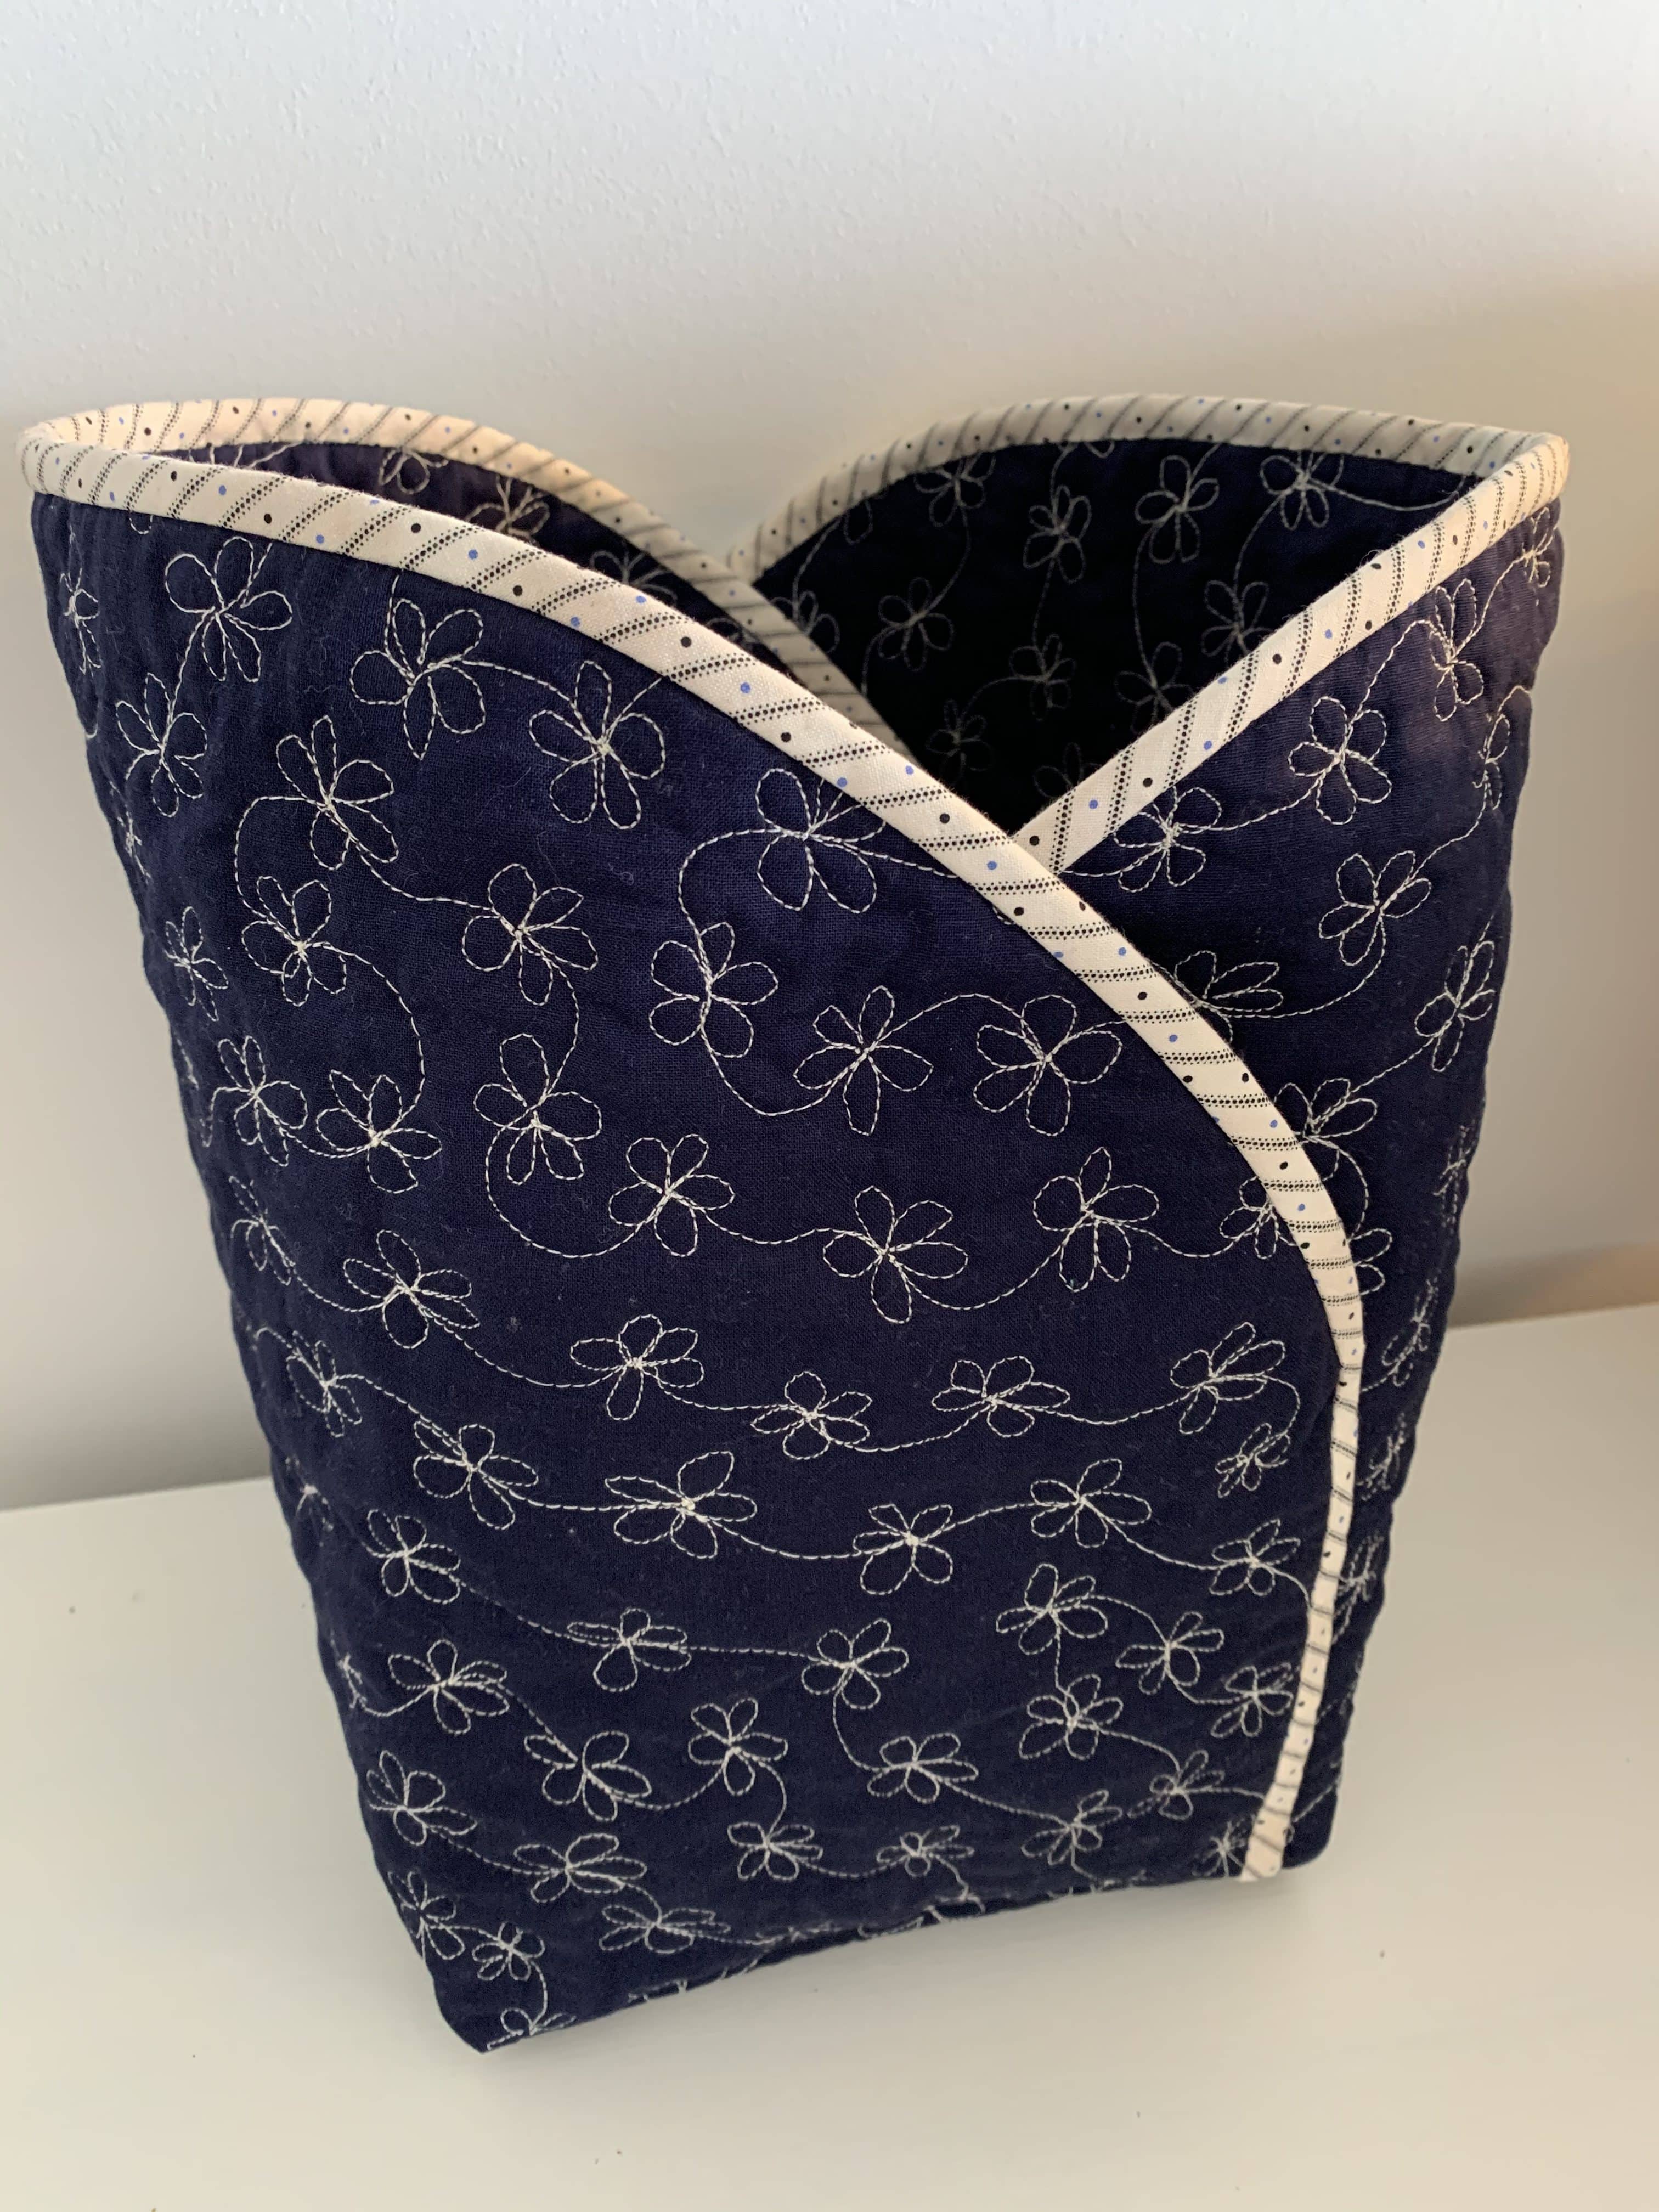
To secure the bag shape.  Whilst the bag is still inside out, carefully pin up the sides of the bag ensuring the bag is upright.  Hand stitch from the end of the curve (where you can see the red pinhead) down to the base of the bag on both sides.
susies-scraps.com
Sashiko Daisies Handbag

Turn the bag to the right side and hand stitch the sides from the base of the curve as before.
susies-scraps.com
Sashiko Daisies Handbag

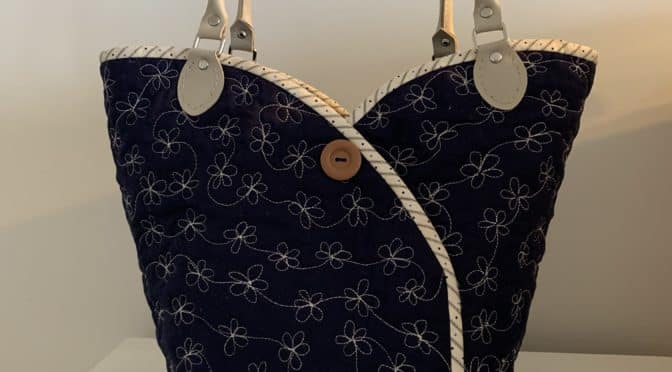
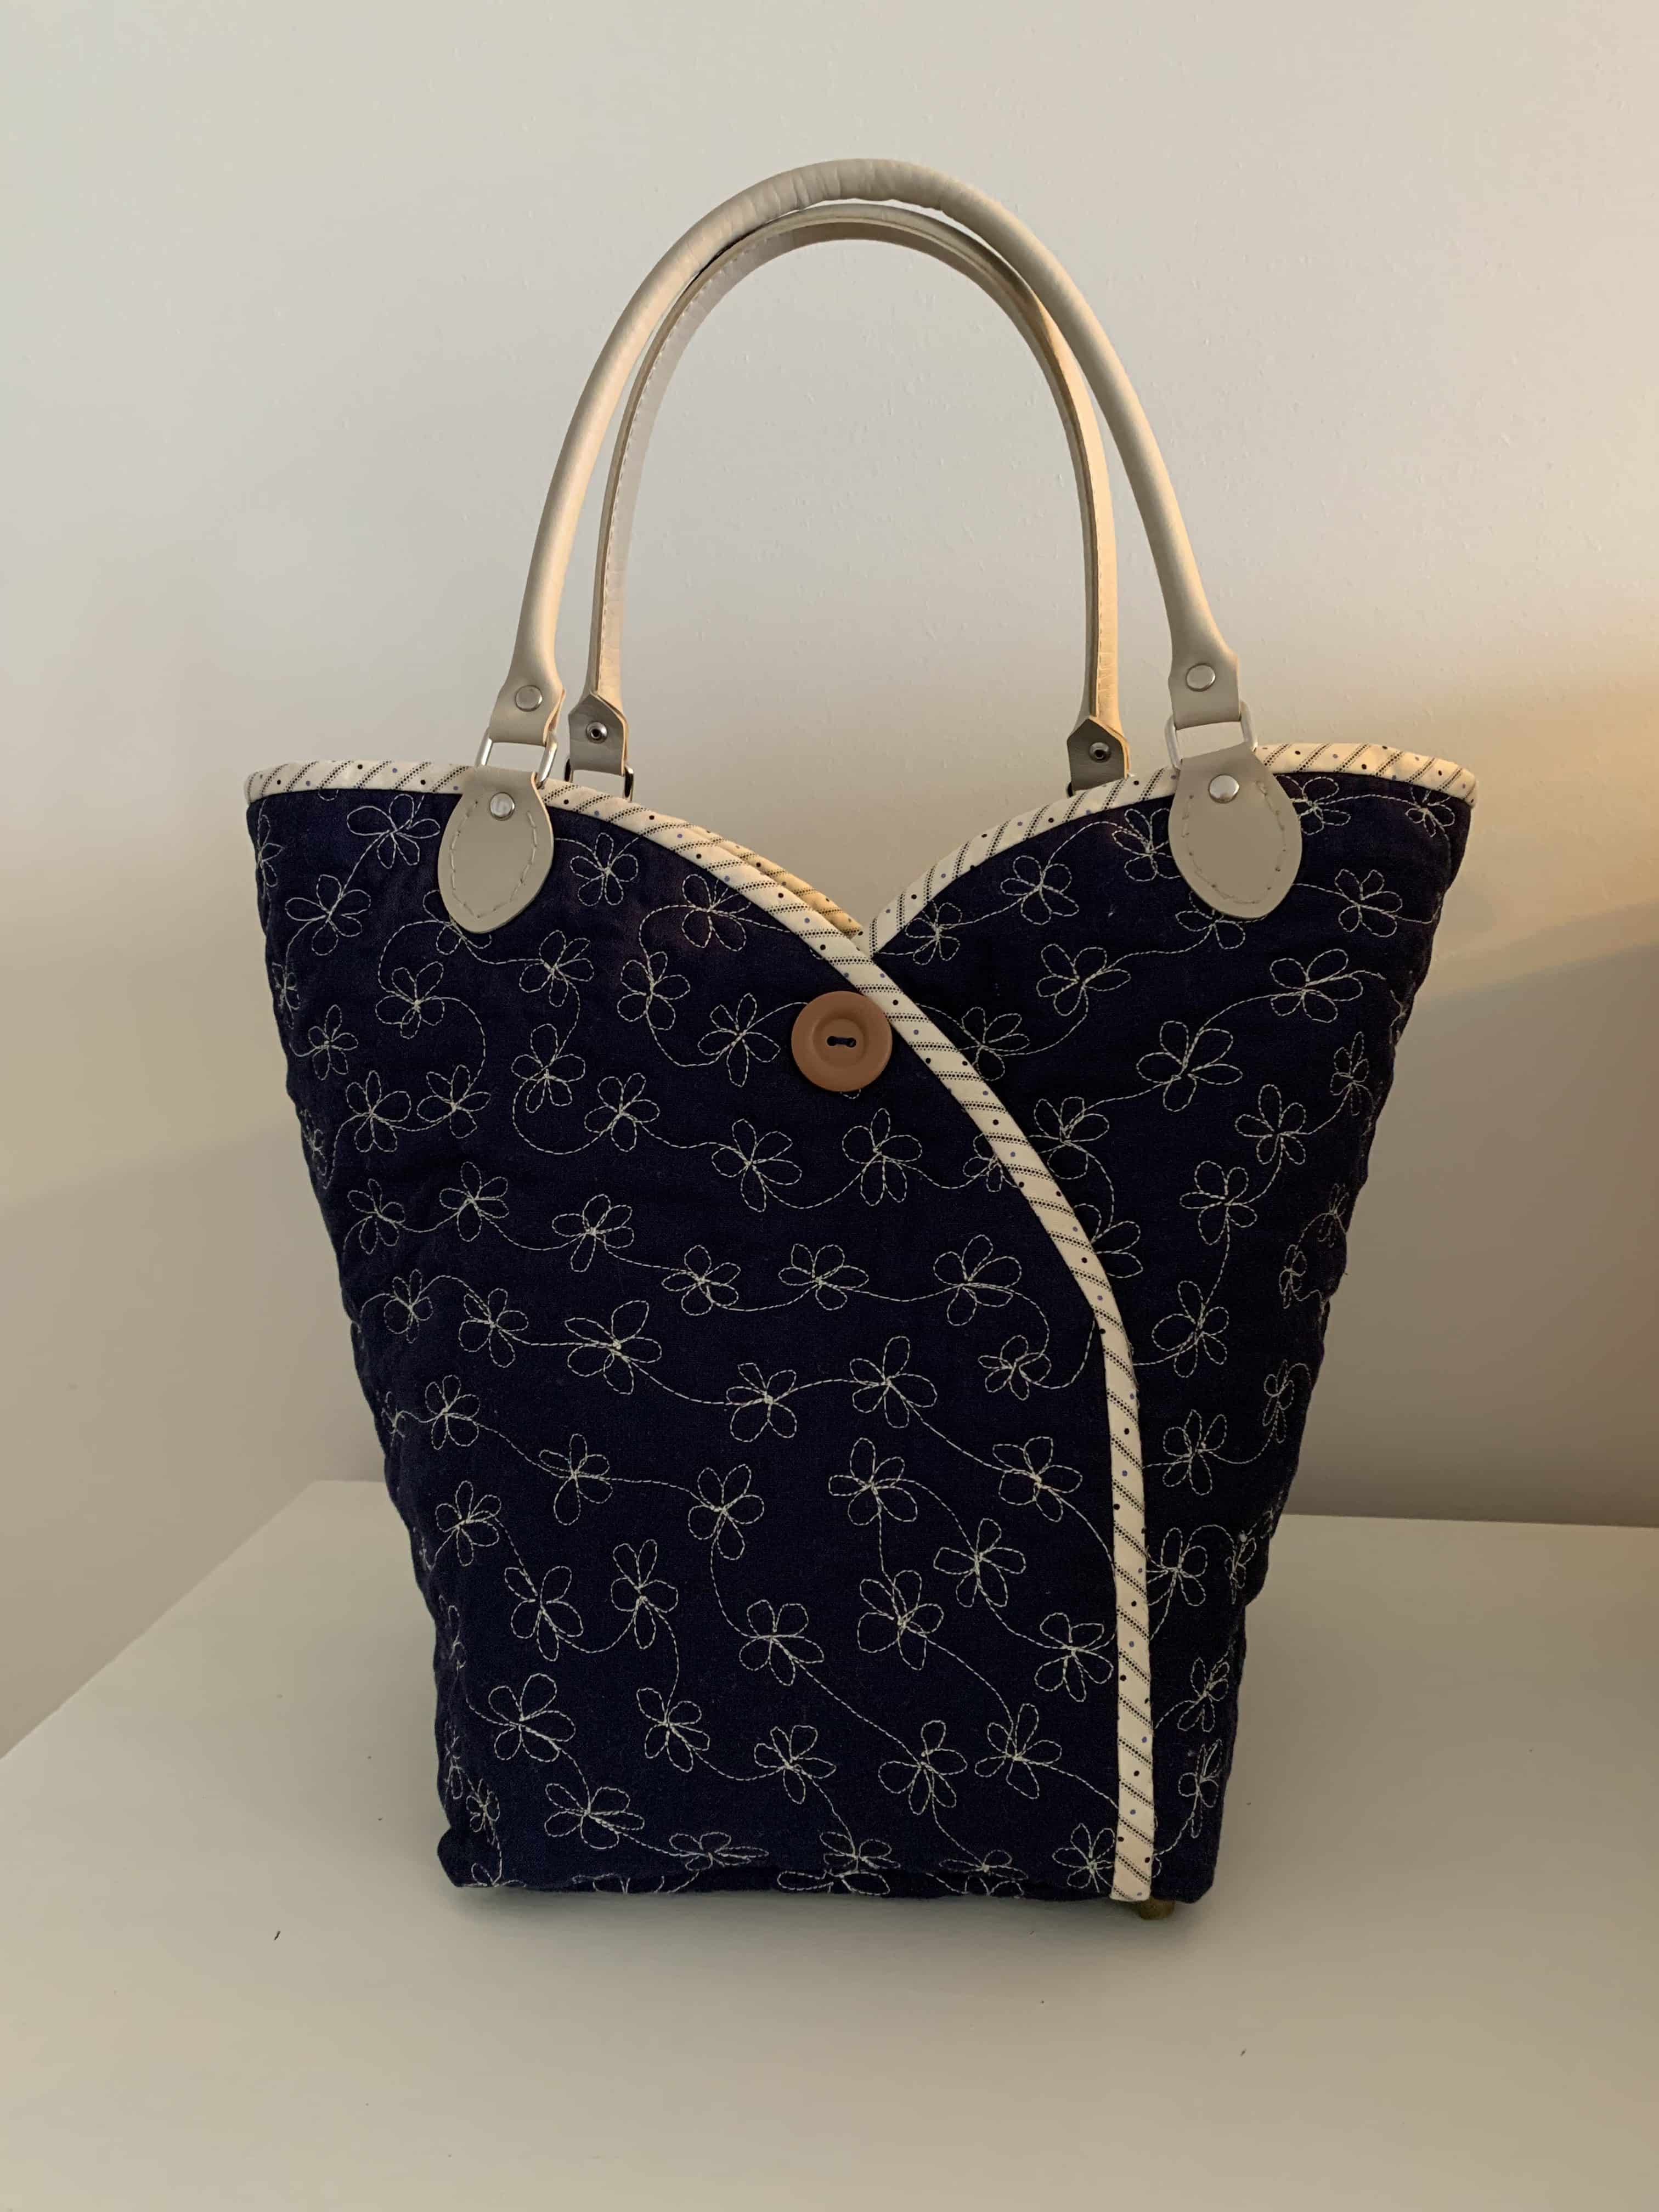
Hand stich the purchased bag handles in place.  Stitch a button to each side at the junction of the two curves.  Your hand will still be able to fit through the side to the two way pocket.

Add the bag feet if using.

There is the Sashiko Daisies Handbag.

If you enjoyed this post, you may also like these other projects

Japanese Knot Bag A New Pattern

Japanese Knot Bag No. 2

QAYG Backpack Quick and Go

Schlep It Good Bag and Pattern Part 1

Quilted Scrap Fabric Baskets & Tutorial

Happy sewing,

Susie © 2020

String Feeder QAYG Bib

String Feeder QAYG Bib

Hello Dear Friends and Readers, hoping that you are all fareing well.  Sometimes, there just isn’t time to make a whole quilt, or you feel like a quick but satisfying and basically free little project.  This may be the one for you!  Quilt As You Go method means an easy completion of the project too!

Feeders or bibs are great clothing accessories.  Like aprons they are excellent for protecting garments from soil whilst still allowing potentially messy activities to occur.  Feeding can definitely be one of them.  Today I am focusing on fabric strings which are absolutely ideal for this project.  Because of the amount of extra fabric involved in the seam allowances and extra stitching, this makes for a really beautiful, super absorbent  and durable feeder/bib.

I can speak from experience.  They really work well.

Yes!  You can use some scraps!  Take some strings of fabrics and left over batting, which you could easily discard and sew them into something really lovely.  Choose a colour of strings that you like, or mix them up and just go for it.

Makes for gorgeous and practical gift giving.

Here is a link about bibs

wikipedia.org Bib garment

susies-scraps.com
String Feeder QAYG Bib

Are you ready!  Let’s make some.

Ideally, make two at a time.  This is because you can chain piece the construction and its actually easier than cutting the threads each time.

Now you may be wondering about the pattern.  I have used a brown paper lunch bag for my templet.

Round off the corners of the lunch bag.  Cut out a small scoop for the neckline.

susies-scraps.com
String Feeder QAYG Bib

Requirements for the String Feeder QAYG Bib

The templet as shown above

Backing fabric piece 10” x 12”

Scrap of batting 10” x 12” (I used cotton)

Fabric strings assorted.  At least 10” long each

2 1/2” strip, approximately 40” long for the binding (for best results, this binding should be cut on the bias, this will make for easier attachment.

susies-scraps.com
String Feeder QAYG Bib

Method

Place the 10” x 12” piece of fabric right side down.  Put the batting piece on top.  Smooth out.

Beginning at the centre, put one strip right side up.  Add a second strip right side down, so that the edges line up.  Stitch approximately 1/4“ from the edge.

I am making two at a time.  Makes it easier.

Flip the top string down.  Finger press well.  Repeat with as many strips as you need to fill the space.

susies-scraps.com
String Feeder QAYG Bib

Once the pieces are covered with strips, it should look like this.  All quilted as you go.

susies-scraps.com
String Feeder QAYG Bib

Lay the templet on the finished piece.  Pin well.

susies-scraps.com
String Feeder QAYG Bib

Cut out following the pattern edge.

Fold the binding strip in half lengthwise, wrong side together.  Cut a length approx 7” long for the neckline.

Lay this length along the neckline front, raw edges together.   Pin and stitch slowly 1/4” from the edge.

susies-scraps.com
String Feeder QAYG Bib

Turn to the back.  Pin securely.  Top stitch slowly incorporating the curve.

Trim the ends to line up with he feeder.

Fold the remainder piece of binding in half lengthwise, right sides together.  Find the centre point and line it up with the centre of the base of the feeder, right sides together as with the neckline.  Pin to hold in place.

susies-scraps.com
String Feeder QAYG Bib


Stitch carefully 1/4“ from the edge around the feeder. Turn back to the wrong side.  Pin in place.  Fold the raw edges of the ties in 1/3rd the fold don’t the folded edge to meet the edge so that the raw edges are all incorporated.

susies-scraps.com
String Feeder QAYG Bib

Stitch close to the edge from the end of one tie all around to the end of the other tie.  Trim the ends a little if necessary.  Make a knot at the end of the ties.  Feeder is done.

susies-scraps.com
String Feeder QAYG Bib


Now I have some news.  It’s been a busy time at our home recently and we have a new little grandson.  Here is the dear little soul, wearing one of his new feeders.

susies-scraps.com
String Feeder QAYG Bib

I think he will grow into it! ????

If you enjpoyed this post, you may also like these other string projects.

Crazy Little Strings  Diamond Charms Quilt Block and Tutorial

Strings n Things

and some other QAYG projects

QAYG Backpack Quick and Go

QAYG Hobo Bag Pattern

Happy stitching,

Susie

© Susan Stuklis 2020


Quilted Border Edge – Free Motion

Quilted Border Edge – Free Motion

Hello Dear Friends and Readers.  Today, thought I would discuss a topic I find a bit challenging at times, in relation to free motion quilting on the edges of a quilt.

For this discussion I am talking about free motion quilting on a domestic machine, just to ensure clarity.   In my experience, the starting of the quilting, can be a bit challenging especially on a large quilt.  Usually this means starting in the centre.  The sheer amount of fabric, seams and batting and the obvious weight of the quilt pulling can take some time and maneuvering.  Ideally it is important to get the quilting at the centre as flat as possible to ensure success as the rest of the quilt progresses. Having said that, I think that quilting up the edges of the quilt can also be a bit challenging.

As I approach the edge of the quilt, similar problems can be encountered as again the weight of the quilt can be problematic but this can be assisted by engaging some extra furniture to take some off the weight and taking some time to get up and physically adjust the quilt to remove tension.  That is really helpful.

The area I find challenging is that last few inches.  And you might well say, why not just sew down the edge before quilting, but that can also lead to pulling and some distortion of the quilt edge.  There are times I have just left it and not quilted it because of the potential problems.  That’s a fair solution too.

What I decided to do on this occasion, once I had completed the main body of the quilting, was to stitch in the ditch of the final border to stabilize the quilt,

Then I wanted to do a border design which needed to meet my criteria being;  Not to take too long, not to be overly complicated, fit the space in a meaningful way, work well as a progression on the border without having to stop too often, and obviously to have some visual appeal.

One important factor which I would like to mention, which I think really matters, is to have a design which has almost equal bidirectional design.  By that I mean, for each forward movement, there is a backward movement, for each clockwise movement, there is an anti clockwise movement and so on.

By free motion quilting with this in mind, it makes it so much easier to quilt too the edge of the quilt keeping the edges even and avoiding puckering.  Thus really stabilizing the quilt almost right to the edge which may translate into an easier binding experience too.

So I would like to show you the design I came up with, It is a variation, simplification and minaturization of the “Egg Flower” Free Motion Egg Flower Quilting design with an alternating tendril.  I used the Egg Flower for the main body of the quilt.

'susies-scraps.com
Quilted Border Edge Free Motion

This is the quilt I am working on.

Old Italian Block Progress and Setting

I have a new quilting foot too which my DH ordered for me from Singer Online.  For the moment I have fitted it to my Singer electric 201K C 1948.

Vintage Singer 201K and FMQ

'susies-scraps.com
Quilted Border Edge Free Motion

The border design is complementary to the Egg Flower design and I think works well for the border.  You  can see how I achieved the bidirectional movement making the design easy to quilt.  I’ve free motion quilted around the edges with relative ease (except for one corner I had to unpick!!!)  The fabric edge looks pretty straight and nice and flat.

susies-scraps.com
Quilted Border Edge Free Motion

.

I cant wait to bind it!

Hope you find this helpful.  I would be most interested to hear your thoughts or strategies  on quilting to the edge.

If you enjoyed this post you may also like

Rolling Scroll and Daisy Chain Free Motion Quilting

and

Free Motion Lily of the Valley Treadle Quilting Tutorial

Happy sewing,

All the best,

Susie

© Susan Stuklis 2020

Crazy for Cottages Quilt Block

Crazy for Cottages Quilt Block

Hello Dear Friends and Readers, I hope you are all well in this period of staying  home.  How many times is the home the focus of where we should be, of things which are comforting and a place of refuge.  But a home is more than than that, it is a place of self expression and a place of restoration and regrouping.  As a woman, wife and mother, I have always held a high regard for the home.  Homes vary within nations, cultures and styles, but asthetically, I have always had a bit of a love for row cottages  and terrace style house, and so that was what I was thinking about in making a new block for houses.

Before we go any further, I would like to point out that, although I love antique quilts,  I am not really a big fan of the schoolhouse block.  No disrespect, but, its just not my thing.  But, cottages…..ahhh, so cute, so inviting.  Schoolhouses can often seem empty and soulless, maybe that’s it….. just not super inviting.

Which brings me to the block…..lets get real, I don’t really want that to be overly complex, I might lose interest after the first one.  As always, I would like that to be easily made from ingredients which are already available, so let’s do it. We will use up some scraps ans …..do you have some 5” x 5”  Charm squares?  By the way, this is a great block for using up some odd fabrics, even ones you don’t really fancy that much, they will get a new life in these little cottages.

Block measures 5” x 10”.  All seams based on 1/4” except the chimney which is sewn with a scant seam.

Ingredients for one Row Cottage Quilt Block

2 of 5” x 5” squares

1 of 2” x 4 1/2” scrap (for the door)

2 of 2”x 2” Check or plaid squares for the windows

2 of 2” x 2” plain squares for the background

susies-scraps.com
Crazy for Cottages Quilt Block

Cutting

From the 5” x 5” square which will be the roof and the step, cut a strip 2”wide from one end.  This will be the step.  The 3” x 5” remainder piece will be for the roof.

From the other 5” x 5” square, cut across to make one  strip 5” x 2” piece.  This will be the lintel for over the windows and door.  From the remainder cut two of  2” x 3” pieces, save the leftover 1” strip for the chimney.

susies-scraps.com
Crazy for Cottages Quilt Block

Lay out the pieces like this.

susies-scraps.com
Crazy for Cottages Quilt Block

Construction of the Row Cottage Quilt Block

I recommend  making two blocks at a time.  It’s easy to chain piece.

From the leftover 1” x 3” strip for the chimney cut 1” off the end. The chimney is foundation pieced.  Place the chimney piece wrong side down onto a 2” x 2” background square about 3/4” from one side.

susies-scraps.com
Crazy for Cottages Quilt Block

Sew a scant 1/4 seam. Fold back and finger press .  It should line up pretty closely with the edge of the background.

susies-scraps.com
Crazy for Cottages Quilt Block

Place this chimney block, right side down onto the 3” x 5” roof piece onto the top right hand corner.  The chimney should be on the lower edge, horizontal to the top of the roof.  Sew, diagonally across the corner as you would for a snowball corner.

susies-scraps.com
Crazy for Cottages Quilt Block

Trim the excess and flip back and finger press.  The chimney should now be standing upright.  Sew the other 2” by 2” background to the opposite side of the roof piece in the same manner.

More about snowballs here.

Charmed Nine Patch and Snowball Recipe

susies-scraps.com
Crazy for Cottages Quilt Block

Sew the two check or plaid window squares to the top of each 2” x 3” side walls.  Finger press.

susies-scraps.com
Crazy for Cottages Quilt Block

Then sew the 2” x 4 1/2” door piece in between the two.  Sew the 2” x 5” lintel over the windows and door.

susies-scraps.com
Crazy for Cottages Quilt Block

Now sew the roof to the top of the house and the step to the bottom of the house.

susies-scraps.com
Crazy for Cottages Quilt Block

Press the block.  This one is not pressed yet!

susies-scraps.com
Crazy for Cottages Quilt Block

Now you have made your first Crazy for Cottages Quilt Block!

susies-scraps.com
Crazy for Cottages Quilt Block

Before you know it, we can make a little village.

susies-scraps.com
Crazy for Cottages Quilt Block

I always have a box of 2” x 2” scraps which are already cut and a basket of 5” x 5” charm squares too which makes it easy to do.

Charms for Charms Basket

These little cottages are rather addictive.  There are so many ways they could be used or set.

I hope you enjoy these Crazy for Cottages Quilt Blocks!  Maybe they will bring some inspiration to your day?

If you enjoy working with 2” and 5” squares you may also like these posts,

Patchwork Celebration Bags Antique Japanese Style & Tutorial

Country Roses Four Patch Quilt Pattern

36 Patch Postage Stamp Blocks Tutorial

Around the Garden in Scraps Block

Happy sewing,

All the best,

Susie

© Susan Stuklis 2020

Oak Leaves and Acorns Quilting Free Motion

Oak Leaves and Acorns Quilting Free Motion

Hello Dear Friends and Readers, today I’m growing an Oak Tree on my quilt.  I recently pruned a small oak tree to improve the shape.   It is gratifying to know that from little things big thing grow.  How marvelous it is that one acorn can grow a big beautiful oak tree which will live for hundreds of years.

I hope this post finds you all well, even if isolated.  I’m sure we are all going through a similar psychological adjustment with being socially isolated and distanced from others.  As an inspirational note,  I believe as quilters and creators that maybe we are better at “self soothing”  by being able to reach into our creative minds and find positive things to do.

susies-scraps.com

I’m thinking we have passed from the preparation period of hunkering down and making sure we have adequate supplies,  to avoid going out altogether if possible.  Now we can get out our projects and make some really good inroads.  In my last post I showed you quilting hydrangeas.

Quilting Hydrangeas

Today I want to share my free motion quilting which I have been doing on this Antique One Patch quilt top.  Here is the link to the quilt top.

Antique One Patch Quilt aka Disappearing Nine Patch

In my mind I have planned the design for a long time and now is the opportunity to do it.  I decided to quilt it on my electric Singer 201k C1948.  As it is a scrap quilt, the quilting doesn’tt always show up that well, but it does give a beautiful texture.

susies-scraps.com
Oak Leaves and Acorns Quilting Free Motion

For those who like details, I’m using one layer of 100% Cotton batting.

I used a wideback in a dark cchocolate fabric so the quilting is very visible on the backing.

susies-scraps.com
Oak Leaves and Acorns Quilting Free Motion

For the free motion quilting,  I’ve used an Aurifil thread in a kind of strong milky coffee colour, which has a nice sheen to it.  The stitching looks a little fluffy on the back and I believe there are three reasons.  I think a bit of the batting is coming through with each stitch, because it is possible the wide backs are a courser weave.  Also its a dark colour, but I’m confident a couple of washes will make a difference.

What has been particularly enjoyable and pleasing about this design, is, that it is not unlike meandering in a way, which means it is not difficult.  Also, it doesn’t seem to create too much uneven tension on the quilt.  By that I mean, there is minimal puckering and the quilt has remained remarkably flat.  I think it’s because the leaves are a complete oval type of shape and the forward and backward motion is even, avoiding any tightness or looseness.  the design is very adaptable.  In nature, the leaves from an oak tree vary so much in size so it’s easy to make some large leaves and fit small ones in wherever necessary.  The acorns add a nice touch, with a different accent and can be placed on stems wherever they seem to fit.

susies-scraps.com
Oak Leaves and Acorns Quilting Free Motion

The following photo is marked up to demonstrate the direction of the stitching.  I make the centre vein of the leaf with a forward and backward motion, then complete the outside shape of the leaf.  The vein can be as curved or straight as you prefer and be of a length which fits into the space.

susies-scraps.com
Oak Leaves and Acorns Quilting Free Motion

Here is the finished quilt.

susies-scraps.com
Antique One Patch Quilt aka Disappearing Nine Patch

The acorns are sewn with a half oval knotched at the top then with a semi circle in the top quarter to give it an appearance of roundness then continue to complete the oval shape.

This free motion quilting is not perfect, and it’s easy to be hypercritical about ones work, however, once the quilting is complete, one doesn’t really focus on each small stitch, rather the overall look and feel of the quilt.

After all, its not a quilt until its quilted and sometimes finished is better that perfect!


I really hope you stay inspired and have a lovely day at home stitching if possible.

If you enjoyed this post, you may also like,

Free Motion Lily of the Valley Treadle Quilting Tutorial

and

Uneven Nine Patch Quilt Pattern Antique Style

and this simple one patch scrap quilt.

Charm Printz Quilt & Tutorial

All the best,

Susie

© Susan Stuklis 2020