
Scrappy Star Sashings
Hello Dear Friends and Readers, today I am pleased to show you and hopefully inspire you to making Star Sashings for quilts.
Welcome to Scrappy Star Sashings.
What are Scrappy Star Sashings? Making Scrappy Star Sashings is a way to create extra interest to a quilt. Today I am making scrappy star sashIngs for a quilt which I am currently working on. By making the Scarppy Star Sashings, one can then incorporate the cornerstones adjoining the sashings, to make a star where the sashings intersect. This will also create diagonal interest within the quilt which will keep your eyes moving over it. Naturally, this is going to require some extra work, however, I do believe it will be worth it and the technique in itself is actually very easy.
I will show you how you can use up lots of scraps too!
This post will become part of the instructions for a much bigger project. In the next post, I will show you how I incorporated these sashings into the quilt.
This technique can be added to many quilts with block designs. The dimensions can be altered according to the block sizes and the sashing width,
This technique is actually just the same as the snowballing technique, except the base piece is long and thin, rather than a traditional square. Here are some other posts with snowball blocks
Scrappy Snowball in Snowballs Block
Wendy’s Way Snowball Table Quilt
Charmed Nine Patch and Snowball Recipe
Let’s get started.
Sashing Size 12” x 4”
Seam allowance 1/4”
Suitable for a 12” x 12” block
Requirements for the Star Sashings
12” x 4” white homespun or muslin cotton sashing pieces
2 1/2” x 2 1/2” scrap squares in assorted prints

Making the Scrappy Star Sashings
Before sewing, you can choose to mark the back of the 2 1/2 inch squares by drawing a line across one diagonal from corner to corner or you can fold the fabric on one diagonal to mark it. If you prefer you can just sew across the diagonal without marking in an aim and shoot method.
Take the 12” x 4” white home spun and on one corner lay down one 2 ½” x 2 ½” printed fabric, square. Make sure it aligns perfectly with a corner.

TIP when sewing the diagonal, try to sew just a hairs breath to the right of the diagonal line. This will ensure that when you fold back the corner that it will not be too short.
OPTIONAL If desired, you can sew second seam a half inch away from the first sewing line towards the corner. That way when you snip off the corner, you can create a half square triangle with the remnant from the corner as pictured below.

I am collecting these half square triangle remnants to use for another project down the track. These these little half square triangles will measure one and three-quarter by one and three-quarter inches.

On the adjacent corner repeat with a different 2 1/2” square.
Repeat the same procedure on the other end of the sashing.

These sashings can be chain pieced.

I am making quite a few. Soon I will post the quilt they will be going into!

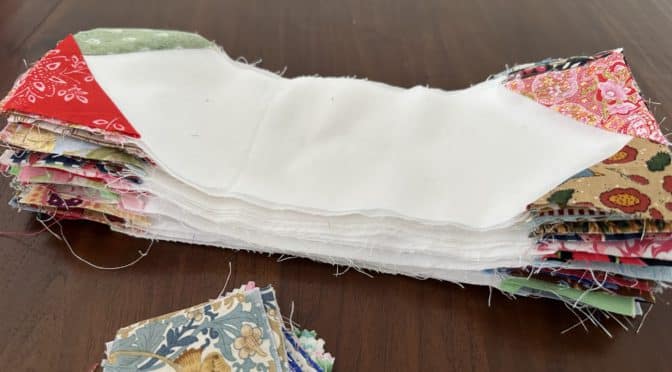
Here is my lovely stack of scrappy sashings.
Thank you for joining me today. I hope you get to sew too.
If you enjoyed this post, you may also like
Irregular Triangle Foundation – Tutorial
Lessons in Lozenges Quilt Blocks
half-square-triangle-units-fast-and-multiple-tutorial
Susie
© Susan Stuklis 2023