
Star Points for Hexagon Stars Antique Inspired – Part 3 Star in a Star
Hello Dear Friends and Readers, welcome to today’s post. Today we will continue with this hand, piecing project. If you have been following along, you will know that that this is my current portable project. I like to take a project along with me when I can’t be near a sewing machine. Although it is slow stitching, it is rather satisfying to achieve something in time which might have otherwise been wasted. Here are the links to part 1 and 2.
Stitching by the Pool – Six Pointed Stars Antique Inspired
Six Pointed Hexagon Stars Antique Inspired Part 2
As it turns out this star shape is ancient in its history and has been seen in various cultures East and West for millennium. Like the hexagons themselves they are perpetual in the way the shape can appear to be never ending. Applying that concept to quilt making when working with hexagon or six pointed shapes means it can be hard to decide where to delineate the edges of the quilt. But rest assured we will find the edge!
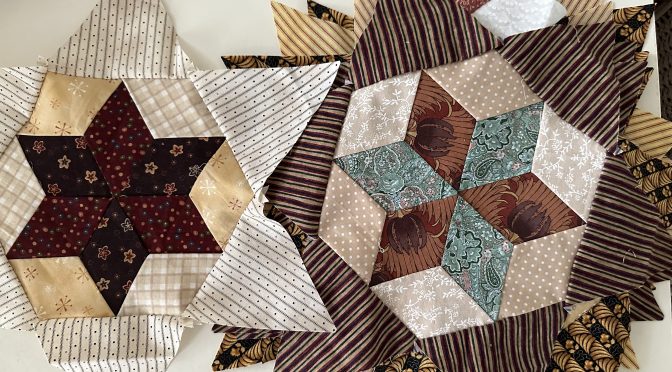
Today is part three of this project. For this part, you need to find some striped fabrics from your stash. ( These could be reproduction style fabrics) This is a good opportunity to use some of those stripes which you might not have had a use for. I am going to use a few different kinds. By using the stripes, it will give the stars a radiating effect which I think will add to the movement within this quilt top. Essentially we will end up with a star within a star!
In order to prepare your triangles, you will need to cut width of fabric strips., four and three-quarter inches wide.
Preparing the Triangles for the Hexagon Stars – Requirements
4 3/4” width of fabric strips of striped fabrics.
Previously made Hexagon Stars Six Pointed Hexagon Stars Antique Inspired Part 2
Preparing the Triangles for the Hexagon Stars – Cutting
Cut the triangles using the 60 degree line on your ruler. That should yield approximately 12 – 13 triangles per strip. In this next image the 60 degree mark is at the top of the strip. Make the cuts by alternating the ruler position for each cut along the strip.

To make the next cut, rotate the ruler so that the 60 degree line s now on the left hand edge. Continue to rotate the ruler to make each cut until the strip becomes too short. Please note that after cutting each side of the triangles should measure 5 ½”. Therefore 5 ½” x 5 ½” x 5 ½”. The height will still measure 4 3/4”.

Six triangles will be required for each star. Lay out the six triangles so that the stripes radiate out from the centre hexagon.

TIP
It is worth noting at this time that we are now working with some longer bias seams with the triangles. At this point treat your stars carefully and avoid stretching on the seams. Personally I would let the fabrics relax themselves. I will do very gentle pressing once all of the blocks are completed at the end if necessary.
Stitching the Triangle Points to the Hexagon Star
Allow, the triangles to overhang each end of one side of the hexagon by approximately 1/4 inch. Right sides together, begin and end stitching at least one quarter inch from the corner edge. This will allow for free ends to nest nest nicely after all the triangle points have been added. I have stitched it in red so that it will show up for the photo. Please use a neutral thread which matches your fabrics.

Once the first triangle has been added, turn back and gently finger press. Bring the needle to the right side of the work. Lay down the second triangle right sides togther and stitch in the same manner.

Here is one completed Hexagon Star with Star points added.

And here is my little stack so far.

I will be back later with part four of putting this Hexagon Stars top together.
Thanks for joining me today.
If you enjoyed this post, you may also like
Grandmother’s Flower Garden Quilt in Progress
Orange Peel Quilt and Pattern and
Take Care
Susie
© Susan Stuklis 2023
Very pretty! I would love to join in but I’m already working on a hexie project. Happy stitching!