Tag Archives: Half Square Triangles

Pink Streak of Lightening Baskets Quilt and Pattern – Antique Inspired – Part 3

Pink Streak of Lightening Baskets Quilt and Pattern – Antique Inspired – Part 3

Hello Dear Friends and Readers. Welcome to today’s post.

Today I would like to share with you how I am adding borders to this antique inspired Pink Strippy Baskets quilt top. ( Actually now the strips have been put together, and because the baskets are offset, the strippy has become a “Streak of Lightening” between the baskets). Here is the link to the previous post.

Pink Strippy Baskets Quilt Antique Inspired Part 2 and

Pink Strippy Baskets Quilt Antique Inspired

I have decided to make a Sawtooth Border. This can be achieved with squares sewn on each side of a diagonal and then cut in half, adding a nice finish to complement the scrappy triangles in the basket blocks. Then complete with a second border.

Finished quilt top size 74″ x 79″

Total Fabric Requirements for the Pink Streak of Lightening Baskets Quilt- Antique Inspired

53 of the Little Beauty Scrappy Baskets in a Nine Patch

At least 5 ½ Yards or 5 metres of pink solid fabric (this includes the amount below for the borders.

2/3 of a Yard/Metre of white fabric for the sawtooth border.

Requirements for the Pink Streak of Lightening Baskets Quilt- Antique Inspired Sawtooth Border and Final Border

From the remaining 2 yards/metres of the pink background fabric

Cut 6 of 3″ Width of Fabric strips, sub cut into 67 of 3″ x 3″ squares for the sawtooth border.

Cut 9 of 4″ Width of Fabric Strips (WOF) for the final Border.

From 2/3 yard/metre of white fabric

Cut 6 of 3″ Width of Fabric Strips – sub cut into 67 of 3″ x 3″ squares for the sawtooth border.

Pink Streak of Lightening Baskets Quilt and Pattern - Antique Inspired - Part 3 susies-scraps.com
Pink Streak of Lightening Baskets Quilt and Pattern – Antique Inspired – Part 3 susies-scraps.com

Making the Units for the Sawtooth Border

You can see I didn’t press my fabric. I’m not worried. I will press before trimming.

Using a pencil, mark a diagonal line across each of the 3″x 3″ white squares. Lay each one onto a pink square. Line up accurately.

Sew a 1/4″ seam down each side of the diagonal line of each square.

Pink Streak of Lightening Baskets Quilt and Pattern - Antique Inspired - Part 3 susies-scraps.com
Pink Streak of Lightening Baskets Quilt and Pattern – Antique Inspired – Part 3 susies-scraps.com

TIP

Be sure to check the seam allowance before proceeding with all of the units. Double check by cutting one apart. After trimming – each unit should measure 2 ½” x 2 ½”.

Pink Streak of Lightening Baskets Quilt and Pattern - Antique Inspired - Part 3 susies-scraps.com
Pink Streak of Lightening Baskets Quilt and Pattern – Antique Inspired – Part 3 susies-scraps.com

Now all these units are pressed and I’m giving them a sliver trim to 2/½” x 2 ½”.

Pink Streak of Lightening Baskets Quilt and Pattern - Antique Inspired - Part 3 susies-scraps.com
Pink Streak of Lightening Baskets Quilt and Pattern – Antique Inspired – Part 3 susies-scraps.com

Joining the Sawtooth Border Units

After trimming all the units, there should be 134 Half Square triangle units.

31 units each for the top and base borders and 36 units for each side border.

Sew the units together into 4 strips. two each of 31 units and 2 each of 36 units.

Be sure that the seam allowance is exactly 1/4″. make sure that all of the units follow the same direction. Press the four strips.

Starting with the base of the quilt, I am adding 31 half square triangle units. and the repeating the same at the top.

The pink unit side is the one which is being attached to the quilt.

Pink Streak of Lightening Baskets Quilt and Pattern - Antique Inspired - Part 3 susies-scraps.com
Pink Streak of Lightening Baskets Quilt and Pattern – Antique Inspired – Part 3 susies-scraps.com

This quilt top was all pieces on a Singer Treadle Singer 201K Treadle C1947

Now repeat the same procedure for the sides of the quilt using the two lengths of 36 units.

Pink Streak of Lightening Baskets Quilt and Pattern - Antique Inspired - Part 3 susies-scraps.com
Pink Streak of Lightening Baskets Quilt and Pattern – Antique Inspired – Part 3 susies-scraps.com

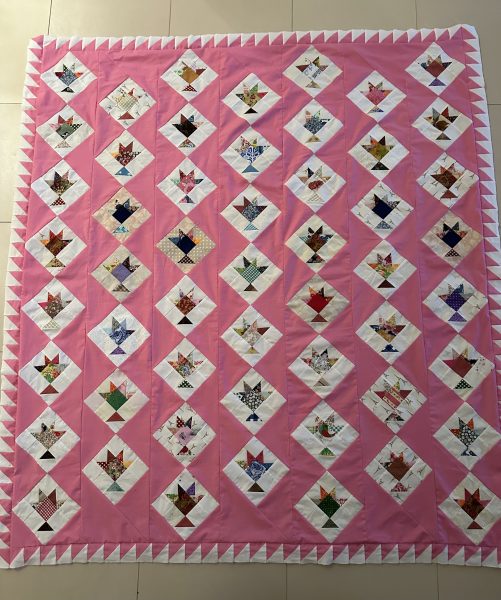
after adding The Sawtooth Borders the top should measure approximately 66 ½” x 71 ½”.
Pink Streak of Lightening Baskets Quilt and Pattern - Antique Inspired - Part 3 susies-scraps.com
Pink Streak of Lightening Baskets Quilt and Pattern – Antique Inspired – Part 3 susies-scraps.com

Join the 4″ width of fabric strips together. I joined mine with straight seams but it probably would have been better to join them on the diagonal like is done with the binding strips. ( I might redo it…)

Measure the quilt top through the centre. I am pointing out my errors today. Can you see that I have added the top and bottom final borders first and then the sides. It would be much better to do the side and then the top and bottom. Sometimes it is just as good to point out the errors.

Pink Streak of Lightening Baskets Quilt and Pattern - Antique Inspired - Part 3 susies-scraps.com
Pink Streak of Lightening Baskets Quilt and Pattern – Antique Inspired – Part 3 susies-scraps.com

Quilt making is always a learning journey afterall. This quilt top is the result of the little scrap triangles which were too pretty to throw away.

Pink Streak of Lightening Baskets Quilt and Pattern - Antique Inspired - Part 3 susies-scraps.com
Pink Streak of Lightening Baskets Quilt and Pattern – Antique Inspired – Part 3 susies-scraps.com

I do like the overall look of this quilt. The sawtooth border was well worth the trouble.

If you enjoyed this post, you may also like

Country Roses Four Patch Quilt Pattern

Great Granny Stars Quilt and Pattern

Holiday Stars

Best wishes to you all.

Susie

© Susan Stuklis 2024

Scrap Mini Granny Square Quilt Blocks

Scrap Mini Granny Square Quilt Blocks

Hello Dear Friends and Readers, I welcome you all to todays post. While I have been on the subject of Scrap Great Granny Square quilt blocks, you may have seen the previous post about Scrap Great Granny Square Blocks which I have been enjoying making.

Scrap Great Granny Squares Quilt Revival

Then I thought what would a little Scrap Mini Granny Square Quilt Block be like….?

Of course I had to give it a try. I got to work to figure out the setting triangles.

They are really very cute and a little addictive I have to say. The little scraps really come to life when they are made into a block. .

So lets not waste any time and we will just get into it. I suggest making a couple of test blocks first to check seam allowance.

I use a scant 1/4“ seam allowance

Block size 4“ x 4“

Finished block size 3 1/2“ x 3 1/2“

I have one of these Quilted Scrap Fabric Baskets – Tutorial A basket of little squares which need to be used. So I sorted them into similar colour groups for the Scrap Mini Granny’s.

Here is my little collation of fabric squares and prepared triangles.

Scrap Mini Granny Square Quilt Blocks susies-scraps.com

Making the blocks

I am giving the amounts for one Scrap Mini Granny Square Quilt Block but I recommend sewing at least two at a time so that you can chain piece them through your machine for greater efficiency.

Scrap Mini Granny Square Quilt Blocks susies-scraps.com

Requirements for one Scrap Mini Granny Square Quilt Block

Five of 1 1/2“ x 1 1/2“ squares, 4 can be coordinated and one odd one for the centre (or make them all scrappy if you prefer)

One of 3“ x 3“ white background square cut once on each diagonal for the side setting triangles.

2 of 2“ x 2“ white background squares cut once on the diagonal to reveal 4 corner triangles.

Scrap Mini Granny Square Quilt Blocks susies-scraps.com

Constructing the Scrap Mini Granny Square Quilt Block

Arrange the 1 ½“ squares with the odd square in the centre and the others on each side like a cross.

Place the side setting triangles in each corner.

Scrap Mini Granny Square Quilt Blocks susies-scraps.com

Now sew these nine pieces like a nine patch (which has the corners cut off) using a scaffolding technique. That is to say, do not cut the threads in between. This will help with seam alignment and nesting of the seams.

More about this technique here. 36 Patch Postage Stamp Blocks Tutorial

I am using my trusty Singer treadle to piece these blocks. Singer 201K Treadle C1947

Scrap Mini Granny Square Quilt Blocks susies-scraps.com

Place a square on a setting triangle aligning it with the right angle as pictured above. Follow on with the centre square on the side square and the next square on the right angle of the side triangle. Do not cut them apart.

Scrap Mini Granny Square Quilt Blocks susies-scraps.com

I have pieced the second block in between in the same way. Now add the next three pieces in the same manner, a side triangle on the top square, the side square on the centre square and a side triangle on the bottom square. Again, do not cut apart.

Centre a corner triangle on each end of the row of three squares and sew on.

Scrap Mini Granny Square Quilt Blocks susies-scraps.com

Now the Scrap Mini Granny Square should look like this.

Scrap Mini Granny Square Quilt Blocks susies-scraps.com

Rotate the block and fold the right row towards the centre row. Carefully nest the seams so they all align and pin in place.

Scrap Mini Granny Square Quilt Blocks susies-scraps.com

Stitch this side seam. Do the same for the other side.

Scrap Mini Granny Square Quilt Blocks susies-scraps.com

Centre the remaining two corner triangles across the ends of the the side squares ensuring that the seams are sitting in the correct direction and sew them to the block.

Scrap Mini Granny Square Quilt Blocks susies-scraps.com

Use small scissors to cut off the bigger doggy ears from the back. Press and sliver trim each block.

Scrap Mini Granny Square Quilt Blocks susies-scraps.com

Here are the blocks I have made. These could be used in many ways. I plan to use them for my Scrappy Great Granny Quilt.

Scrap Mini Granny Square Quilt Blocks susies-scraps.com

If you enjoyed this post, you may also like

Scrappy Depression Economy Block Made Easy

Antique Four Patch Economy Block Tutorial

Scrappy Jacob’s Ladder Quilt Reimagined

Happy sewing

Susie

© Susan Stuklis 2022

Sashiko Free Motion Quilting For Antique Inspired Scrappy Broken Dishes Lap or Cot Quilt

Sashiko Free Motion Quilting for Antique Inspired Scrappy Broken Dishes Lap or Cot Quilt

Hello Dear friends and Readers, I recently finished a quilt for my little grandson. After much thought I decided to use a Sashiko style design for the quilting. I really couldn’t imagine how else to quilt it because of all of the intersecting angles of the quilt other than straight line quilting or hand quilting. I thought this would give the best effect for this patchwork pattern.

I started by doing a few blocks to secure the quilt top and then kept going to do the entire quilt. It does require frequent turning of the quilt to achieve the design, however I believe it was well worth it. I will show you a picture of the back of the quilt shortly so that you can see how the design looks.

I think this quilt should last the test of time with this secure quilting and the design style will mean it’s something he can keep for ever, if he so chooses.

Here is a link to the quilt top instructions.

Scrappy Broken Dishes Quilt – Antique Inspired

I used an electric Singer 201K with a free motion quilting foot.

Sashiko Free Motion Quilting for Antique Inspired Scrappy Broken Dishes Lap or Cot Quilt
susies-scraps.com
Sashiko Free Motion Quilting for Antique Inspired Scrappy Broken Dishes Lap or Cot Quilt
susies-scraps.com

In completing each Sashiko arched seam, I found that the challenge was to judge the length of the arch as it differs in length depending on which side of each triangle is being quilted.

In other words, because each triangle is an Isoscelles right angle triangle, the hypotenuse is significantly longer than the opposite and adjacent side of each triangle and the corner angles are much tighter.

Here is some triangle refresher in case you are interested.

https://www.mathsisfun.com/triangle.html

Sashiko Free Motion Quilting for Antique Inspired Scrappy Broken Dishes Lap or Cot Quilt
susies-scraps.com
Sashiko Free Motion Quilting for Antique Inspired Scrappy Broken Dishes Lap or Cot Quilt
susies-scraps.com

You may notice than my seams are way less than perfect. However, I think it got better as I went along. Improving quilting skills takes practice. I have to say that sometimes perfection really is the enemy of the good. Sometimes it just has to be done. The nice thing is that when the quilting was finished, even though there was a fair bit of difference in each seam, the overall pattern looks pretty good and has given the quilt a lot of strength and stability.

Here is a close up look at the back.

Sashiko Free Motion Quilting for Antique Inspired Scrappy Broken Dishes Lap or Cot Quilt
susies-scraps.com
Sashiko Free Motion Quilting for Antique Inspired Scrappy Broken Dishes Lap or Cot Quilt
susies-scraps.com

And then the whole of the back.

Sashiko Free Motion Quilting for Antique Inspired Scrappy Broken Dishes Lap or Cot Quilt
susies-scraps.com
Sashiko Free Motion Quilting for Antique Inspired Scrappy Broken Dishes Lap or Cot Quilt
susies-scraps.com

For the piano key border I quilted lots of loops to make it secure.

Sashiko Free Motion Quilting for Antique Inspired Scrappy Broken Dishes Lap or Cot Quilt
susies-scraps.com
Sashiko Free Motion Quilting for Antique Inspired Scrappy Broken Dishes Lap or Cot Quilt
susies-scraps.com

Here is the finished quilt.

Sashiko Free Motion Quilting for Antique Inspired Scrappy Broken Dishes Lap or Cot Quilt
susies-scraps.com
Sashiko Free Motion Quilting for Antique Inspired Scrappy Broken Dishes Lap or Cot Quilt
susies-scraps.com

It is such a nice feeling to finish a quilt, Isn’t it?

Hopefully he will get plenty of use from it.

Sashiko Free Motion Quilting for Antique Inspired Scrappy Broken Dishes Lap or Cot Quilt
susies-scraps.com
Sashiko Free Motion Quilting for Antique Inspired Scrappy Broken Dishes Lap or Cot Quilt
susies-scraps.com

If you enjoyed this post and are still seeking some inspiration, you may also like these.

Charmed by Monkeys Quilt

Pinwheel Medallion Quilt – Baby Quilt

Antique Nine Patch with Sashiko Quilt

Arkansas Cross Roads Quilt

Stars and Crosses Band Quilt Pattern

Happy quilting. What will you sew today?

Susie

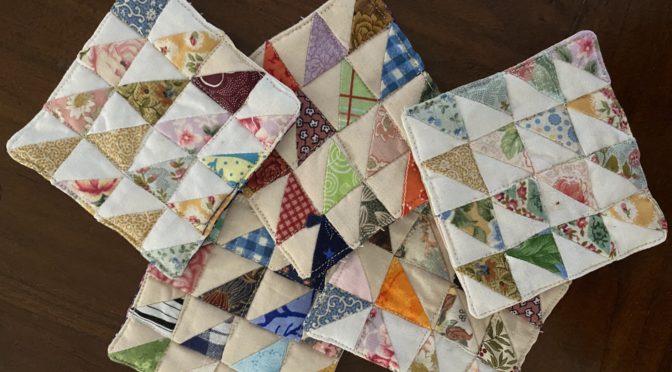
Scrappy quilted coastal coasters

Scrappy Quilted Coastal Coasters

Hello dear Friends and Readers, a little project today which uses small scraps. If you are not into little scraps, then please you do not need to read any further. I’m posting these because I made these little coasters and have really enjoyed using them.

They seem to have the right amount of absorption and because of the small nature of the pieces, glasses and cups sit nicely on them without being uneven. I think that counts. Apart from that, they are super cute.

Drinkcoaster History

These are made from leftover triangles which occur when making the sew and flip method and cutting away the underside remainder triangles. This could be for a snowball block, frienship star blocks, flying geese (unless you use this no waste method Susie’s NEW Flying Geese Quilt Blocks Scrappy Style and anywhere else that triangles are cut away.

Why did I call them Coastal? Well because at the time I was having a little holiday near the beach and they do remind me of the sails on boats.

These were small triangles the equivalent of a 1 1/2” square cut once on the diagional. I know, others probably would have thrown them out, but, you know, the fabrics were quite pretty and I had half a bucket of triangles, so this is what happened.

There is no binding required.

Finished side 4” x 4”.

Scrappy Quilted Coastal Coasters

In order to make these little coasters, here is what you will need.

Requirements for each Scrappy Quilted Coastal Coaster

16 pairs of small triangles, 16 light 16 medium to dark. The equivalent size of a 1 1/2” square cut once on the diagonal. ie the short sides of the triangles measure 1 1/2”

1 of a 4 1/2” x 4 1/2” square of scrap batting

4 of 2 1/2” x 2 1/2” squares made into a four patch.

susies-scraps.com
Scrappy Quilted Coastal Coasters

Method

Before we begin, I absolutely recommend chain piecing these little coasters. Because the pieces are so small they will be dragged down into your feed dogs if they are pieced individually. With chain piecing, you will have a happy time. So do keep something under your needle at all times. Make more than one at a time or make them between other piecing.

Use a very scant 1/8” seam to join your light and dark triangles together.

This does reduce the amount of seam bulk on the back.

susies-scraps.com
Scrappy Quilted Coastal Coasters

Finger press them open and trim off the little doggy ears.

Make the 4 Patch using a 1/4” seam. Press all the units.

susies-scraps.com
Scrappy Quilted Coastal Coasters

Lay out the 16 squares so that all the darker triangles are in the same direction.

susies-scraps.com
Scrappy Quilted Coastal Coasters

Sew the block together, by sewing the first 4 pairs together, continuing to use a small 1/8th” seam allowance. Then add the two subsequent coloums of the units. By sewing it together like this it is easier to match the seam allowances as best as possible.

susies=scraps.com
Scrappy Quilted Coastal Coasters

Now sew the horizontal seams, ensuring that the seams nest as best as possible.

susies-scraps.com
Scrappy Quilted Coastal Coasters

Press.

Put the four patch right side up on top of the square of batting. Put the triangles 16 patch on top right side down and stitch around the perimeter, leaving a 2 – 3” opening for turning on one side. Clip the corners.

susies-scraps.com
Scrappy Quilted Coastal Coasters

Turn the unit it the right side. Use a chop stick or similar to push out the corners and side seams.

susies-scraps.com
Scrappy Quilted Coastal Coasters

Turn under the seam allowance to close the hole. Top stitch all the way around as close to the edge as possible.

Quilt in the ditch across and down between the squares. If you have a walking foot, you should use it here for a much better result.

susies-scraps.com
Scrappy Quilted Coastal Coasters

Enjoy your coasters!

As a postscript, a lady from Scrap Quilt Enthusiasts, commented that adding one to a Christmas Card would be nice. I think thats a lovely idea.

Scrappy Quilted Coastal Coasters

If you enjoyed this post, you may also like these other small scrappy projects,

36 Patch Table Mat

Pincushion On Point

Quilted Scrap Fabric Baskets – Tutorial

And this post where you can see how I utilised the leftover half square triangle blocks which I think really set this quilt top off.

Lessons in Lozenges Quilt Blocks

Have a lovey day. hope you can get a little bit of sewing in.

Susie

2021

Lessons in Lozenges Quilt Blocks

Lessons in Lozenges Quilt Blocks

Hello my Dear Friends and Readers,

Sit down and have a cuppa  with me if you like.  Last year I attended a Bedford charity quilt event. I happened to mention it to my friend Lyn who was rather miffed that she hadn’t been to one as she had previously bought kits on eight occasions!  So this year we invited her along!  Thank you to Marion for the invitation.  I have referred to the Bedford quilt day previously which was run by Orange Tree Quilters Orange Tree Quiltersand hosted by Faye Packham and Lessa Siegele who are both extremely well known quilt makers and a whole lotta fun to be around.

Faye Packam has managed to raise over AUD$ 300,000 with her charitable works which is pretty awesome.  Lessa Siegele has been a quilting matriarch / master for a long time.  we had a delightful chat.  You might like to check out her Jacks Chain Variation Ring Cycles quilt pattern which is ever popular and a bit more about her in this link.

https://addicted2fabric.com.au/2014/10/30/leesa-siegele/

Anyhow, its a fun day!  It’s basically a ready set go and rush for your quilt pack.  There are quite a few designs to choose from.  Last year I chose the Log Cabin, but as is my nature, I had to make it my own so I changed the layout.  This is the link here.

Lessons in Log Cabin Blocks

This year I had trouble deciding……..Eventually I settled on a Noughts and Crosses Kit which was all cut as charm squares from plaid fabrics.  I’m pretty fond of plaid and sometimes they can be difficult to find.  I actually don’t mind how old the fabrics are.  As a matter of fact I think that can be an advantage, because one has the ability to make something unique.  Apart from that, they have got a nice Blokey (Aussie slang for good men) feel about them.  Sometimes we have the need to make quilts for our men or about them.  Recycling men’s shirts would work so well with this pattern.  I’m thinking memory quilts.  If you are feeling sentimental now that’s okay.  I used some of my husbands most favorite shirts which were no longer wearable and sewed them into a quilt for our youngest child to give it more meaning.

I always keep a bunch of precut charm squares on hand at home

Charms for Charms Basket

susies-scraps.com
Lessons in Lozenges Quilt Blocks

See all of those delicious plaids.  Previously I have made a Road to Tennessee quilt using this style of pattern.  It is very adaptable.

Road to Tennessee Quilt and Pattern

Because I had previously made the Road to Tennessee quilt, I decided not to follow the Noughts and Crosses pattern (also often referred to as hugs and kisses).  But… I have always loved the Lozenge, so I decided to go with that idea.  I have had Lozenge Quilt ideas in mind for a long time.  So why not start today?

So I began sewing my blocks.  I couldn’t’ help myself.  I just had to sew that second seam to make two extra half square triangle blocks.

susies-scraps.com
Lessons in Lozenges Quilt Blocks

Then when I cut them off, I had all these delicious 2” x 2” half square triangle units.  Totally unnecessary, but lots of fun.

susies-scraps.com
Lessons in Lozenges Quilt Blocks

So what is the lesson you might ask…. well…. just diverging briefly, I was following a post recently in the Scrap Quilt Enthusiasts where “squaring up blocks” was being discussed…. it appears that most people seem to like /need to do it.  Now, don’t get me wrong I absolutely love every step of the process of creating a quilt except – you guessed it “squaring up blocks”.  It got me to thinking. So I wrote this post on the subject.

Squaring Up of Quilt Blocks

It’s really very delightful to sit and sew without interruption, and seems such a luxury!  They even have lovely ladies coming around to collect blocks for pressing.  Now please don’t get me wrong, I did appreciate it but…

I had sewn  quite a few of my lozenges blocks and thought they looked quite good. I’d used my wooden thing to finger press beforehand.
When they came back from pressing, instead of a nice square block, they were all distorted.  The triangular comers were particularly bad and the corners of the lozenge were short and I knew they were straight before.
Well, I thought, gosh, my sewing and seam allowance is terrible today. I need to reassess what I’m doing!!!

So, I sewed some more and they seemed okay so I opted to decline the pressing service. ????. Not to be ungrateful, but that is what happens with steam iron  and unwashed fabrics.

Anyhow instead of one lozenge block I created this.  One Lozenge and two half square triangle units.

susies-scraps.com
Lessons in Lozenges Quilt Blocks

I used all the spares and leftovers. and put the quilt top together  like this in a 7 x 10 configuration.  Whilst I have concentrated on the idea of Lozenges….this is also known as the Floating Star Block if the colours are reversed.  According to Barbara Blackman Encyclopaedia of Pieced Quilt Patterns 1993, pg 392 it can also be called a Quilt of Variety from Kansas City Star 1938.

susies-scraps.com
Lessons in Lozenges Quilt Blocks

Then I got to work on those half square triangle units.

susies-scraps.com
Lessons in Lozenges Quilt Blocks

I can highly recommend chain piecing for small units.  It’s not only efficient, but it eliminates problems with small pieces of fabric being drawn down into the feed dogs and saves thread.

susies-scraps.com
Lessons in Lozenges Quilt Blocks

These little units are so cute. I decided  to pair them up.  I sewed two sets of 21 pairs of half square triangle units  (That is 84 altogether)

susies-scraps.com
Lessons in Lozenges Quilt Blocks

I did not cut the units apart.  Then I sewed them together to make a scrappy diamond border.  I thought this would best compliment the Lozenge blocks.

susies-scraps.c
Lessons in Lozenges Quilt Blocks

Added them to the top and bottom of the quilt top.

susies-scraps.com
Lessons in Lozenges Quilt Blocks

Then I added the pre cut borders but….they were too short for my adaptation so I added some friendship stars to the corners.

susies-scraps.com
Lessons in Lozenges Quilt Blocks

These are also from the half square triangle units.

Now altogether, this is how it turned out.  I think it has antique look to it  or maybe a country look…,

susies-scraps.com
Lessons in Lozenges Quilt Blocks

There we have it. Do you see the secondary pattern of stars?

susies-scraps.com
Lessons in Lozenges Quilt Blocks

I really enjoyed my day.  I might have to go and cut up some of my Husband’s shirts! ????

if you liked this post you may also enjoy

Fettered Friendship Stars Quilt Pattern Bordered

Or

Quilt for a Brother

And this simple quilt which would also be great with plaids or shirts from a loved one.

Charm Printz Quilt & Tutorial

I hope you are feeling inspired.
Happy stitching,

Susie

As a post script to this post, I would like to thank Cynthia for her comment  (see below).  You may like to log onto Bonnie Hunter’s site to see her Smokey Mountain Star Quilt and another strippy design.   She has a very clever way of using this block which can quickly give you a bigger quilt and she has also focused on plaids.

https://quiltville.blogspot.com/2005/06/smokey-mountain-stars.html?m=1

All the best Susie

© Susan Stuklis 2021