Isn’t it a wonderful feeling when a quilt is finally finished and it’s time to give it to the person intended. I made this quilt for my second son and I think he was pretty chuffed. There is a lot of love in all the stitching we do, I believe. This quilt is no exception. It is a good size and I am sure he will put it to good use. My inspirations were from Antique quilts I have admired and the fabrics I chose are reminiscent of the kinds of shirts he tends to wear. He likes colour and has chosen some beautiful designs at times so that is why l looked to some small and medium modern florals as well as some stripes, paisley and plaids which I think reflect his style and personality. All the fabrics I found from my stash. Another inspiration is that he learned Italian when he was younger, so it seems appropriate…..
The pattern is called Old Italian Block. Here is the link to the blocks and the progress and setting.
It is a way of doing an overall design on a domestic machine. I have discussed before how it is helpful to stitch in a manner where there is both forward and backward or clockwise and anticlockwise movements to prevent buckling of the fabric. You can read more about that here and how I quilted the border.
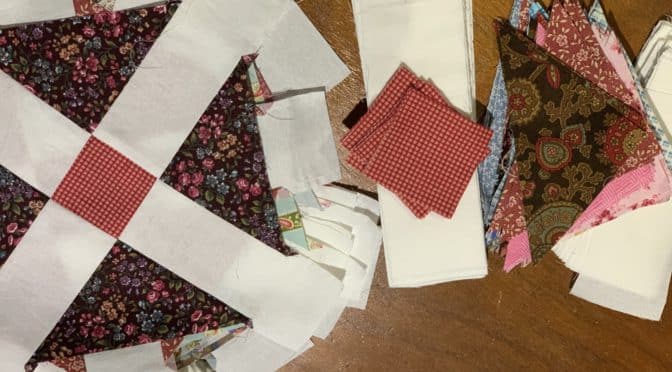
And here are my sashing pieces and extra cornerstones.
Old Italian Block Progress and Setting susies-scraps.com
I decided to sash the blocks and add red cornerstones the same as I have used in the block. This creates a lovely secondary pattern which is almost like stars.
Old Italian Block Progress and Setting susies-scraps.com
The sashing pieces in the white background are like the blocks. The sashing pieces are 8 1/2“ x 2 1/2”. The cornerstones are 2 1/2” x 2 1/2”
Old Italian Block Progress and Setting susies-scraps.com
I have decided to make the quilt 7 x 7 blocks. Therefore 49 of the Old Italian Blocks Antique Style Made Easy.
64 of 2 ½” x 2 ½” red smal print gingham squares for the cornerstones
8 of 2 ½” red small print gingham width of fabric strips for the binding
Old Italian Block Progress and Setting susies-scraps.com
It is going to make a good sized quilt. Here I am putting it all together. I’m using a 201k treadle you might have seen Alex Askaroff recently doing a very informative post on the Singer 201k machines. Here is the link. https://sewalot.com/singer_201k_sewalot.htm
I really love to use this treadle, every single time!
Old Italian Block Progress and Setting susies-scraps.com
Now I’ve finished the 49 Old Italian Blocks Antique Style Made Easy, I have put the sashing and cornerstones in between . Hopefully you can see the secondary pattern I was keen to achieve. Like stars in between.
Old Italian Block Progress and Setting susies-scraps.com
Here it is, laid it out on the ground for your perusal. I am making this quilt for one of my son’s. He doesn’t know.
I will need to get onto quilting it very soon!
Old Italian Block Progress and Setting susies-scraps.com
Hello Dear Friends and Readers, I am quietly excited about sharing this block with you today. I really do think it is an elegantly simple block, with great adaptability.
I actually made a couple of these blocks using a different tecnique years ago, and while it’s okay, I didn’t pursue it. This is the one where you begin with two squares, splice them up interchange the pieces and get two blocks. To be honest, was not totally sold on it. I felt it was a bit restrictive in terms of fabric design and a little distorted.
Old Italian Quilt Block Antique Style Made Easy
A couple of weeks ago, my dear friend Heather and I shared a cup of tea and some retail therapy together, she has just returned from a wonderful stay of several weeks in Italy. All these thoughts of Italy, reminded me of my previous attempts of making this Old Italian block.
I began researching Old Italians and in my wanderings rediscovered this gem!
Isn’t she gorgeous! I felt a renewed excitement about creating this block. But I wanted it so be easy to do and very adaptable in it’s design elements.
Researching this block I discovered there were not so many examples as I was expecting. I believe one of the problems is that it always creates a bit of an issue when dealing with bias seams, and I don’t know about you, but when I start seeing measurements which are all obscure you know like 6 7/8ths and 3 1/8th my eyes glaze over and my interest quickly fades. I didn’t want any of that! It must be more simple and achievable!
I saw another lady was teaching the block by paper piecing it to get good results, and I do think this is an indication of how the block construction can be problematic to get a good result.
I was surprised to see that there are not really many examples that I could find, compared to other block designs. I found a remaining example from the Civil War that was a soldier’s cot quilt. I believe this design has also been used as an “Album” style block making the Centre square white which could be embroided or written on. The same could be done if the cross pieces were white too. It has been made as a potholder quit (the antique version of quilt as you go technique. I could see that from the few antique quilts on Pinterest that the design is really quite amazing, depending on how the fabrics are used.
According to Barbara Brackman, Encyclopedia Of Pieced Quilt Patterns, page 222, Old Italian Block, is attributed to Nancy Cabot, however I believe this design base is also seen in English quilts 100 years earlier.
I set about making a prototype, but, I decided it was a bit small. Here is my sample.
Old Italian Quilt Block Antique Style Made Easy
So I tried again. This time I’m really delighted with how it has turned out. Simple, easy, quick and stable even though we are working with triangles. No weird cutting sizes either! As usual, you can use your scraps to cut the pieces for this quilt, or you can cut from your stash, like I have on this occasion.
Old Italian Block Antique Style Made Easy
I am happy with this result. Would you like to make some of these blocks with me? I will stop talking ???? and show you how I have done it. It is no more difficult than making a nine patch.
I’m piecing these blocks on a Singer 15 Treadle from 1902.
All fabrics have been gently washed before commencement. All seams based on 1/4”.
Block size measurement is 8 1/2” by 8 1/2”.
Requirements for one Old Italian Block Antique Style – Made Easy
1 of 6 1/2” x 6 1/2” square, cut once on each diagonal to reveal 4 triangles
4 of 2 1/2” x 6” strips in a contrasting fabric (I am using white)
1 of 2 1/2” x 2 1/2” square for the Centre (I am using a red print
Old Italian Quilt Block Antique Style Made Easy
Here you can see my cuttings for this block.
Method of Construction for Old Italian Block Antique Style Made Easy
Lay out the pieces of the block.
Old Italian Quilt Block Antique Style Made Easy
Take your 9 cut pieces to the sewing machine. Place one triangle right angle to a short side of one of the 6” x 2 1/2” rectangles, right sides together. Sew the seam. Repeat on the other side of the strip.
Old Italian Quilt Block Antique Style Made Easy
Old Italian Quilt Block Antique Style Made Easy
Make another unit the same way. Sew the remainder 2 1/2” x 6” strips to two opposing side of the red centre square.
Now place one of the triangle units, right side together onto the centre strip. Ensued that you carefully nest the centre square seams. Pin to secure. Sew the seam. Repeat for the other side.
Old Italian Quilt Block Antique Style Made Easy
Press the block. Use a quilting ruler to square up and trim the corners. Here are some of mine before pressing and trimming.
Old Italian Quilt Block Antique Style Made Easy
I was telling Marion about how I was making these blocks. She managed to find in her collection and old pattern and a beautiful quilt she had made some time back using this block as an example of what you can do. She has alternated her blocks with a nine patch in a square block and some appliqué. Her Old Italian Blocks use different colours in the strips which keeps the eye moving of the quilt.
Marion’s Quilt using Old Italian Block, kindly published with her permission.