Tag Archives: 36 patch

Postage Stamp Scrappy Irish Chain Quilt Top

Postage Stamp Scrappy Irish Chain Quilt Top

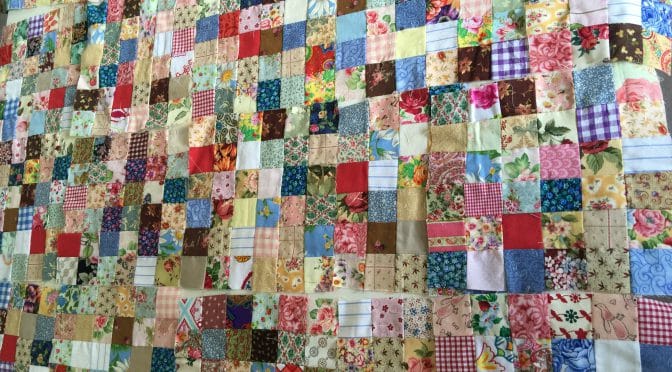
Hello Dear Friends and Readers, and a warm welcome to today’s post. This is a post, I have been working on for a long time. It is a great way to use all kinds of scraps. This quilt top is made from small squares, which, when incorporated together look good, despite their many differences.

Today I am sharing a kind of scrappy Irish chain variation made with postage stamps blocks.

By collecting up all the small pieces of fabric and cutting them to a size that will actually become something beautiful down the track. Cut Up Your Quilting Off-cuts and Obsession with Pre Cuts / Make Your Own

As a project is completed, cutting the leftovers into useable strips or squares means they are ready to use when the need arises!

Postage Stamp Scrappy Irish Chain Quilt Top susies-scraps.com

Today’s quilt has been put together by using two different blocks and alternating them. The challenge with the postage stamp blocks is to try to make them as even as possible, and with the points being as sharp as possible. I have to admit that I began making these blocks a long time ago, My seam allowance in the beginning was really too small. At this stage have decided to accept the fact that my blocks are a little bit uneven. I am putting it down to a learning curve, from which I believe I have progressed in that time. Sometimes finished is better than perfect. I did become waylaid with this project because I ran out of the background fabric hand despite looking around I could not really find a perfect match, so, with those imperfections in mind, I believe it’s better not to dwell on it any longer, and to complete the project. Despite that, it’s still a pretty quilt top, I am sure you will agree, and learning from the journey is good.

I have mentioned it before, but one thing which I believe I have done correctly, is to pre-wash all these fabrics so that when the finished quilt finally is washed, there won’t be too much shrinkage in the fabrics, given they are all so different.

I understand it is a personal choice. To Wash or Not to Wash?….This is the Question

Finished quilt top size 81 ½” x 63 ½”

Requirements for Making the Postage Stamp, Irish Chain Quilt Top

32 of postage stamp blocks 36 Patch Postage Stamp Blocks Tutorial

31 of Around the Garden in Scraps Blocks Around the Garden – In Scraps – Block

This quilt top could be made in any size you like, using the same approach whether it was a cot, single, double queen or king size, depending on how many scraps you would like to use.

Postage Stamp Scrappy Irish Chain Quilt Top susies-scraps.com

Making the Postage Stamp Scrappy Irish Chain Quilt Top

Beginning with a Postage stamp Block, attach an Around the Garden in Scraps Block. Next row, Begin with an Around the Garden In Scraps Block and attach a 36 Patch Postage Stamp Block.

Repeat until this pattern has been repeated for a total of 9 rows. Begin the next row alternating the blocks as before so that the quilt top will be in a 9 x 7 configuration.

Postage Stamp Scrappy Irish Chain Quilt Top susies-scraps.com

I call this scaffolding a quilt top. Please use the same method as making the 36 Patch Postage Stamp Blocks Tutorial.

This makes it very easy to put the quilt top together.

TIP

Use binding clips on the edges of the first row set to keep the blocksin order and prevent twisting.

Postage Stamp Scrappy Irish Chain Quilt Top susies-scraps.com

Thank you for joining me for the is fun use of scraps. If you enjoyed this post, you may also like

36 Patch Table Mat

And this great scrappy quilt block Arkansas Cross Road Quilt Block Tutorial

Scrappy Jacob’s Ladder Quilt Reimagined

Happy stitching,

Susie

© Susan Stuklis 2026

Sixteen Across Quilt Block

Sixteen Across Quilt Block

Hello dear friends and Readers and welcome to today’s post. I would like to share with you a simple block for using up scraps. I’ve been playing around with these blocks for a few weeks now, in between some hand quilting and hand stitching this top …

Scrappy Diamonds Kaleidoscope Beauty Star Medallion Quilt – Part 3

Today‘s Sixteen Across blocks are machine pieced, super scrappy and super simple and yet, will give some design impact due to the diagonal placement of the darker colours. It is a very easy way to get an on point diagonal design without cutting any triangles.

Essentially, this is like a 16 patch postage stamp block however, the placement of colour gives the design impact. The only thing you will need to decide is whether your fabrics are light or dark, and then sort them appropriately. These are great for that kind of relaxing machine piecing, where one can just sit down with a bunch of squares and get into that mediative zone. These blocks have been pieced on a vintage Singer treadle Singer 201K Treadle C1940

I happen to have a bucket full of 2 1/2 inch squares and that was the inspiration for these blocks. I have previously made 36 patch blocks and 16 patch postage stamp blocks which I will give you the links for.

36 Patch Postage Stamp Blocks Tutorial

Postage Stamp Blocks

Using the link for the 36 patch block, you can read the method for putting these squares together in a way that makes matching the points very easy and gives a good result every time. I like to call it scaffolding the block. I use this method for putting quilts together too. Keeps things together nicely and is very good for keeping seams nested and pieces in order.

Of course you could change the size of the squares you use. I just happen to have the 2 1/2 inch squares.

Block size 8 1/2” x 8 1/2”

Seam allowance 1/4”

Requirements for one Sixteen Across Quilt Block

10 of 2 1/2” x 2 1/2” dark medium squares

Six of 2 1/2 inch x 2 1/2” light squares

Sixteen Across Quilt Block susies-scraps.com

Making the Sixteen Across Block

Begin by laying out the 16 of 2 1/2” x 2 1/2” squares in a 4 x 4 matrix. I lay mine out the same way each time to avoid any confusion. I make two blocks at a time so that I can alternate them through the machine.

Top (first) row – two dark squares. followed by two light squares,

Second row – three dark squares, one light square.

Third row – one light square, followed by three dark squares

Fourth row – two light squares, followed by two dark squares

Sixteen Across Quilt Block susies-scraps.com

Beginning from the top left hand corner, and following this method of the 36 Patch Postage Stamp Blocks Tutorial, from the first row, place the second square on top of the first square right sides together and sew a seam down the right side. Do not cut the thread,

Sixteen Across Quilt Block susies-scraps.com

Now follow with the next two squares from the second row in the same way then the next two squares from the third row and fourth row, so a they all remain chained together.

(Now start your second block or whatever you are stitching in between the blocks.)

Beginning again from the top, open out your eight squares, finger press and keeping the order correct, begin piecing from the top of the third row. And work down in the same way adding the squares to the right side.

Sixteen Across Quilt Block susies-scraps.com

Follow on with the last set of squares in the same way.

Now turn the whole block to sew all the columns together, making sure that the seams are nested nicely, points are aligned. Pin to hold in place. Sew the three seams and the block is finished.

Sixteen Across Quilt Block susies-scraps.com

Press the block.

Sixteen Across Quilt Block susies-scraps.com

I am not sure exactly how I will put these together yet. They could just be put together as they are for a quick scrappy quilt or sashed.

Happy stitching.

If you enjoyed this post, you may also like

Around the Garden – In Scraps – Block

Four in Nine Patch Block Tutorial

Uneven Four Patch Block Tutorial

Antique One Patch Block Made Easy

Susie

©Susan Stuklis 2023

36 Patch Table Mat

36 Patch Table Mat

As I’m sitting here enjoying a little pre Christmas aperitif, I thought I should share with you all, my 36 Patch Table Mat!  I’m pondering Christmas menus and admiring the cherries in the glass, a vintage second hand crystal balloon style, which together, are looking particularly festive!  I’m hoping to give you all a little pre Christmas, or anytime inspiration. ????????

I went to the Adelaide Hills the other day picking cherries. Here is some of my pickings!

Christmas for me is about family and food, and fresh cherries are so much of that festive feeling, don’t you think?

Anyhow, getting back to the topic…,

This little mat is rather nice, is larger than a coaster, and possibly more like a Mug Rug but so much more adaptable as you can see!

Of course, you can use your Quilting fabric scraps, which is always excellent!  They can be unified by the binding. Make one, or as many as you like to make a set,  or give as gifts. It’s up to you.

If you would like to whip up some of these for Christmas or at any time, here’s how I did it.

Ingredients 

36 of 2″ x 2″ squares
1 of 10″ x 10″ square of fabric for the backing
1 of 10″ x 10″ batting square
1 of 2 1/2″ width of fabric (WOF) strip for the binding
 
Method
 
Assemble your 36 of 2″ x 2″squares.  Sew together into a 36 patch block. This is the method I use. It allows for good seam matching!


Once the 36 Patch block is made, press the block.  Now layer the 10″ square, right side down, the batting square, followed by the 36 Patch block right side up.
 
Quilt as desired.  I quilted a pomegranate pattern.
 

Trim to square up.

Fold the 2 1/2″ strip in half lengthwise wrong sides together.  Stitch the binding strip to the front of the mat raw edges aligning.  Roll back and hand stitch to the back.

If you enjoyed this post, you may also like,

Dish Quilt and Tutorial

Four Patch Table Mat

Keep On Posting!

Have a great day!

All the best,

Susie

36 Patch Postage Stamp Blocks Tutorial

36 Patch Postage Stamp Blocks

Hello Dear Friends and Readers.  Ever wondered what to do with all those small scraps?

With this block, you can literally make fabric with all the small scraps.

36 Patch Postage Stamp Block Tutorial susies-scraps.com

This block uses all fabrics.  If you were ever scared to try a scrap quilt or scrap blocks, you can do this with confidence.  Put in all the small seemly unusable pieces. Don’t worry if the fabrics have no relation to each other.  Don’t worry if they are solids, plaids, moderns, novelty prints, florals….it really doesn’t matter.  In fact the more variation, the better.

Cut Up Your Quilting Off-cuts

36 Patch Postage Stamp Block Tutorial susies-scraps.com

I am using 2″ squares to make these blocks.

36 Patch Postage Stamp Block Tutorial susies-scraps.com

When I have left over fabric from another project, then I cut them into useable size scraps.

Here is my bag of 2″ squares.  I just added to it periodically.

36 Patch Postage Stamp Block Tutorial susies-scraps.com

Aussie Flour Sacks

Naturally there are many ways you can approach putting this block together and believe me I’ve tried quite a few, like making two patches, four patches or nine patches or individual rows.  If you look closely you will see that some of my blocks are not as neat.  They were part of the learning curve.  I genuinely believe the best way is to make them into connected blocks.  This is how I do it.

Ingredients for one 9 1/2″ Block

36 of 2″ x 2″ scrap fabric squares

Making the 36 Patch Postage Stamp Block

Test your 1/4″ seam.  The main thing is to be consistent and probably on the scant side of 1/4″.  Sew fabric squares together in pairs.  Make sure no two same fabrics are next to each other.  Sew six pairs, chain piecing, them.  Do not cut them apart.  Open up the connected pairs, then sew another six squares to the six squares on the right.  Again, do not cut them apart.   Here I have finished 4 squares in each row.

36 Patch Postage Stamp Block Tutorial susies-scraps.com

Now here is 5 squares in each row and commencing number 6.

36 Patch Postage Stamp Block Tutorial susies-scraps.com

Continue, using the same method, until all the 36 squares are used, and you should now have 6 rows of 6 squares.  By using this method it will create a scaffold or framework between the squares, the result is much neater and so much more organised and the seams will abut each other very nicely.

36 Patch Postage Stamp Block Tutorial susies-scraps.com

Do not press yet.  Now turn the block to sew the columns.   Make sure when you sew each row that the seams are nested and all travelling in the same direction for each column.   I hope you can see that the seams are all facing to the right, and underneath they are all facing to the left.  I find pinning is very useful at this point.  This will give nice even points and then when you press the block it will sit nicely, despite the fact that it has many pieces.

36 Patch Postage Stamp Block Tutorial susies-scraps.com

Do the same thing with each column, ensuring that the seams sit alternating with each other.  Now press the block.  Trim to 9 1/2″ if necessary.  Of course making a few at a time means something can always be under the needle.

36 Patch Postage Stamp Block Tutorial susies-scraps.com

I’m putting these together on my Singer Treadle.

A Journey with Sewing Machines 

These blocks are quite addictive.  They are an easy project to do at any time.  There is no particular planning involved.   Once they are made, they can be put together as you like.  They can be joined together directly, or put together with sashings, or, placed with alternate plain blocks, or set on point and many other variations.  It’s really up to you!

I decided to combine these blocks with the Around the Garden  In Scraps Block.  

You can see how that is progressing here.

It Feels Like Rain

If you enjoyed this post, you may also like

The Spinner Blocks Made Easy 

Quilted Scrap Fabric Baskets & Tutorial

Quilted Scrap Fabric Book Cover Tutorial

Have a great day!

Susie