Tag Archives: Postage Stamp Blocks

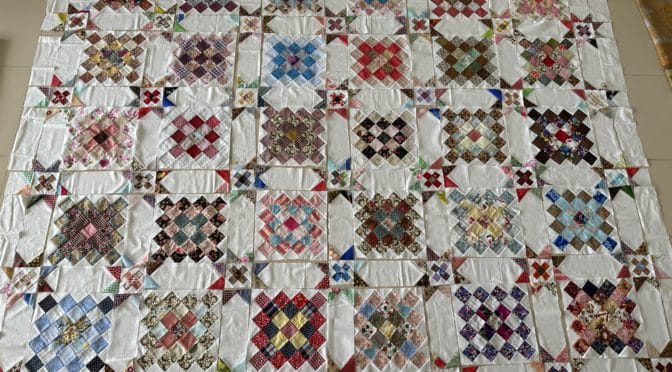
Postage Stamp Scrappy Irish Chain Quilt Top

Postage Stamp Scrappy Irish Chain Quilt Top

Hello Dear Friends and Readers, and a warm welcome to today’s post. This is a post, I have been working on for a long time. It is a great way to use all kinds of scraps. This quilt top is made from small squares, which, when incorporated together look good, despite their many differences.

Today I am sharing a kind of scrappy Irish chain variation made with postage stamps blocks.

By collecting up all the small pieces of fabric and cutting them to a size that will actually become something beautiful down the track. Cut Up Your Quilting Off-cuts and Obsession with Pre Cuts / Make Your Own

As a project is completed, cutting the leftovers into useable strips or squares means they are ready to use when the need arises!

Postage Stamp Scrappy Irish Chain Quilt Top susies-scraps.com

Today’s quilt has been put together by using two different blocks and alternating them. The challenge with the postage stamp blocks is to try to make them as even as possible, and with the points being as sharp as possible. I have to admit that I began making these blocks a long time ago, My seam allowance in the beginning was really too small. At this stage have decided to accept the fact that my blocks are a little bit uneven. I am putting it down to a learning curve, from which I believe I have progressed in that time. Sometimes finished is better than perfect. I did become waylaid with this project because I ran out of the background fabric hand despite looking around I could not really find a perfect match, so, with those imperfections in mind, I believe it’s better not to dwell on it any longer, and to complete the project. Despite that, it’s still a pretty quilt top, I am sure you will agree, and learning from the journey is good.

I have mentioned it before, but one thing which I believe I have done correctly, is to pre-wash all these fabrics so that when the finished quilt finally is washed, there won’t be too much shrinkage in the fabrics, given they are all so different.

I understand it is a personal choice. To Wash or Not to Wash?….This is the Question

Finished quilt top size 81 ½” x 63 ½”

Requirements for Making the Postage Stamp, Irish Chain Quilt Top

32 of postage stamp blocks 36 Patch Postage Stamp Blocks Tutorial

31 of Around the Garden in Scraps Blocks Around the Garden – In Scraps – Block

This quilt top could be made in any size you like, using the same approach whether it was a cot, single, double queen or king size, depending on how many scraps you would like to use.

Postage Stamp Scrappy Irish Chain Quilt Top susies-scraps.com

Making the Postage Stamp Scrappy Irish Chain Quilt Top

Beginning with a Postage stamp Block, attach an Around the Garden in Scraps Block. Next row, Begin with an Around the Garden In Scraps Block and attach a 36 Patch Postage Stamp Block.

Repeat until this pattern has been repeated for a total of 9 rows. Begin the next row alternating the blocks as before so that the quilt top will be in a 9 x 7 configuration.

Postage Stamp Scrappy Irish Chain Quilt Top susies-scraps.com

I call this scaffolding a quilt top. Please use the same method as making the 36 Patch Postage Stamp Blocks Tutorial.

This makes it very easy to put the quilt top together.

TIP

Use binding clips on the edges of the first row set to keep the blocksin order and prevent twisting.

Postage Stamp Scrappy Irish Chain Quilt Top susies-scraps.com

Thank you for joining me for the is fun use of scraps. If you enjoyed this post, you may also like

36 Patch Table Mat

And this great scrappy quilt block Arkansas Cross Road Quilt Block Tutorial

Scrappy Jacob’s Ladder Quilt Reimagined

Happy stitching,

Susie

© Susan Stuklis 2026

Sixteen Across Quilt Block

Sixteen Across Quilt Block

Hello dear friends and Readers and welcome to today’s post. I would like to share with you a simple block for using up scraps. I’ve been playing around with these blocks for a few weeks now, in between some hand quilting and hand stitching this top …

Scrappy Diamonds Kaleidoscope Beauty Star Medallion Quilt – Part 3

Today‘s Sixteen Across blocks are machine pieced, super scrappy and super simple and yet, will give some design impact due to the diagonal placement of the darker colours. It is a very easy way to get an on point diagonal design without cutting any triangles.

Essentially, this is like a 16 patch postage stamp block however, the placement of colour gives the design impact. The only thing you will need to decide is whether your fabrics are light or dark, and then sort them appropriately. These are great for that kind of relaxing machine piecing, where one can just sit down with a bunch of squares and get into that mediative zone. These blocks have been pieced on a vintage Singer treadle Singer 201K Treadle C1940

I happen to have a bucket full of 2 1/2 inch squares and that was the inspiration for these blocks. I have previously made 36 patch blocks and 16 patch postage stamp blocks which I will give you the links for.

36 Patch Postage Stamp Blocks Tutorial

Postage Stamp Blocks

Using the link for the 36 patch block, you can read the method for putting these squares together in a way that makes matching the points very easy and gives a good result every time. I like to call it scaffolding the block. I use this method for putting quilts together too. Keeps things together nicely and is very good for keeping seams nested and pieces in order.

Of course you could change the size of the squares you use. I just happen to have the 2 1/2 inch squares.

Block size 8 1/2” x 8 1/2”

Seam allowance 1/4”

Requirements for one Sixteen Across Quilt Block

10 of 2 1/2” x 2 1/2” dark medium squares

Six of 2 1/2 inch x 2 1/2” light squares

Sixteen Across Quilt Block susies-scraps.com

Making the Sixteen Across Block

Begin by laying out the 16 of 2 1/2” x 2 1/2” squares in a 4 x 4 matrix. I lay mine out the same way each time to avoid any confusion. I make two blocks at a time so that I can alternate them through the machine.

Top (first) row – two dark squares. followed by two light squares,

Second row – three dark squares, one light square.

Third row – one light square, followed by three dark squares

Fourth row – two light squares, followed by two dark squares

Sixteen Across Quilt Block susies-scraps.com

Beginning from the top left hand corner, and following this method of the 36 Patch Postage Stamp Blocks Tutorial, from the first row, place the second square on top of the first square right sides together and sew a seam down the right side. Do not cut the thread,

Sixteen Across Quilt Block susies-scraps.com

Now follow with the next two squares from the second row in the same way then the next two squares from the third row and fourth row, so a they all remain chained together.

(Now start your second block or whatever you are stitching in between the blocks.)

Beginning again from the top, open out your eight squares, finger press and keeping the order correct, begin piecing from the top of the third row. And work down in the same way adding the squares to the right side.

Sixteen Across Quilt Block susies-scraps.com

Follow on with the last set of squares in the same way.

Now turn the whole block to sew all the columns together, making sure that the seams are nested nicely, points are aligned. Pin to hold in place. Sew the three seams and the block is finished.

Sixteen Across Quilt Block susies-scraps.com

Press the block.

Sixteen Across Quilt Block susies-scraps.com

I am not sure exactly how I will put these together yet. They could just be put together as they are for a quick scrappy quilt or sashed.

Happy stitching.

If you enjoyed this post, you may also like

Around the Garden – In Scraps – Block

Four in Nine Patch Block Tutorial

Uneven Four Patch Block Tutorial

Antique One Patch Block Made Easy

Susie

©Susan Stuklis 2023

Great Granny Stars Quilt and Pattern

Great Granny Stars Quilt and Pattern

Hello Dear Friends and Readers and welcome to today’s post. Now that Christmas is pretty much behind us, it is nice to begin to get back to my current Great Granny Stars project which I have been working on. Before we start I will add that you really can use a lot of scraps up to make this quilt. If you are really really feeling dedicated you may even consider a scrappy binding too which would use even more!

For those of you who are regular visitors you may also notice that we have decided to get rid of all the advertisements on the site. In my personal opinion Google had made things way too … ahem.  It looks so much better. ????

If you have been following along with the Great Granny and Mini Granny blocks you may well enjoy the challenge of putting this very scrappy quilt together. Here we are on the final part of the Scrappy Great Granny Quilt revival to which we will add some stars to give it a bit of twinkle! I will add the links to all the blocks so that you can catch up if you missed out. Scrap Great Granny Squares Quilt Revival

All requirements for the quilt will be in this post.

All fabrics have been washed and lightly pressed before use.

All seams based on 1/4”

Finished size approximately 88 ½” x 104 ½”

Please read all instructions before commencing. Don’t forget to save all your triangle off cuts to join in with another quilt project later! ????

Fabric Requirements for the Great Granny Stars Quilt

6 yards/metres (approximately) of scrap assorted print fabric

6 yards/metres of white homespun

1 yard/metre in your colour/print choice for the binding

Batting piece approximately 100” x 115”

Backing fabric approximately 110” x 120”

Cutting Instructions for the Great Granny Stars Quilt

From the assorted print fabrics cut:

1288 of 2 ½” x 2 ½” squares

and 210 of 1 ½” x 1 ½” squares

From the white homespun cut:

36 of 4” width of fabric strips. Subcut 106 of 4” x 12” strips for the Star Sashings and the border.

14 of 4 1/2” width of fabric strips. Subcut 108 of 4 ½” x 4 ½” ” squares. Cut each square once on each diagonal to reveal 432 setting triangles for the 36 Great Granny Square blocks.

9 of 3” width of fabric strips.

Subcut 72 of 3” x 3” squares. Cut each square once on the diagonal to reveal 144 corner triangles for the Great Granny Square Blocks.

Subcut an extra 46 of 3” x 3” squares cut once on each diagonal to make the setting triangles for the Mini Granny Square blocks

3 of 2” width of fabric strips. Subcut 92 of 2” x 2” squares, cut once on the diagonal to reveal 184 corner triangles for the Mini Granny Square blocks


Making the blocks for Great Granny Stars Quilt

Instructions for each of the parts of the Great Granny Stars Quilt are in these links.

Make 36 of the Great Granny Squares Blocks. Trim each block to 12” x 12” Scrap Great Granny Square Block Tutorial

Make 46 of the Scrap Mini Granny Square Quilt Blocks Scrap Mini Granny Square Quilt Blocks

Make 84 of the Scrappy Star Sashings blocks Scrappy Star Sashings

For the Border

Make 26 half sashing blocks using the 26 of 4” x 4” white homespun squares in the same manner as the Star Sashings using only 2 of the 2 ½” x 2 ½” of 52 of the remainder 2 ½” x 2 ½” assorted squares on one side of each square. Reserve 22 of the plain 4” x 12” white homespun sashing pieces to alternate with half sashing blocks and 4 of the Mini Granny’s for the final cornerstones.

Assembling the Great Granny Stars Quilt

Lay out the 36 of Scrap Great Granny Squares blocks in a 5 x 6 configuration leaving a 4” gap between each block.

Great Granny Stars Quilt and Pattern susies-scraps.com

Put a Scrap Mini Granny Square Quilt Block Scrap Mini Granny Square Quilt Blocks at the corner junction of each of the Scrap Great Granny Square Blocks Scrap Great Granny Square Block Tutorial and continue all around the perimeter at the gaps as shown below.

Great Granny Stars Quilt and Pattern susies-scraps.com

Lay out the Scrappy Star Sashings blocks Scrappy Star Sashings, so that they are lying next to each Scrap Great Granny Square Block. 7 rows of 6 for each direction.

Great Granny Stars Quilt and Pattern susies-scraps.com


For the Border Add a Half Star Sashing Square to the edge of each of the Mini Granny Blocks on the perimeter to complete the stars.. Put the four leftover Mini Granny Blocks in the last four corners as the cornerstones.

Great Granny Stars Quilt and Pattern susies-scraps.com

Put the remainder 22 plain white sashing pieces in between each Half Star Sashing square

Great Granny Stars Quilt and Pattern susies-scraps.com

Assemble the Great Granny Stars Quilt

Now that all the pieces are laid out, assemble the quilt in the same manner. I like to use a scaffolding method. Beginning from the top right hand corner beginning to sew the quilt pieces together by chain sewing the first two columns of pieces together, Do not clip apart. At the end of the column go back to the top and add the next column in the same manner. Continue until all the pices have been included.,

Great Granny Stars Quilt and Pattern susies-scraps.com

Here you can see how the chaining threads act as a scaffolding for the whole quilt.

Great Granny Stars Quilt and Pattern susies-scraps.com

Now turn the whole quilt and sew all the rows. It should be easy to achieve nice alignment because of the chaining threads.

TIP Use binding clips to easily support the weight of the quilt while sewing the rows together. Here is some further information about binding clips https://www.amazon.com.au/Purple-Angelduck-Binding-Quilting-Crafting/

Great Granny Stars Quilt and Pattern susies-scraps.com


Here is the finished Great Granny Stars top ready to be quilted.

Great Granny Stars Quilt and Pattern susies-scraps.com

If you enjoyed this post, you may also like some of these other quilt patterns with stars.

Ohio Stars Part 3 – Sash It

Fettered Friendship Stars Quilt Pattern Bordered

Charm Square Stars “Anika’s Quilt” Free Pattern

and Holiday Stars Quilt and Pattern

and for those who like hand piecing Stitching by the Pool – Six Pointed Stars Antique Inspired

Happy stitching,

Susie

© Susan Stuklis 2023

Nesting Quilt Block Seams

Nesting Quilt Block Seams

Hello Dear Friends and Readers, today I would like to discuss Nesting Seams for Quilt Blocks.  I would have to say at the outset that it seems to be assumed knowledge for quilters, but its not necessarily that easy to explain.

This has come about because I had a lovely question from Linda asking me how I nest my seams?  I got to thinking about this.  So I decided to go down this rabbit hole with some further thoughts.  It’s actually a very good question.  Well in the first instance I wasn’t sure whether she meant for a block, or in general, and when you think about it, quilt blocks can be so variable, each quilt block could deserve their own detailed explanation of how to lay out the seams depending on which block you are making.  Well then, when it comes to putting a quilt together, thats another situation again, depending on the type and intricacies of the blocks.  Sometimes, it just isn’t possible to “nest a seam”, and they unfortunately have to lay on top of each other.  That is where sashing can be useful because they create a clean line to put a block against…..or maybe not.  If a sashing is also detailed, it may present it own problems.

I have no idea where the term “Nesting” a seam came from.  There are so many other terms for nesting and none of them really relate to sewing.  In my mind, I think the idea may have come from the fact, that the back of a seam and where they join can sometimes look like a bit of a nest!  We all know the term nesting to make a home ready for babies, or as a place of comfort and happiness for families and individuals.  It is  often related to preparation, neatness and readiness for other things to happen.

When it comes to seams, there are many other descriptors used for dressmaking and tailoring which are, in my mind, quite different to quilting.  The seam allowances and styles and methods of seams are quite varied.

These days there are some quilters who like to press their seams open.  I’m not saying it’s right or wrong, but its not my preference.  One of the things which can occur is migration of quilt batting.  I think this can be prevented by nesting seams which are turned to one side rather than opened.  I have written an article about this here.

Quilting Seams Pressed Open or Closed Debate

It is important to remember that dressmaking is quite a contrast to patchwork.  Usually in dressmaking one is working with one fabric.  There are some joins and the seams are generally wider and finished.    However with patchwork, there are some or many fabrics used to make a patchwork design on the outside.  There are many unfinished seams and the pieces can be quite small.  The seams will add a lot of weight and bulk to the finished piece too.

Still, what does it mean to nest a seam?  To me, nesting a seam, is a seam which is turned to one side after two pieces of fabric are joined together.  This seam may meet another seam, like at a crossroad.  In order for that seam to meet the other seam and for the corners to meet at (for the sake of the argument at 90 degrees) then the opposing seam is better to fold to the opposite direction.  In doing this the two folded seams which are meeting, need to abut or align as closely as possible together,  and folded to opposing directions in order for the outside pattern of the quilt block to keep its pattern sharp and the fabrics to lay as flat as is possible.

How is the seam nested or aligned?  I find it is useful to put the two pieces together, and then feel between fingers and thumb to check that the seams and lined up as close together as possible, with the seams in opposing directions.  Depending on the length of the seam, it can be helpful to pin in place to prevent movement whilst sewing together.  Be careful that the seam is not distorted by the pin or the stitching as sometimes the feed dogs do not keep up the underside with the top.

My favourite method is to sew the pieces together with a framework or scaffold of thread achieved by chain piecing which holds the pieces of fabric together.  I have outlined this method in this post.

36 Patch Postage Stamp Blocks Tutorial

Here I can show you the result of this method.  To keep it real, I am showing you some blocks which have not  yet been pressed.  I do not press them until they are all sewn together.  Bear in mind that these are made with 1 1/2” pieces and they are all scraps and the fabrics are all slightly different even though they are all quilting cottons.  See how the direction of the seams alternate right, left, right, left.

susies-scraps.com
Nesting Quilt Block Seams

Because I have use the scaffolding method to sew it together, the block is pretty flat considering how many seams there are.

Here is another block from the right side and you can see that the points are pretty sharp to within a thread or two width.

susies-scraps.com
Nesting Quilt Block Seams

I hope this can shed a little bit of light on Nesting Seams for Quilt Blocks.  Remember that sometimes you just have to do the best you can.  It is not always possible to nest a seam.  Sometimes I have unpicked the seam to make it lay in the opposite direction as this will improve the lay of the quilt top for quilting and prevent distortion of the block.

One other point, folding and pressing the seam to the darker fabric is often recommended.  It this is especially useful when sewing with very light coloured fabrics, where the seam allowance can sometimes show through.  So in this instance  you many ot may not be able to nest the seams.  Each quilt is different and you will need to asses it as you go.

If you enjoyed this post and you are keen for some other tips for quilting and patchwork you may also enjoy these posts.

Wash your Pre-Cuts?

Clip As You Go Technique

Obsession with Pre Cuts / Make Your Own

While We Wait

Lessons in Log Cabin Blocks

Signature Pre-Cuts from Your Stash

Free Motion Quilting Part 3 The Sandwich

Happy stitching,

Susie


It Feels Like Rain

It Feels Like Rain

Hello Dear Friends and Readers,

In stark contrast to last weekend when the weather leant itself to the glorious pleasure of sewing outside in the warmth of the sun, with an antique Singer hand crank,  today it is raining. There is a heavy mist enveloping the hills.   Winter is surely arriving.  You can click on the link for the sunshine post, in case you missed it….

Singer 28K C1901 in the Sun

And as delightful as that was, I do love the changing of the seasons.   Time to rug up with warm boots and jeans, get cosy and get sewing.

Appropriately, we listened to some Buddy Guy, including, Feels Like Rain.   You can listen too if you like.  It is a great way to capture a mood, and get lost in the moment, don’t you think?

https://m.youtube.com/watch?v=QButLzJB5SI

I couldn’t help but to do some treadling. I needed to make a few more of these Aound the Garden in Scraps Block.  Admittedly, I have been making these blocks for quite a long time, but it doesn’t matter as it is just made with scraps!

Around the Garden In Scraps Block

Here is a stack of them ready to go.

Around the Garden in Scraps Quilt Block

My plan is to combine them with some 36 Patch Postage Stamp Blocks.  If you would like a sure fire way to use your scraps, this is it!  A marvellous way to use up all sorts of oddments, give them a home and create an easy project which can be picked up anytime, without too much thought, or used as an in between block, when working on other projects.

36 Patch Postage Stamp Blocks Tutorial

Here the blocks coming together!  I am alternating them.  It is somewhat like an Irish Chain, but with four patch centres.  The fire is burning and its toasty warm!

Quilt blocks 36 patch Postage Stamp
Quilt top susies-scraps.com  

I have to confess, the blocks are not perfect, some of them I really made years ago and my 1/4” seam was a bit scant.  Nevertheless I am putting them together.  It is a scrap quilt after all.  And, it’s all part of the learning journey.

I hope I have inspired you to put some of your scrappy blocks together too.  I feels good.

If you love postage stamp blocks, you may also like these great little projects.

Quilted Scrap Fabric Baskets & Tutorial

36 Patch Table Mat

Happy sewing!

Susie