Tag Archives: Quilted Christmas Scrappy String Stockings

Vintage Style String Me Along

Vintage Style String Me Along

Hello Dear Friends and Readers and a warm welcome to today’s post. I have spent about one month in Western Australia and that time has been amazing and so interesting. If you follow me on FB or Insta you can see some of the photos there.

Now I am black home and it’s good to be here. My sewing room has been calling and I must say it is somewhat of a mess and needing a good tidy up! I thought I would start with a box of scraps which was doing nothing. A collection of all sorts of odd shapes and different fabric lines, chucked into the box from various different projects over time. In order to make some room and be able to get back to some basic machine stitching, i decided to make some string blocks with this fabric.

Vintage Style String Me Along susies-scraps.com

I sorted out the pieces and cut them very roughly into odd strips. Better pieces of fabric I cut into strips and added to my pile which may be used for a log cabin in the future. Lessons in Log Cabin Blocks It didn’t take that long and can be way more fun than hauling yardage. The piles of strips look very nice and my pile of rough strings gave a sense of achievement. As always, there is more fabric than anticipated and I’m pretty sure I can create at the very least, a baby quilt or a lap quilt.

In the pile I also have two old thin pillow coverings, so I cut them up to use as the foundation for the string blocks. My vision is a vintage style looking quilt which is homey and full of delightful strings. Depression era quilts were sometimes made of strings of fabric in this manner in order to use what was already available and then recycled into a quilt top. This lead to some very pretty quilts with a lovey mixture of fabrics. They often used the fabric feedsack bags to make clothing and quilts. It is a great look. The way the blocks will be positioned will give plenty of interest.

Begining by placing a string in the centre of the foundation block on the diagonal, making sure that it overhangs the edges. Cover with another string, right sides down lining up the sewing edges as much as possible. Sew, making at least a 1/4” seam. Make two blocks at a time so that it keeps the flow going and doesn’t use as much thread. Press the fabric strip open. I use a wooden thing or finger press well before adding the next strip. I even used up old bobbin thread which is actually great because now my bobbins are cleaned up as well!

Vintage Style String Me Along susies-scraps.com

This is how it looks from the back before trimming. It may look a little distorted because the foundry=tion was very thin however that will not matter once the block is trimmed.

I remember PJ from Quilting time in Dixie saying that she used old thin sheets for the foundation blocks and that seemed like an excellent idea to me.

In order to keep this as simple as possible I used my regular 6” ruler to cut the fabric into 6” x 6” squares to use for the foundations. This made it very easy to trim the blocks after pressing. this is how it looks from the front before trimming.

Vintage Style String Me Along susies-scraps.com

I used my trusty old treadle to make these blocks. Having been out of use for a while she responded to a good oiling. That is one of the advantages of this machine. The maintenance is easy, just give a good oiling! Treadle Tinkering

Vintage Style String Me Along susies-scraps.com

I plan to put the blocks together like this. I really like the pattern and it looks good from every side. I hope you can feel inspired dot make some string blocks. Loads of fun. It doesn’t require over thinking which means that it progresses very quickly.

Vintage Style String Me Along susies-scraps.com

If you enjoyed this post, you may also like these other string projects.

Any String Goes – Pineapple Improvisational String Quilt Blocks

String Pot Holders or Trivets for Christmas

quilted christmas scrappy string stockings

Crazy Little Strings – Diamond Charms Quilt Block and Tutorial

Pink Strings Table Mat

String Feeder QAYG Bib

“End of Day” Quilters Basket – Free Tutorial

Thank you for joining me today and as always I wish you happpy stitching.

All the best, Susie.

© Susan Stuklis 2026

Diamond Stars Christmas Table Runner

Diamond Stars Christmas Table Runner

Hello Dear Friends and Readers, welcome to todays post. Christmas is rapidly approaching, so I will not take up too much of your time with a preamble. I have always wanted to make a new Christmas runner and somehow this has eventuated with the inspiration of the previous post which was this Diamond Star Quilt Block Made Easy

Just so you know, I did not use specific Christmas fabrics, I just used things I already had, but of course you can use specific Christmas fabrics. It is 5” Charm Squares friendly.

When cutting up the blocks I saved the pieces which are cut from the end of the centre Diamond portion of each block to make the border. Of course one could make a plain border if preferred.

Here is an article about stars and Christmas.

https://www.christianity.com/wiki/holidays/what-is-the-significance-of-the-star-of-bethlehem.html

So lets gets started on todays project!

Please read all instructions before commencing

All seams based on 1/4“

Finished runner size 22 3/4” x 67”

Requirements for the Diamond Start Christmas Table Runner

48 of assorted 5” x 5” red squares

48 of assorted 5” x 5” green squares

24 of 1 3/4” x 1 3/4” centre squares in a beige print for the star centres

96 waste ends of the diamonds (saved from the cutting of the blocks

5 of 5” x 5” beige squares cut once on each diagonal to reveal 20 setting triangles for the borders

4 of 3” x 3” beige squares cut once on the diagonal to reveal 8 corner border triangles

5 of 2 1/4” Width of Fabric strips for the binding

Backing fabric approximately 71” x 26”

Batting of choice approximately 71” x 26”

Diamond Stars Christmas Table Runner susie’s-scraps.com

Constructing the Diamond Stars Table Runner

Make the Centre Panel

Using the red and green 5 “ x 5” squares construct the 24 Diamond Star Blocks Diamond Star Quilt Block Made Easy

Diamond Stars Christmas Table Runner susie’s-scraps.com

Trim all the blocks to 8” x 8”

Remember to save the 96 waste ends of the diamonds when cutting the blocks to use for the 12 Broken Dishes Blocks for the end borders.

Assemble the blocks into a 3 x 8 configuration and stich together taking as much care as possible to match and nest the underlying seams.

Diamond Stars Christmas Table Runner susie’s-scraps.com

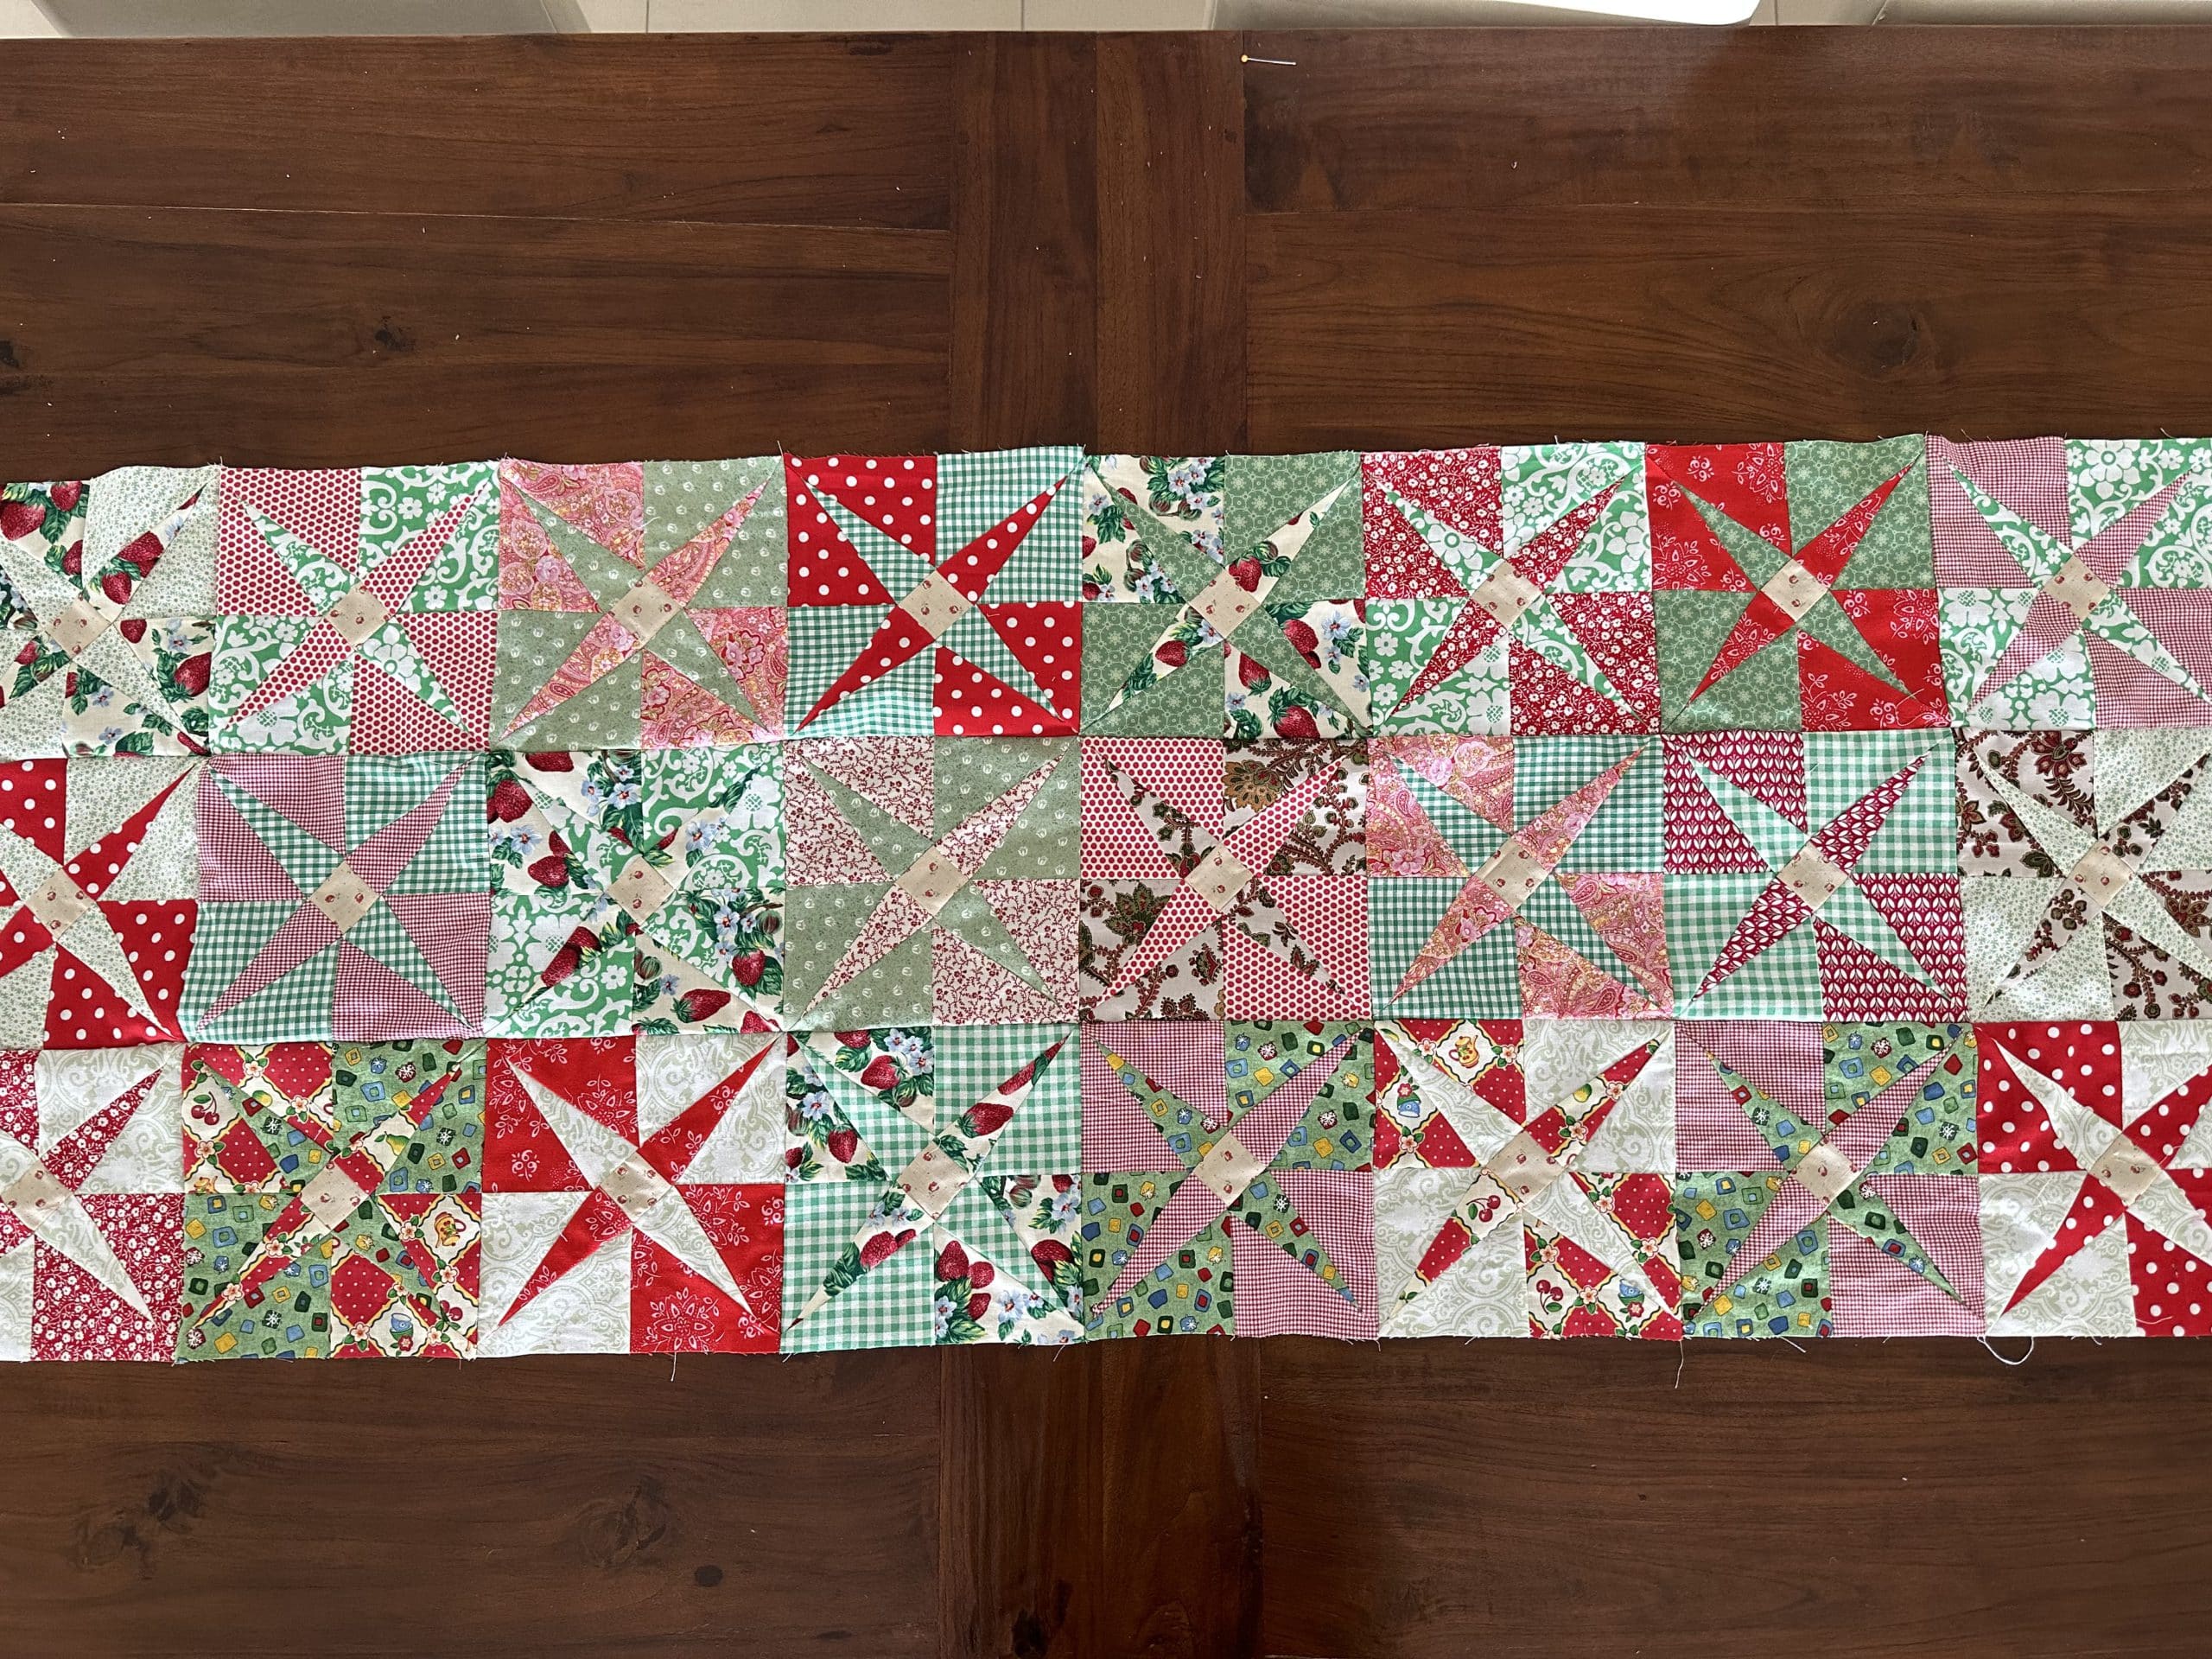
Here are the blocks all together. Press.

Diamond Stars Christmas Table Runner susie’s-scraps.com

Make the two Broken Dishes End Borders

Using 8 each of the waste ends of the diamonds, assemble them into a Broken Dishes block. For more information on Broken Dishes blocks see this post Broken Dishes Block Totally Scrappy – Made Easy

Diamond Stars Christmas Table Runner susie’s-scraps.com

Repeat to make 12 Blocks in total. Each Block should measure 3” x 3”.

Diamond Stars Christmas Table Runner susie’s-scraps.com

Using the previously cut beige setting triangles, lay them out in between the border Broken Dishes blocks. Add the four corner triangles to the ends of each border set.

Diamond Stars Christmas Table Runner susie’s-scraps.com

Sew the setting triangles to each side of the Broken Dishes Blocks making sure to line up the right angle edge of the triangle with the corner of the Broken Dishes Blocks. lastly add the Corner triangles. for a more detailed explanation see The borders of this quilt. Country Roses Four Patch Quilt Pattern

Diamond Stars Christmas Table Runner susie’s-scraps.com

Attach a completed Broken Dishes border to each end of the runner.

Diamond Stars Christmas Table Runner susie’s-scraps.com

Lay out the backing, batting and runner on top. prepare for quilting. I just stitched in the ditch around the Diamond Stars. and then around the Broken Dishes blocks.

Diamond Stars Christmas Table Runner susie’s-scraps.com

Sew all the binding strips together. Prepare binding strips for quilts – Tutorial

Attach to the perimeter of the Diamond Stars Table Runner Quick Bind Every Time – Tutorial

Diamond Stars Christmas Table Runner susie’s-scraps.com

This is a lovely wide runner which will easily host a good amount of hot dishes for the centre of the Christmas table. Not bad from scraps.

Diamond Stars Christmas Table Runner susie’s-scraps.com

As a side, it would also make a lovely bed runner if you feel so inclined.

If you enjoyed this post, you may also like

Christmas Stars Table Runner and Pattern

Hexagon Star Snowflake Trivet

Floral Pyramid Doorstop

Quilted Christmas Stocking

Merry Christmas!

Susie

© Susan Stuklis 2022

quilted christmas scrappy string stockings

Quilted Christmas Scrappy String Stockings

Hello Dear Friends and Readers and welcome to a little pre Christmas scrappy festive project. Today I would like to share with you a scrappy Christas project which will use some leftover fabric string off cuts. Strings of fabric are so much fun to use and are always surprising and artistic. This project is a small one which will not take very long and will make a lovey addition to Christmas cheer for years to come, or gift for someone you love.

Being a string project, we do not want to be too uptight about it. They are only strings after all. I am using a mixture of traditional red green gold and white, however, I think any colours would probably look great, depending on your audience. ( I am fancying a pink one. ????)

What is a string? For those who are not familiar, a “string” is a thin length of fabric which has been cut off. This is done usually to straighten an edge of yardage, squaring up quilt backings, really anywhere where there is a leftover strip of fabric which you may not ordinarily use. It can be thick or thin or even crooked, it doesn’t matter. As a guide, maybe any width about or less than 1 1/2” wide will do it. Depending on how many strings you save and whether or not you wish to use them for quilt making. Here is some examples of how they can be used.

Crazy Little Strings – Diamond Charms Quilt Block and Tutorial

Strings n Things

String Feeder QAYG Bib

Anyhow, times a wastin’ lets just do it. Can I suggest making two at a time so that you can keep continuity with your piecing. Either that or use it as an Inbetween project. That is, “Inbetween” seams!

Seams based on 1/4”

Finished size approximately 17” x 13”

Requirements for each of the Quilted Christmas Scrappy String Stockings

1 of the stocking pattern drawn onto kitchen paper or newspaper.

Fabric strings

1 scrap piece of batting approximately 17” x 13”

2 of a plain backing/ lining of homespun, calico or 17” x 13”

1 of a pattered or plain focus fabric for the back also 17” x 13”

2 yards/metres of 2 1/2” binding which has been cut on the diagional

Double these ingredients if you are going to make two at a time like me.

Quilted Christmas Scrappy String Stockings  susies-scraps.com
Quilted Christmas Scrappy String Stockings susies-scraps.com

Make the paper pattern

I used some kitchen sandwich paper, the unwaxed kind. It’s thin and tears fairly easily.

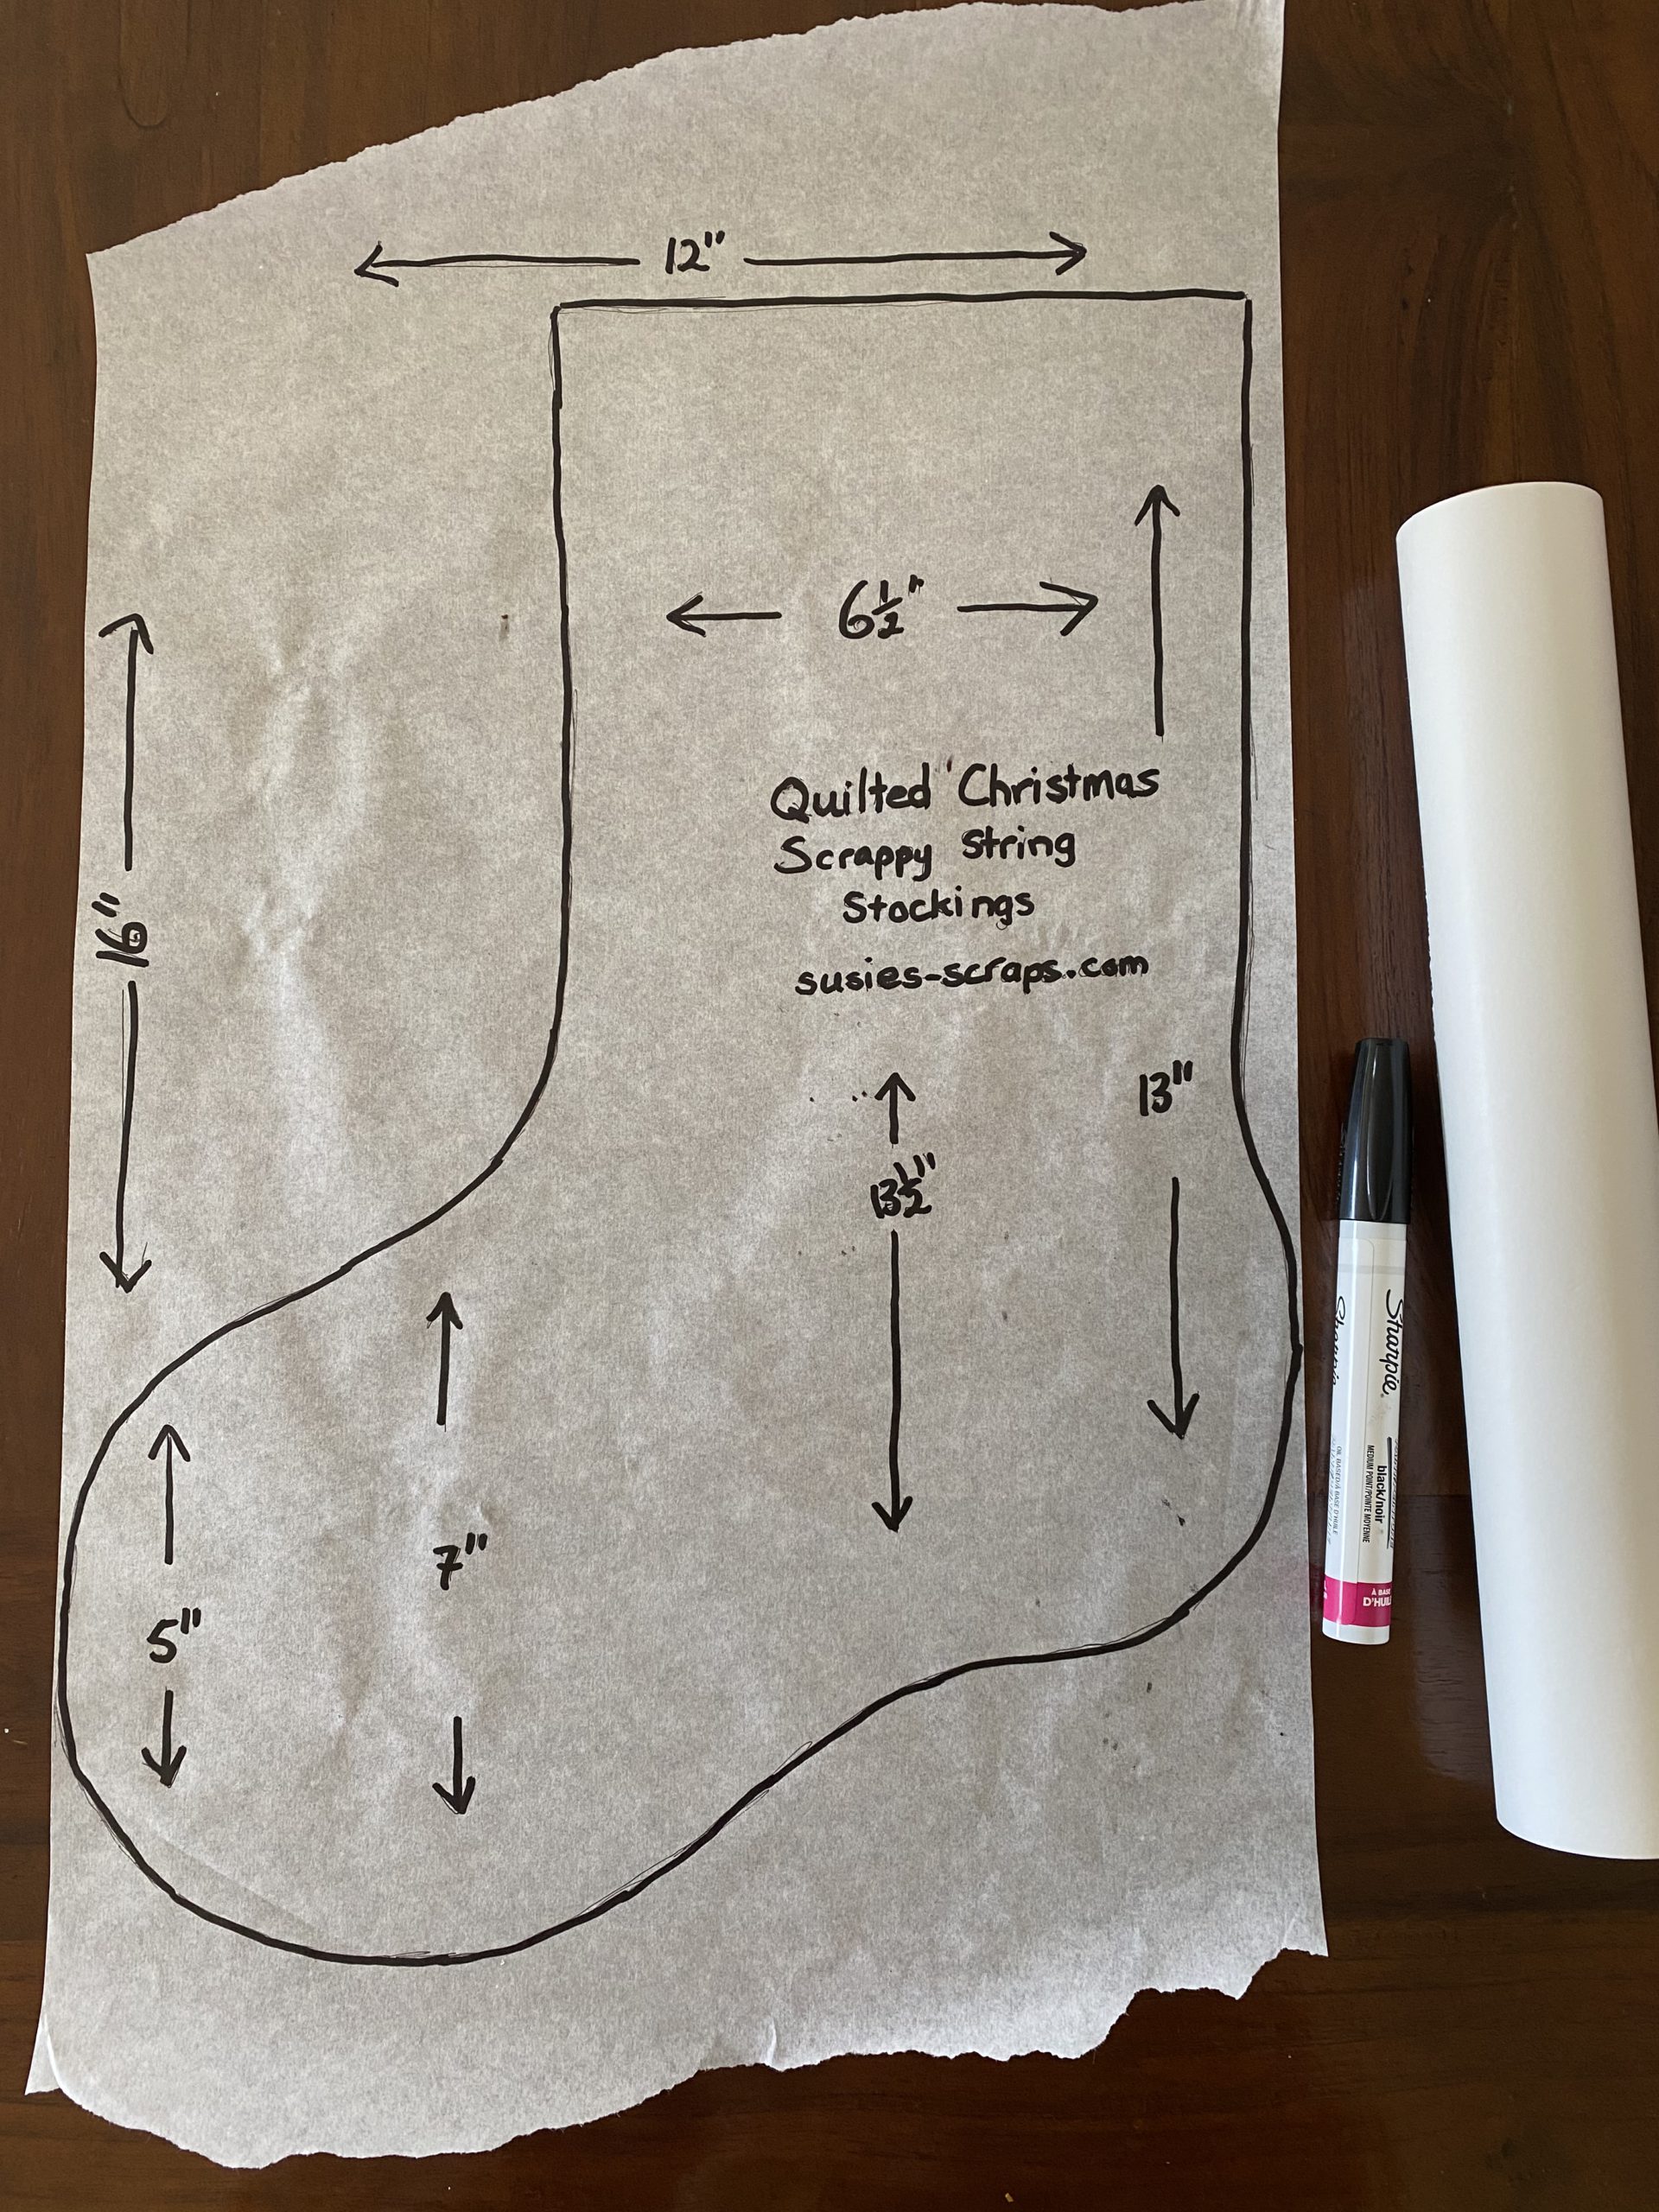
Draw the stocking shape onto the paper. Make an extra one if you are going to make two.

Cut out the stocking shape.

Quilted Christmas Scrappy String Stockings  susies-scraps.com
Quilted Christmas Scrappy String Stockings susies-scraps.com

If you do not wish to draw your own pattern or you prefer a different shape you could use some printable patterns such as these.

https://northpolechristmas.com/christmas-stocking-template.html

Making the Quilted Christmas Scrappy String Stockings

I am making two stockings at a time so that I always have something under my needle. Starting from the “ankle” area of the stocking pattern on the paper, lay across the first string right side up and the next string right side down on top of the first string. Use a small stitch length to sew a seam approximately 1/4”. Precision is not necessary. Open up the second string. Finger press. Keep adding strings to each side until the stocking is full. If desired use a light coloured and wider string for the cuff of the stocking. Turn over to the back side. Trim the strings to the edge of the paper pattern. Turn over and add one more thicker string obliquely across the heel area. You will see I have chosen red. Trim the edges off the diagonal piece. Carefully remove the papers from the back.

Quilted Christmas Scrappy String Stockings  susies-scraps.com
Quilted Christmas Scrappy String Stockings susies-scraps.com

Lay the string stocking on to of the batting. Lay the batting on top of one of the lining fabric. Quilt the stocking. I just stitched in the ditch of all the seams.

Once it is quilted, trim off the excess batting to the edge of the stocking.

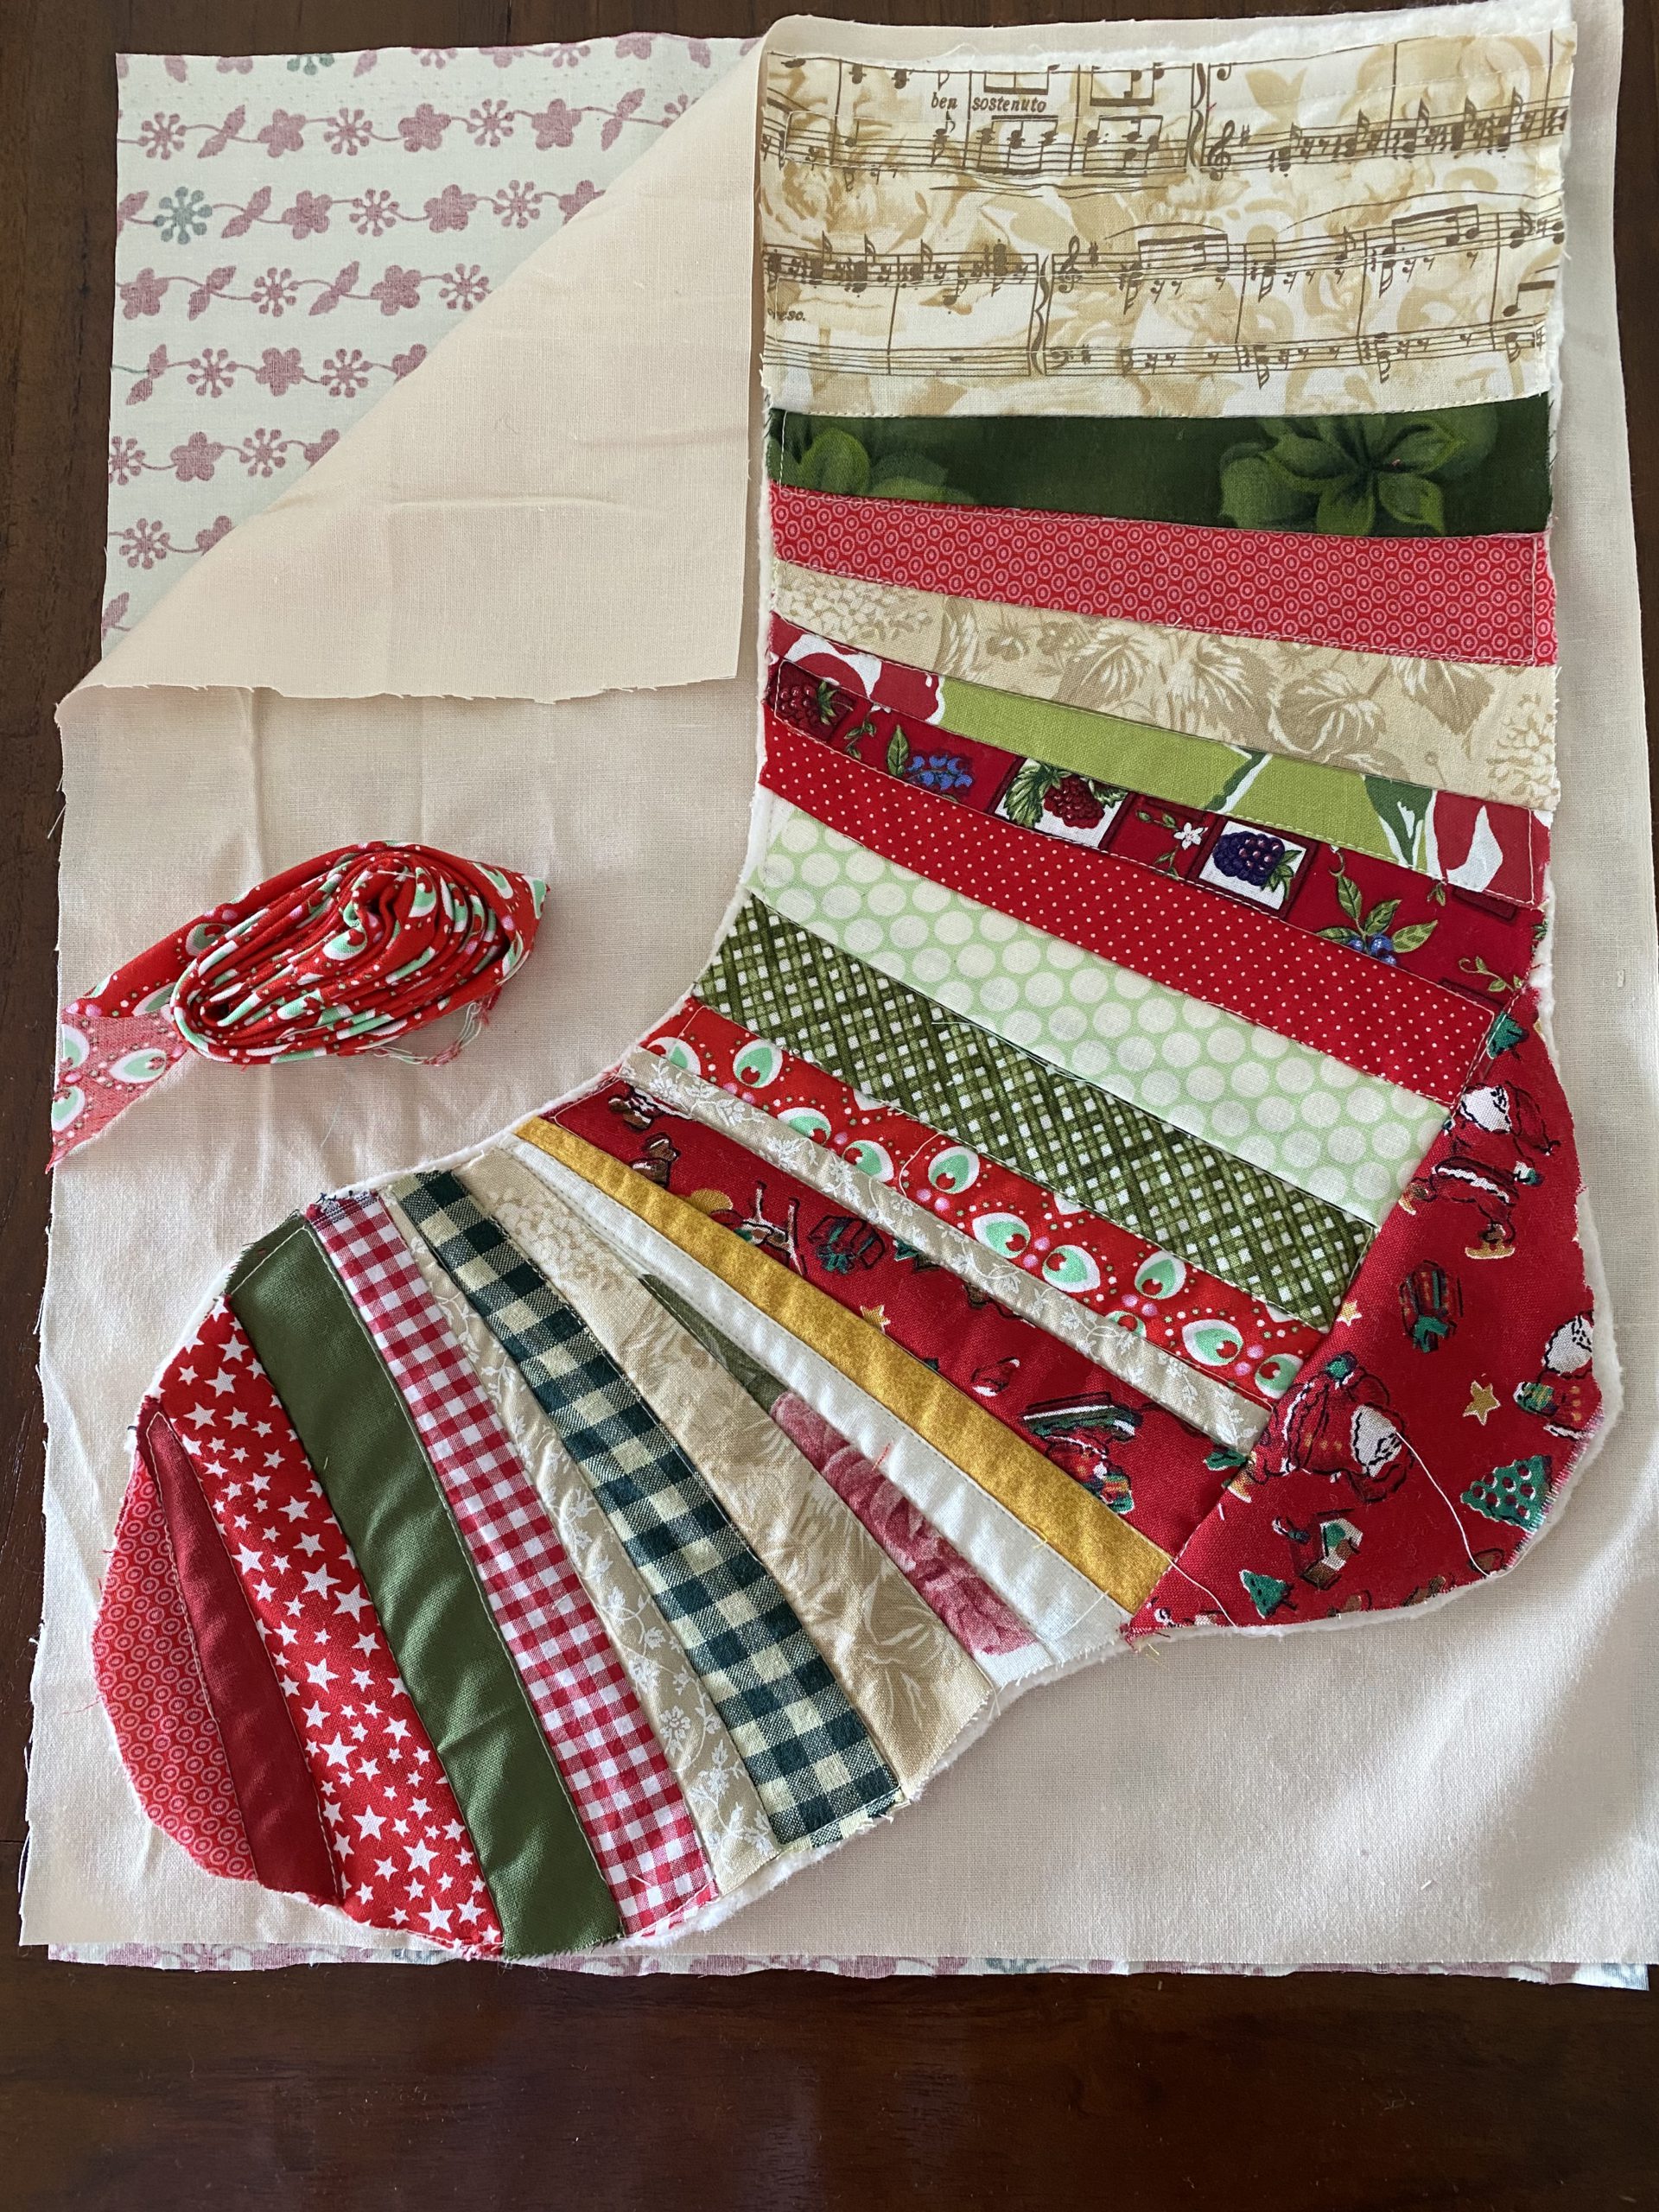
Prepare the back. Lay the 13” x 17” backing piece right side down. Lay the 13” x 17” lining piece on top of that. Now lay the stocking on top.

If you haven’t done so already, prepare your 2 yards/metres of binding strip. This must be cut across the diagonal of the fabric for best results as it will be going around curves.

Prepare binding strips for quilts – Tutorial

Quilted Christmas Scrappy String Stockings susies-scraps.com

Use the stocking as the pattern to cut out the back.

Quilted Christmas Scrappy String Stockings  susies-scraps.com
Quilted Christmas Scrappy String Stockings susies-scraps.com

Apply a strip of binding to the top of the stocking and the two backing pieces.

Quilted Christmas Scrappy String Stockings  susies-scraps.com
Quilted Christmas Scrappy String Stockings susies-scraps.com

Machine stitch in place.

Quilted Christmas Scrappy String Stockings  susies-scraps.com
Quilted Christmas Scrappy String Stockings susies-scraps.com

Turn the binding over to the other side and hand stitch in place. Put the stocking front on top of the stocking back. Starting at the top of the stocking stitch the two stocking pieces together leaving the bound tops open.

Quilted Christmas Scrappy String Stockings  susies-scraps.com
Quilted Christmas Scrappy String Stockings susies-scraps.com

Add the Binding

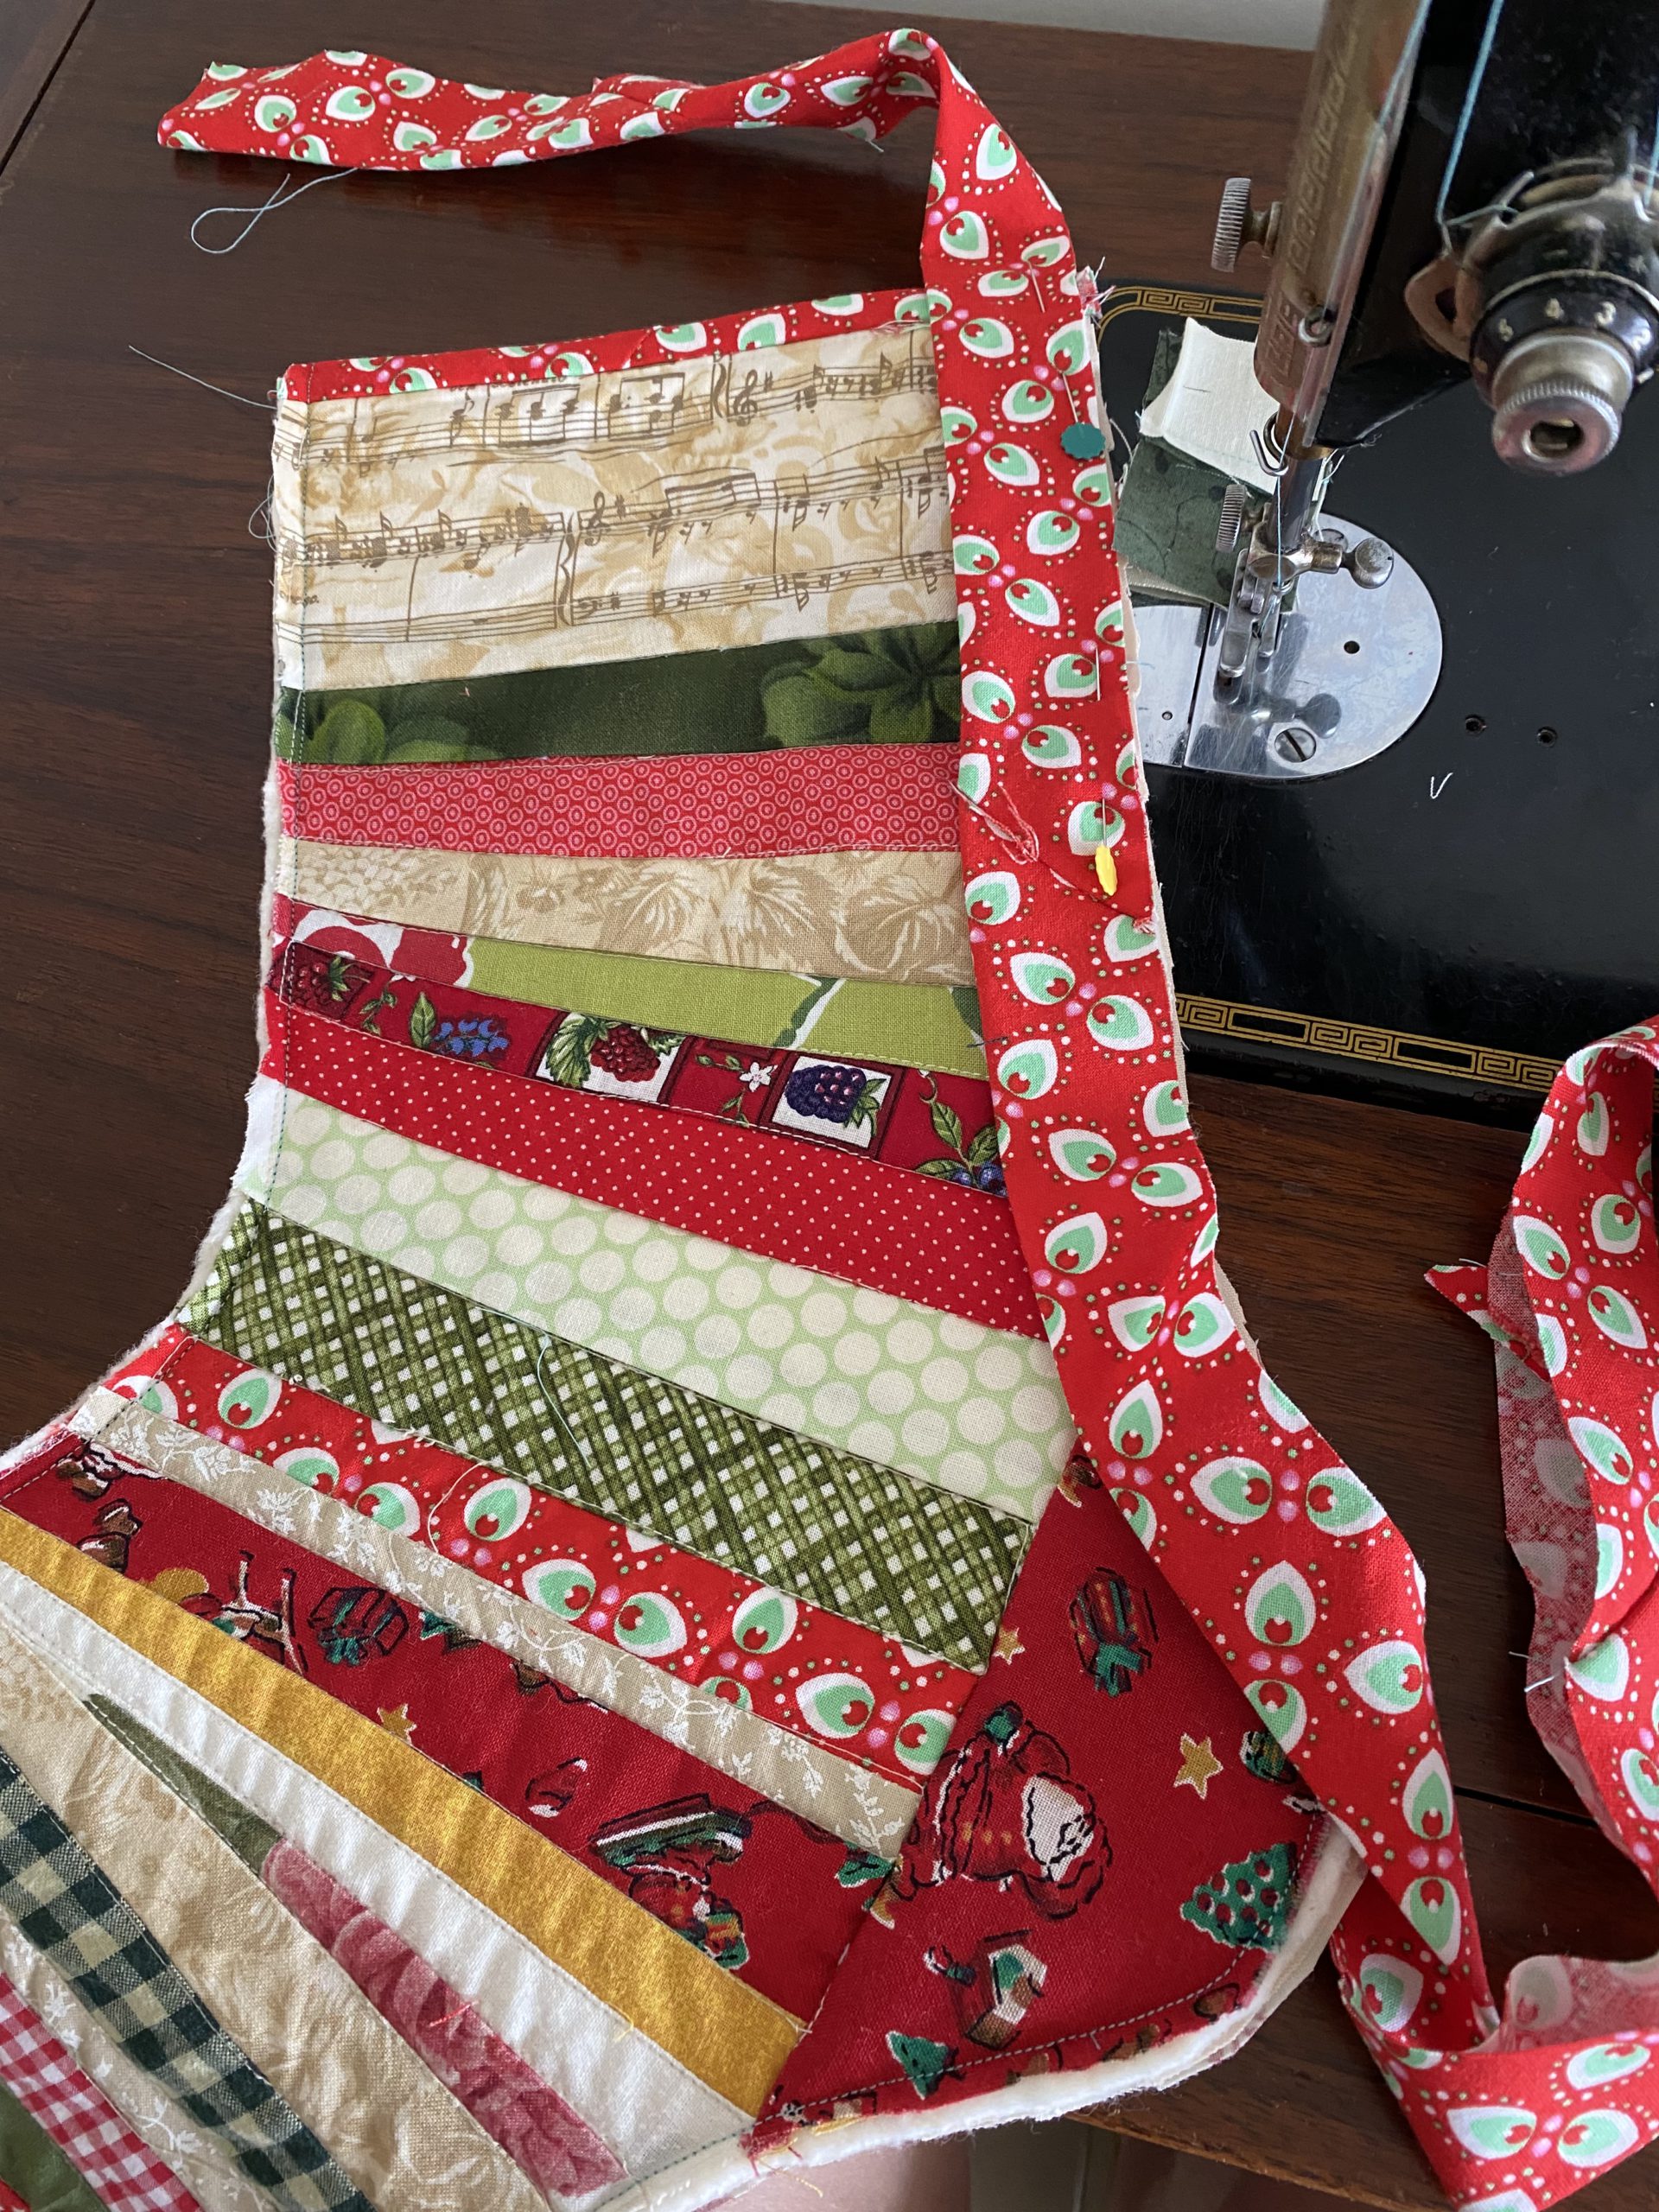
Beginning at the top right side of the stocking, leave a tail of binding approximately 8” in length. This will become the hook/handle.

Quilted Christmas Scrappy String Stockings  susies-scraps.com
Quilted Christmas Scrappy String Stockings susies-scraps.com

Stitch the binding all the way around the edge of the stocking. Leave a tail of about 3/4” on the other end to turn over and neaten the end. Turn over to the back and hand stich in place.

Quilted Christmas Scrappy String Stockings  susies-scraps.com
Quilted Christmas Scrappy String Stockings susies-scraps.com

Turn the tail in one third and then over to enclose the raw edges including the end. Hand stitch to finish.

Quilted Christmas Scrappy String Stockings  susies-scraps.com
Quilted Christmas Scrappy String Stockings susies-scraps.com

Stitch the tail end to the back of the top of the baking to make the hook.

Quilted Christmas Scrappy String Stockings  susies-scraps.com
Quilted Christmas Scrappy String Stockings susies-scraps.com

There is the Quilted Christmas Scrappy String Stocking.

Quilted Christmas Scrappy String Stockings susies-scraps.com

I made a little one as well just for fun. Same method but smaller.

These are for my two little Christmas Stars. Here is the latest arrival. He’s a little angel.

Quilted Christmas Scrappy String Stockings  susies-scraps.com
Quilted Christmas Scrappy String Stockings susies-scraps.com

To all my friends and readers, I hope you all have a very wonderful Christmas, wherever you are in the world and whatever you end up doing on the day. Whether you are with a crowd or a few or even if you are on your own, maybe there will be a chance to make a few stitches which always feels good.

If you enjoyed this post, you may also like

Hexagon Star Snowflake Trivet

Hot Packs Two Ways and Pattern

Floral Pyramid Doorstop

End of Day Quilters Clothes Hangers Tutorial

Merry Christmas.

Susie 2021.

What’s Cooking?…Cranberry and Pistachio Biscotti

Hello Dear Friends ans Readers, welcome to todays post and a delicious biscotti recipe.  Biscotti could be called antique biscuits.  They have been around for a long time in various forms.

Biscotti were originally made to keep for long periods and survive extended sea journeys. They are such a clever biscuit and are easy to bake.  No special equipment required to make them.  The ingredients are simple and no fat is used.  They are cooked twice.

Biscotti are still a very appealing biscuit, hundreds of years later. They  are delicious to have with a cup of tea or coffee.  Good for dunking as they are on the hard side.  Their shape and colours look great too.  Biscotti make a lovely gift because of their excellent keeping qualities and look wonderful packed in a glass jar or wrapped in cellophane, if there’s any left!  Christmas is also a great time to make them, especially with their green nuts and red cranberries!

This is how I do it.

Ingredients

3 large free range eggs
1 cup sugar
1 teaspoon vanilla bean paste or grated zest of one orange
2 cups of strong plain flour
1 teaspoon baking powder
100 g pistachios

100g dried cranberries

Method

Line a large tray with baking paper.  Set oven to 180 degrees celsius.  Put the eggs into a large mixing bowl.  Add the vanilla and whisk through.  Add the sugar and whisk until well combined.  Now add the flour, baking powder, pistachios and cranberries.  Use a wooden spoon or spatula and mix to combine well and ensure ingredients are evenly distributed.

Form the mixture into two logs on the baking tray.  Bake for about 20 minutes or until beginning to turn a little golden and firm to touch.

image

Remove from the oven and allow to cool.  If time allows, wrap in foil and allow to stand overnight.

The next day, use a sharp knife to slice the biscuits obliquely to about 7mm thick.  See the lovely colours.  Set the slices onto a baking sheet and bake at about 160 degrees for about 15 minutes or until the biscuits are slightly golden and firm and dry.

image

Remove from the oven.  Cool.  Store in an airtight container.  Makes about 40 biscotti.

image

This is one of my favourite biscuit recipes.  I think they are very classy and not too rich.  They have great keeping qualities but without compromising delicious taste.

Variation

Substitute 1 cup of raw almonds and 1 tsp almond essence for the pistachios and cranberries to make almond biscotti.

If you enjoyed this post, you may also like

What’s Cooking…? Anzac Biscuits

Diamond Stars Christmas Table Runner.

quilted christmas scrappy string stockings

What’s Cooking…? Fruit Cake

What’s Cooking…? Talking Turkey 2  Don’t Stuff the Buff

Enjoy your biscuits!

Susie