Tag Archives: Starmania Trip Around The World Quilt

Making a Mystery Quilt

Making a Mystery Quilt

Hello Dear Friends and Readers and a warm welcome to 2026! Happy New Year! It is probably obvious to say that I’m sure that we have all been busy in the lead up to, and over the Christmas period. I think it depends on how much we feel like we need or want to do too. It is easy to get over extended. I know… I’m guilty of that too. It is important to try to etch out some time for yourself too. No matter what that might be, and I believe that for many of us, sewing can really be a godsend, whether that is with company, or just finding those quiet moments to sew, relax and reflect. It is a good place to be.

Making a Mystery Quilt susies-scraps.com

Leading up to Christmas, one of my FB friends, Karen Sharp, asked me if I was going to do Bonnie Hunter’s Mystery Quilt??? To be honest, I have never considered it before, as I always have too many of my own unfinished projects and ideas to work on. However…this year, it did peak my interest, having been to Iceland less than 2 years ago and a few months ago I went to New Zealand, as I really wanted to see the Lupins there. And they were spectacular in the setting of all the glacial lakes over there.

Making a Mystery Quilt susies-scraps.com

So, with that in mind, and looking at my burgeoning desk scraps, and despite the fact that Christmas is so busy, I decided to take up the challenge. Could I keep up with the pace of the weekly posts? No, not entirely, but I gave it a good crack…Could I finish most of the top in the time allocated? I have made most of the parts except Part 7. Could I use up some scraps? Indeed I did, And I do feel motivated to clean up the rest of them now? Yes I do! Sometimes this is a problem. Quilting Patchwork Mojo! I really tried to use from my scraps. I only used a bit of yardage when absolutely necessary. I didn’t have a lot of purple, so I substituted some of it with blues. As you can see from my main photo, there is blue in the Lupins too!

Making a Mystery Quilt susies-scraps.com

At the same time, I have also been working on completing this quilt top Scrappy Diamonds Kaleidoscope Beauty Star Medallion Quilt – Part 3 My next post will deliver the next part of that quilt top.

So, getting back to the scraps, I thought, what have I got to lose, my scraps were looking very messy and frankly uninspiring, so I decided to make the Mystery. It is called Lupine and Laughter “A Quiltville Winter Mystery”

Making a Mystery Quilt susies-scraps.com

Today I thought I would show you what I have made so far, and let you know, if you haven’t already, that it is not too late for you to join in this mystery before it becomes one of her paid patterns. Head on over to Quiltville Blogspot for all the instructions.https://quiltville.blogspot.com/2026/01/lupine-laughter-mystery-part-seven.html

Today is the big reveal, so you can see what the whole quilt will look like!

I will warn you, there is a lot of sliver trimming as you can see from this photo!

Making a Mystery Quilt susies-scraps.com

I really have enjoyed the mystery, and in a way it did help me to take a little bit of time out and still have a sewing focus happening in the background of the Christmas rush. And my sewing space is regaining some order too!! That is a bonus.

Making a Mystery Quilt susies-scraps.com

I hope this post finds you well, and that you too can find some time to sew today.

Making a Mystery Quilt susies-scraps.com

Again, best wishes for the New Year, and if you enjoyed this post you many also like this post which is a pattern from a Brigitte Giblin, and Australian quilt maker.

Starmania Trip Around the World Quilt

All the best, and happy stitching.

Susie

© Susan Stuklis 2026

Making a Mystery Quilt susies-scraps.com

Starmania Trip Around the World Quilt

Starmania Trip Around the World Quilt

Hello Dear Friends and Readers and a warm welcome to today’s post. Today I’m sharing this big finish. I started this quilt four years ago after Ellie Milbank invited me to join in making this quilt designed by Brigitte Giblin. Starmania Trip Around The World quilt challenge. Brigitte Giblin is a French born Australian quilter living in Sydney.

Delighted by the invitation, I decided to buy the pattern and join the group which you can see on Facebook as well.

I did not buy any fabrics for this quilt. It’s entirely made of scraps from my stash so I had to challenge myself to choose fabrics and colours which would go together. I have to admit, at times it was a challenge because I ran just short of some of the fabrics. I had to piece some of the diamonds to make it work. It was all part of their fun.

It has occurred to me that making quilts is a bit like having children, in that they give you something to measure time by…..I wouldn’t have thought that it was more than four years ago that I began this quilt journey. Time flies.

The finished size of this quilt is pretty big at 84” x 84”. I needed to enlist the help of two big men to hold it up for the photo.

Starmania Trip Around the World Quilt susies-scraps.com

This quilt was entirely hand pieced, except for the binding which was added by a machine.

The corner pieces in the original design were just a fabric print, but I felt that it was lacking something, so I continued the triangles around the corner borders to finish the quilt top.

Starmania Trip Around the World Quilt susies-scraps.com

Once I finished hand piecing the top, it seemed logical to hand quilt it. During the past couple of years, I hand quilted the whole quilt outlining each diamond approximately a quarter inch from the seam lines. For hand quilting the corners, I decided to do a cross hatch pattern. It seemed the most logical as the background fabric of the corners was busy. The rest of the quilt is straight line quilting.

Here you can see the relief pattern of the quilting on the back.

Starmania Trip Around the World Quilt susies-scraps.com

Making this Starmania Trip Around the World quilt challenge was most enjoyable and also challenged me to use to use my scraps. I did not purchase any fabric for this quilt. Even the backing fabric.

Starmania Trip Around the World Quilt susies-scraps.com

When I say finished, that is not entirely true as I still need to complete the label and add a hanging

There is more information about this quilt and a link to the Brigitte Giblin site in the previous post. Starmania Trip Around The World quilt challenge

Thank you for visiting.

If you enjoyed this post, you may also like

All In Hand – Lessons In Hand Quilting

Simple Approach to Hand Quilting

Hand Quilting Scrappy Thousand Pyramids

Happy stitching,

Susie

© Susan Stuklis 2025

Diamond Star Quilt Block Made Easy

Diamond Star Quilt Block Made Easy

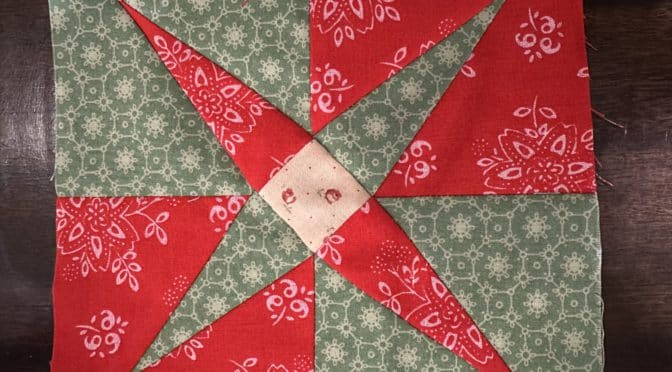
Hello Dear Friends, New Friends and Readers, welcome to todays post. Christmas is coming and I have a great block for you to enjoy! I had a lovely question from Mary who asked if I had a pattern which was like the Crossed Canoes block but with a solid centre and more like a star.

Well I went back to my post, Crossed Canoes Quilt Block Antique Inspired Made Easy

Well, at first I thought, nooo, this will be a bit trickier and need some hand piecing but that’s not the case. In fact this block will be easier to complete than the Crossed Canoes Block. Easy to cut. no templets or special equipment is required. And when I thought about it , this would also make an awesome patriotic quilt design too. So, what do you think, are you interested? If so come along on this quick block journey with me.

This is essentially a four patch type of block and also a Four Pointed Star Block.

As Christmas is rolling in soon, I am going with Christmas colours.

Block size approximately 8” x 8”.

All seams based on 1/4 inch.

Requirements for One Diamond Star Quilt Block Made Easy

2 of 5” x 5” red squares

2 of 5” x 5” green squares

1 of 1 3/4” x 1 3/4” cream squares

Diamond Star Quilt Block Made Easy susie’s-scraps.com

Marking the Squares for Cutting

Stack the 4 of 5” squares neatly and exactly on top of each other.

From the bottom right hand corner, make a small mark 1 1/2” exactly from the corner on each side. on the opposing left top corner make a mark 3/4” from the corner on each side.

Placing your quilting ruler on the diagonal between these two corners, make a mark 1 ½” from the bottom right hand corner.

Five marks in total. I used a permanent marker.

Cutting the Pieces for the Diamond Star Quilt Block Made Easy

Place the ruler between the top left corner and the bottom right mark. Cut along that line. do the same for the opposite mark to the corner.

Diamond Star Quilt Block Made Easy susie’s-scraps.com

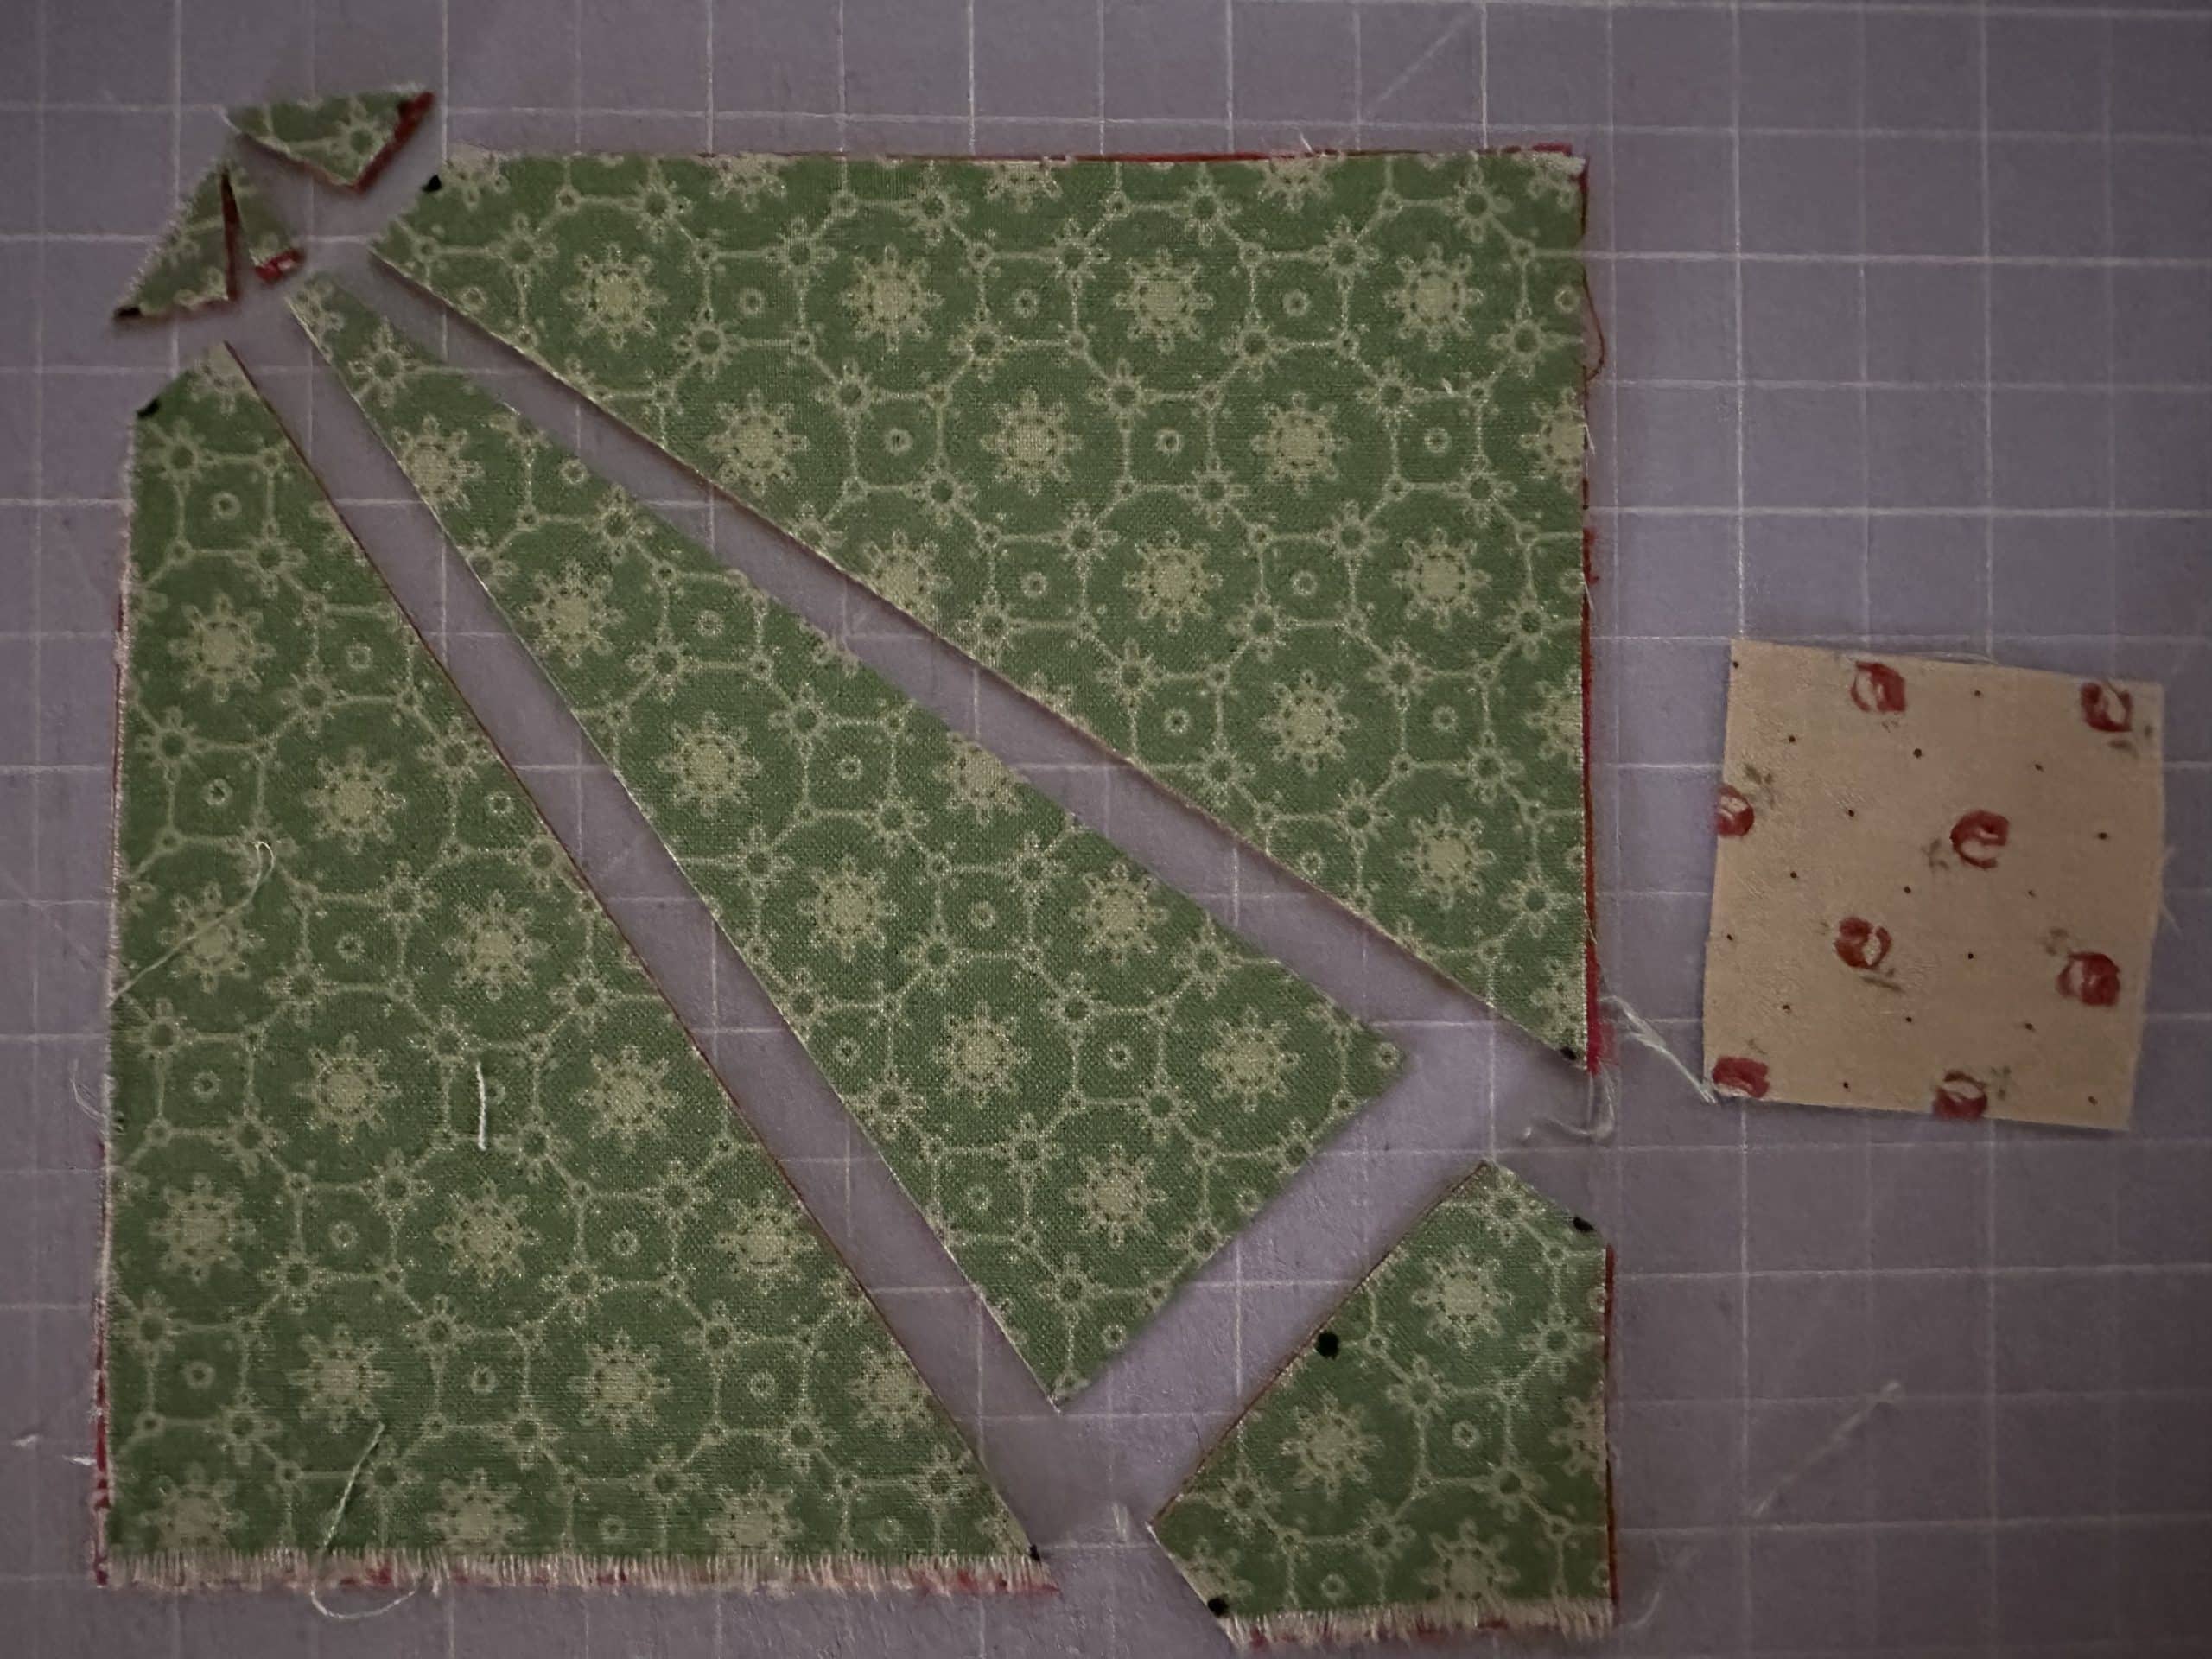
Keeping all the pieces in place cut across between the two left hand corner marks which are 3/4” away from the corner. Discard tose little pieces. Now move the pieces apart. Cut across the lower part of the centre piece at the marking which is 1 ½” from the base.

Diamond Star Quilt Block Made Easy susie’s-scraps.com

Remove the 4 bottom right corner pieces. replace with the single 1 3/4” square as pictured below.

Diamond Star Quilt Block Made Easy susie’s-scraps.com

Undo each stack of four pieces and interchange them around the centre square so that it resembles a four pointed star with the two colors opposing for each square of the block, as pictured below.

Diamond Star Quilt Block Made Easy susie’s-scraps.com

Constructing the Diamond Star Quilt Block Made Easy

With right sides together sew the centre seam of each of the four side triangle sets. each triangle set will have one red side, and one green side.

Diamond Star Quilt Block Made Easy susie’s-scraps.com

With right sides together carefully pin the the green centre star point to one side of a side triangle set. Note that the bottom right corner will slightly overhang the bottom of the two triangle set so that when it folds back it will be in line with the base of the two triangle set.

Sew the two red star points to the centre cream square. We will call this the red centre star point strip.

Diamond Star Quilt Block Made Easy susie’s-scraps.com

Tip

After sewing, fold back and finger press, the green centre star point. Note that the bottom of the star point lines up with the base of the triangle set. Use your rotary cutter and ruler or small scissors to remove the small excess fabric at the top of the star point where it joins to the side triangle set. I have marked this area with black texta or sharpie in the image below. Make sure to do this for one side of each of the star points to remove excess fabric from the corners of the block.

Diamond Star Quilt Block Made Easy susie’s-scraps.com

Attach the next side triangle set to the other side of the green star point. Finger press to open. Repeat for the two side triangle sets green star point on the opposite side, See image below.

Diamond Star Quilt Block Made Easy susie’s-scraps.com

Carefully pin the long red center square and two star points two to the green star point and side triangle sets, ensuring that the center square perfectly lines up with the green star point. These seams should nest around the center square. Remember to remove the little excess fabrics at the at the points.

Diamond Star Quilt Block Made Easy susie’s-scraps.com

Repeat to attach the other whole side of the block to the opposite side of the red centre star point strip. Make sure to pin carefully before sewing.

Diamond Star Quilt Block Made Easy susie’s-scraps.com

Open out the block and press to open fully. Here is how the completed diamond star block should look.

Diamond Star Quilt Block Made Easy susie’s-scraps.com

Thank you for joining me today for this Diamond Star Quilt Block Made Easy.

if you enjoyed this post, you may also like,

Stitching by the Pool – Six Pointed Stars Antique Inspired

The Arrowhead Quilt Block Made Easy

Scrappy Diamonds Blocks

Crazy Little Strings – Diamond Charms Quilt Block and Tutorial

Starmania Trip Around The World quilt challenge

Lone Star

Yankee Puzzle Block Made Easy.

Happy sewing,

Susie

© Susan Stuklis 2022

Stitching by the Pool – Six Pointed Stars Antique Inspired

Stitching by the Pool – Six Pointed Stars Antique Inspired

Hello hello Dear valued Friends and Readers. Welcome to today’s post. I just love stitching! I feel like it is such a privilege to have you all visit! My mission is to inspire you to make something today. And to use something you already have. Don’t go shopping. Go to your cupboard. Really. There will be something you can use. This project is done by hand stitching. Even if that is not your regular thing, I believe it is really lovely to have at least one hand stitching project in progress. Why you may ask? Well, for one thing, it is extremly relaxing, Hand stitching is a quiet and rather theraputic pursiut which also travels well, especially when it is small. I always try to take a hand stitching project with me on a holiday or if I have to be somewhere waiting. While We Wait Another advantage is, it lends itself to stitching shapes which may not be machine friendly.

Having said that, these stars could be machine pieced with a lot of care….

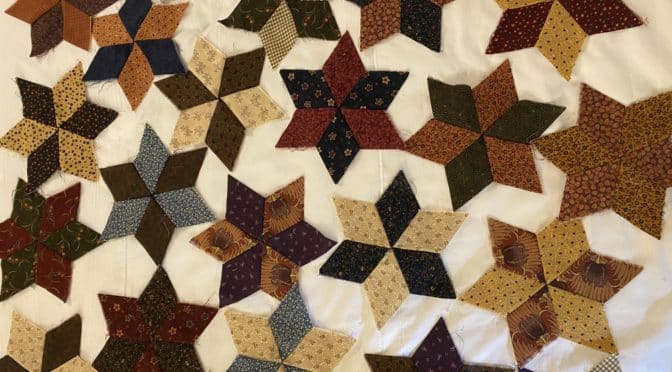
The inspiration was provided when my friend Ellie, sent me some of her beautiful scraps. Thank you Ellie! Amoungst them was some jelly roll strips which appear to be antique reproduction prints, at a guess. As I have always wanted to make some six pointed stars it seemed like a logical and obvious use for the strips. So, I cut some delicious diamonds and packed them nicely to take on holidays with me and escape the winter cold for a little while.

Requirements for the Six Pointed Stars Antique Inspired

Do you have some 2 1/2” strips lying around? Or……an “aging” jelly roll somewhere? These are easy to cut into diamonds for this Six Pointed Star Block – Antique Inspired.

Are you ready…the cutting is easy. Nothing special required. Just a cutting ruler with a 60 degree line on it and a rotary cutter.

Cutting the 2 1/2″ strips

It is important that the strips are accurate in their 2 1/2″ width. When I say that I am referring to 2 1/2″ width of fabric strips.

Lay out a strip on the cutting board. A few can be stacked if preferred. If you want to fussy cut – then stick with one at a time.

Make sure the strip/s are as straight as possible. Position the ruler with the 60 degree line aligned with the top edge of the strip. For the first cut make sure the ruler is near the beginning end of the strip. Make the first cut.

Stitching by the Pool – Six Pointed Stars Antique Inspired susies-scraps.com

Move the ruler so that it is 2 1/2″ from the first cut maintaining the 60 degree line at the top edge and the ruler edge is parallel with the first cut. I hope that makes sense.

Stitching by the Pool – Six Pointed Stars Antique Inspired susies-scraps.com

Continue cutting in the same way for the rest of the strip. At least six diamonds should be able to be cut from one width of fabric strip.

It certainly gives a feeling of accomplishment having a nice stack of diamonds ready for hand piecing.

Stitching by the Pool – Six Pointed Stars Antique Inspired susies-scraps.com

They can be packed into a nice little bag ready to take with you. I’m using this one. This Patchwork Celebtion Bag can be easily made from scraps. This is the smaller version.

Patchwork Celebration Bags – Antique Japanese Style – Tutorial

Stitching by the Pool – Six Pointed Stars Antique Inspired susies-scraps.com

Stitching the Six Pointed Star Antique Inspired

Now for the yummy stitching. Choose six diamonds three each of two different fabrics.

Stitching by the Pool – Six Pointed Stars Antique Inspired susies-scraps.com

Put two different diamonds right side together. Using a quarter inch seam allowance and beginning the seam approximately 1/4″ to 3/8” from the diamond end, use a small running stitch to hand stitch the seam along one side and finish with a couple of locking stitches 1/4″ from the end.

Stitching by the Pool – Six Pointed Stars Antique Inspired susies-scraps.com

Open the two and place the next diamond alternating the fabrics and taking care to match each new diamond with the previous one.

Stitching by the Pool – Six Pointed Stars Antique Inspired susies-scraps.com

Sew the remaining five seams in the same manner.

Stitching by the Pool – Six Pointed Stars Antique Inspired susies-scraps.com

Continue until the six diamonds are used and the star is complete.

Stitching by the Pool – Six Pointed Stars Antique Inspired susies-scraps.com

Actually quite simple.

These Six Pointed Stars stitch up surprisingly quickly!

Stitching by the Pool – Six Pointed Stars Antique Inspired susies-scraps.com

And indeed it is so relaxing. Stitching by the pool!

Stitching by the Pool – Six Pointed Stars Antique Inspired susies-scraps.com

Here is the link to part 2

Six Pointed Hexagon Stars Antique Inspired Part 2
If you enjoyed this post, you may also like

Hand Pieced Spool Blocks with Instructions

Starmania Trip Around The World quilt challenge

Holiday Stars Quilt and Pattern

Orange Peel Quilt with Charms – Journey so Far

Grandmother’s Flower Garden Quilt Like Grandma Used to Make

Hexagon Star Snowflake Trivet

Happy Hand Stitching,

Susie

© Susan Stuklis 2022

Starmania Trip Around The World quilt challenge

Starmania Trip Around The World Quilt Challenge

Hello Dear Friends and Readers,

I just can’t tell you how delighted I was, when my friend Ellie Millbank, invited me to join this Starmania TAW challenge, by Brigitte Giblin. A special thank you to you Ellie! I would encourage you to check out Ellie’s absolutely gorgeous hand pieced quilts too on FB or Instagram. I have really enjoyed this challenge. Brigitte Giblin is an Australian quilt maker, who is inspired to recreate antique quilt designs with her own beautiful style and a focus on handpiecing. I have to admit that I have also greatly admired the work of Nancy Horsefall too. Brigitte Giblin has recreated this wonderful crib quilt which is one of my favourites.

nancy-horsfall-s-baby-s-crib-quilt-pattern

I’m always creating my own designs, however, it is really lovely to participate in someone else’s challenge too. Today I’m sharing with you my quilt top and progress of this challenge. This is a hand piecing project. It is such a lovely gentle art to hand stitch a quilt or any other hand stitching, and evening time can be a nice opportunity to do this. Often it is easy to sit on the lounge at the end of the day with nothing in our hands. So even if you prefer to machine piece, this does not really cut into your time, if worked into a time where your hands might otherwise be idle.

Isn’t it amazing, when you think about it, how a whole quilt can be made by your hands with just one needle, a spool of thread, and the pieces of cut fabric. Because it is a Trip Around the World, you can choose and cut your fabric as you go. It doesn’t have to be done all at once. Also you can use fabrics and scraps, from your stash, which I would encourage, rather than buying new fabric. Actually, it is a good way to challenge yourself by choosing only from your stash.

This a wonderful antique style quilt. Quilts with similar construction styles have also been called Lone Star, Star of Bethlehem and Blazing Star to the best of my knowledge.

If you are interested in making this hand pieced project, you can visit her site. You will need to purchase the pattern.

brigitte-giblins-starmania-taw-challenge-ispy-templates

The quilt top begins with a centre octagon, so this is an opportunity to use a special piece of fabric, with a unique design and this may be the focus of the quilt and help you to choose the direction and colours of the quilt top. I’m pretty confident that whatever styles and colours your choose it will be a success. Here is how I started.

Starmania Trip Around The World Quilt

Auditioning some fabrics for the Starmania quilt beginning. I think once the centre fabric is chosen it makes it easier to proceed.

susies-scraps.com
Starmania Trip Around The World Quilt

Here are the first few rows. I just realised that when I started the top the weather was lovely and warm. so its been a slow construction for several months.

Starmania Trip Around The World Quilt

A few more rows and a bit more auditioning. I really like to use some checks or plaids in my quilts. For this quilt I decided to recycle one on my husbands shirts which was just the right colour and lightness that I wanted. You can see the start of that light green check. For more ideas on this subject see this post.

Get shirty

It may seem obvious, but the fabric requirements increase quite dramatically with the last several rows. I had to piece some of the diamonds as I had underestimated the amount of fabric required. But that’s okay.

Starmania Trip Around The World Quilt

It took me some time to figure out what to use for the last row. Eventually I settled on a solid pink. It complements the other fabrics I have used and I had a good amount of it. I didn’t want to be caught short at the end.

Starmania Trip Around The World Quilt

The last row in progress. Then it is time to do the corners. Brigitte Giblin picked a beautiful floral for her corners. As I too love florals, I decided to use one from my stash which I think picks up the colours in the fabrics I have already used. In hindsight, it may have been a brilliant idea to start with choosing the corner fabrics first, then working back to the beginning. ????

For my quilt, I decided to do a combination of piecing for the edges and a large piece of fabric for each corner. I felt like it needed some framing.

Auditioning the corner fabric.

susies-scraps.com
Starmania Trip Around the World Quilt
Starmania Trip Around the World Quilt susies-scraps.com

Then I pieced the edges for the corners.

susies-scraps.com
Starmania Trip Around the World Quilt
Pieced Corners for the Starmania Trip Around the World Quilt susies-scraps.com

I attached the corners to the previously auditioned corner print which picks up a lot of the colours already used in the quilt. That greeny yellow gives it a bit of spark.

Starmania Trip Around the World Quilt
Starmania Trip Around the World Quilt susies-scraps.com

There we have it. Probably about a year in the making but a lovely journey. I think I might try to hand quilt this one. It seems deserving.

A special thank you to Brigitte Giblin for the pattern and inspiration and to Ellie Millbank for the invitation. ????

If you are finding some joy from this hand pieced project, you may also like to visit this post.

Grandmother’s Flower Garden Quilt in Progress

For a small machine pieced lone star quilt, here is a link,

Matildas Star Quilt

If you like star quilts, you may also enjoy these posts.

Ohio Stars Part 3 – Sash It

Charm Square Stars “Anika’s Quilt” Free Pattern

If you want to make a really quick star quilt, then this may be for you.

“Star Baby” Quilt Tutorial

Hope you can do some sewing. Have a wonderful day.