
Great Granny Stars Quilt and Pattern
Hello Dear Friends and Readers and welcome to today’s post. Now that Christmas is pretty much behind us, it is nice to begin to get back to my current Great Granny Stars project which I have been working on. Before we start I will add that you really can use a lot of scraps up to make this quilt. If you are really really feeling dedicated you may even consider a scrappy binding too which would use even more!
For those of you who are regular visitors you may also notice that we have decided to get rid of all the advertisements on the site. In my personal opinion Google had made things way too … ahem. It looks so much better. 😊
If you have been following along with the Great Granny and Mini Granny blocks you may well enjoy the challenge of putting this very scrappy quilt together. Here we are on the final part of the Scrappy Great Granny Quilt revival to which we will add some stars to give it a bit of twinkle! I will add the links to all the blocks so that you can catch up if you missed out. Scrap Great Granny Squares Quilt Revival
All requirements for the quilt will be in this post.
All fabrics have been washed and lightly pressed before use.
All seams based on 1/4”
Finished size approximately 88 ½” x 104 ½”
Please read all instructions before commencing. Don’t forget to save all your triangle off cuts to join in with another quilt project later! 😉
Fabric Requirements for the Great Granny Stars Quilt
6 yards/metres (approximately) of scrap assorted print fabric
6 yards/metres of white homespun
1 yard/metre in your colour/print choice for the binding
Batting piece approximately 100” x 115”
Backing fabric approximately 110” x 120”
Cutting Instructions for the Great Granny Stars Quilt
From the assorted print fabrics cut:
1288 of 2 ½” x 2 ½” squares
and 210 of 1 ½” x 1 ½” squares
From the white homespun cut:
36 of 4” width of fabric strips. Subcut 106 of 4” x 12” strips for the Star Sashings and the border.
14 of 4 1/2” width of fabric strips. Subcut 108 of 4 ½” x 4 ½” ” squares. Cut each square once on each diagonal to reveal 432 setting triangles for the 36 Great Granny Square blocks.
9 of 3” width of fabric strips.
Subcut 72 of 3” x 3” squares. Cut each square once on the diagonal to reveal 144 corner triangles for the Great Granny Square Blocks.
Subcut an extra 46 of 3” x 3” squares cut once on each diagonal to make the setting triangles for the Mini Granny Square blocks
3 of 2” width of fabric strips. Subcut 92 of 2” x 2” squares, cut once on the diagonal to reveal 184 corner triangles for the Mini Granny Square blocks
Making the blocks for Great Granny Stars Quilt
Instructions for each of the parts of the Great Granny Stars Quilt are in these links.
Make 36 of the Great Granny Squares Blocks. Trim each block to 12” x 12” Scrap Great Granny Square Block Tutorial
Make 46 of the Scrap Mini Granny Square Quilt Blocks Scrap Mini Granny Square Quilt Blocks
Make 84 of the Scrappy Star Sashings blocks Scrappy Star Sashings
For the Border
Make 26 half sashing blocks using the 26 of 4” x 4” white homespun squares in the same manner as the Star Sashings using only 2 of the 2 ½” x 2 ½” of 52 of the remainder 2 ½” x 2 ½” assorted squares on one side of each square. Reserve 22 of the plain 4” x 12” white homespun sashing pieces to alternate with half sashing blocks and 4 of the Mini Granny’s for the final cornerstones.
Assembling the Great Granny Stars Quilt
Lay out the 36 of Scrap Great Granny Squares blocks in a 5 x 6 configuration leaving a 4” gap between each block.

Put a Scrap Mini Granny Square Quilt Block Scrap Mini Granny Square Quilt Blocks at the corner junction of each of the Scrap Great Granny Square Blocks Scrap Great Granny Square Block Tutorial and continue all around the perimeter at the gaps as shown below.

Lay out the Scrappy Star Sashings blocks Scrappy Star Sashings, so that they are lying next to each Scrap Great Granny Square Block. 7 rows of 6 for each direction.

For the Border Add a Half Star Sashing Square to the edge of each of the Mini Granny Blocks on the perimeter to complete the stars.. Put the four leftover Mini Granny Blocks in the last four corners as the cornerstones.

Put the remainder 22 plain white sashing pieces in between each Half Star Sashing square

Assemble the Great Granny Stars Quilt
Now that all the pieces are laid out, assemble the quilt in the same manner. I like to use a scaffolding method. Beginning from the top right hand corner beginning to sew the quilt pieces together by chain sewing the first two columns of pieces together, Do not clip apart. At the end of the column go back to the top and add the next column in the same manner. Continue until all the pices have been included.,

Here you can see how the chaining threads act as a scaffolding for the whole quilt.

Now turn the whole quilt and sew all the rows. It should be easy to achieve nice alignment because of the chaining threads.
TIP Use binding clips to easily support the weight of the quilt while sewing the rows together. Here is some further information about binding clips https://www.amazon.com.au/Purple-Angelduck-Binding-Quilting-Crafting/

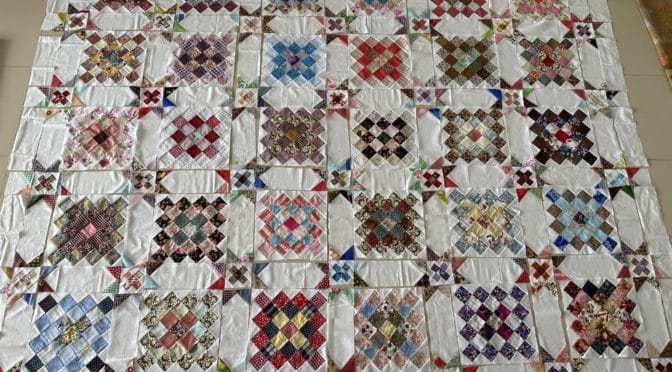
Here is the finished Great Granny Stars top ready to be quilted.

If you enjoyed this post, you may also like some of these other quilt patterns with stars.
Fettered Friendship Stars Quilt Pattern Bordered
Charm Square Stars “Anika’s Quilt” Free Pattern
and Holiday Stars Quilt and Pattern
and for those who like hand piecing Stitching by the Pool – Six Pointed Stars Antique Inspired
Happy stitching,
Susie
© Susan Stuklis 2023
This quilt inspires me. I have started making 12″ (fiished) Great Granny Squares blocks by Lori Holt’s method. And I made a 23″ x 28″ one (with 12 four and a half inch finished blocks) with the diamonds around the outside edge. Now I know what I can do with the 12″ blocks to make them be a little different. Great directions! Thank you.
I love this, thank you!
I loved reading this! Your sashing takes this quilt up to the next level!
Lovely – i followed the granny squares and have them ready now the mini squares to do – i had started to flag but now i have seen what a lovely finish = i am re-inspired to carry on thank you xx
Thanks Susie. You always create such wonderful pieces and are very generous in sharing your talent and ideas with us.
On another note, thank you for ‘getting rid’ of the ads. I do hope it is not a huge impost on and that the lack of revenue doesn’t impact too much. It is such a pleasure to be able to read a blog without constantly trying to get rid of the ads (usually quite unsuccessfully)
Well done you. I’m hoping some others may follow your lead.
What a phenomenal quilt top. I am a fairly new quilter and the stash of scraps is building up and needs to get used so I will be trying this pattern. At first glance it looked complicated to me but because I know from experience how well written your patterns are I do believe I can make this. Thank you for all you do and generously share with the quilting world. ❤️
You created a beautiful quilt. I rarely make a quilt and this would be too much work for me, but I do enjoy reading your blog posts and looking at the pretty pictures – thank you Susie 🙂
Hi Susie, I have just discovered your site via pinterest and am simply in awe of your work and your generosity in sharing it! Your quilts are beautiful and I will definitely be trying some of your great sounding recipes – thank you so very much for all of your work putting these together, your site is a breath of fresh air 😊
Wow! Excellent tutorial, photos and realistic progress on a beautiful quilt. Thank you for sharing, Susie!