Category Archives: Depression Era Quilts

Vintage Style String Me Along

Vintage Style String Me Along

Hello Dear Friends and Readers and a warm welcome to today’s post. I have spent about one month in Western Australia and that time has been amazing and so interesting. If you follow me on FB or Insta you can see some of the photos there.

Now I am black home and it’s good to be here. My sewing room has been calling and I must say it is somewhat of a mess and needing a good tidy up! I thought I would start with a box of scraps which was doing nothing. A collection of all sorts of odd shapes and different fabric lines, chucked into the box from various different projects over time. In order to make some room and be able to get back to some basic machine stitching, i decided to make some string blocks with this fabric.

Vintage Style String Me Along susies-scraps.com

I sorted out the pieces and cut them very roughly into odd strips. Better pieces of fabric I cut into strips and added to my pile which may be used for a log cabin in the future. Lessons in Log Cabin Blocks It didn’t take that long and can be way more fun than hauling yardage. The piles of strips look very nice and my pile of rough strings gave a sense of achievement. As always, there is more fabric than anticipated and I’m pretty sure I can create at the very least, a baby quilt or a lap quilt.

In the pile I also have two old thin pillow coverings, so I cut them up to use as the foundation for the string blocks. My vision is a vintage style looking quilt which is homey and full of delightful strings. Depression era quilts were sometimes made of strings of fabric in this manner in order to use what was already available and then recycled into a quilt top. This lead to some very pretty quilts with a lovey mixture of fabrics. They often used the fabric feedsack bags to make clothing and quilts. It is a great look. The way the blocks will be positioned will give plenty of interest.

Begining by placing a string in the centre of the foundation block on the diagonal, making sure that it overhangs the edges. Cover with another string, right sides down lining up the sewing edges as much as possible. Sew, making at least a 1/4” seam. Make two blocks at a time so that it keeps the flow going and doesn’t use as much thread. Press the fabric strip open. I use a wooden thing or finger press well before adding the next strip. I even used up old bobbin thread which is actually great because now my bobbins are cleaned up as well!

Vintage Style String Me Along susies-scraps.com

This is how it looks from the back before trimming. It may look a little distorted because the foundry=tion was very thin however that will not matter once the block is trimmed.

I remember PJ from Quilting time in Dixie saying that she used old thin sheets for the foundation blocks and that seemed like an excellent idea to me.

In order to keep this as simple as possible I used my regular 6” ruler to cut the fabric into 6” x 6” squares to use for the foundations. This made it very easy to trim the blocks after pressing. this is how it looks from the front before trimming.

Vintage Style String Me Along susies-scraps.com

I used my trusty old treadle to make these blocks. Having been out of use for a while she responded to a good oiling. That is one of the advantages of this machine. The maintenance is easy, just give a good oiling! Treadle Tinkering

Vintage Style String Me Along susies-scraps.com

I plan to put the blocks together like this. I really like the pattern and it looks good from every side. I hope you can feel inspired dot make some string blocks. Loads of fun. It doesn’t require over thinking which means that it progresses very quickly.

Vintage Style String Me Along susies-scraps.com

If you enjoyed this post, you may also like these other string projects.

Any String Goes – Pineapple Improvisational String Quilt Blocks

String Pot Holders or Trivets for Christmas

quilted christmas scrappy string stockings

Crazy Little Strings – Diamond Charms Quilt Block and Tutorial

Pink Strings Table Mat

String Feeder QAYG Bib

“End of Day” Quilters Basket – Free Tutorial

Thank you for joining me today and as always I wish you happpy stitching.

All the best, Susie.

© Susan Stuklis 2026

Postage Stamp Scrappy Irish Chain Quilt Top

Postage Stamp Scrappy Irish Chain Quilt Top

Hello Dear Friends and Readers, and a warm welcome to today’s post. This is a post, I have been working on for a long time. It is a great way to use all kinds of scraps. This quilt top is made from small squares, which, when incorporated together look good, despite their many differences.

Today I am sharing a kind of scrappy Irish chain variation made with postage stamps blocks.

By collecting up all the small pieces of fabric and cutting them to a size that will actually become something beautiful down the track. Cut Up Your Quilting Off-cuts and Obsession with Pre Cuts / Make Your Own

As a project is completed, cutting the leftovers into useable strips or squares means they are ready to use when the need arises!

Postage Stamp Scrappy Irish Chain Quilt Top susies-scraps.com

Today’s quilt has been put together by using two different blocks and alternating them. The challenge with the postage stamp blocks is to try to make them as even as possible, and with the points being as sharp as possible. I have to admit that I began making these blocks a long time ago, My seam allowance in the beginning was really too small. At this stage have decided to accept the fact that my blocks are a little bit uneven. I am putting it down to a learning curve, from which I believe I have progressed in that time. Sometimes finished is better than perfect. I did become waylaid with this project because I ran out of the background fabric hand despite looking around I could not really find a perfect match, so, with those imperfections in mind, I believe it’s better not to dwell on it any longer, and to complete the project. Despite that, it’s still a pretty quilt top, I am sure you will agree, and learning from the journey is good.

I have mentioned it before, but one thing which I believe I have done correctly, is to pre-wash all these fabrics so that when the finished quilt finally is washed, there won’t be too much shrinkage in the fabrics, given they are all so different.

I understand it is a personal choice. To Wash or Not to Wash?….This is the Question

Finished quilt top size 81 ½” x 63 ½”

Requirements for Making the Postage Stamp, Irish Chain Quilt Top

32 of postage stamp blocks 36 Patch Postage Stamp Blocks Tutorial

31 of Around the Garden in Scraps Blocks Around the Garden – In Scraps – Block

This quilt top could be made in any size you like, using the same approach whether it was a cot, single, double queen or king size, depending on how many scraps you would like to use.

Postage Stamp Scrappy Irish Chain Quilt Top susies-scraps.com

Making the Postage Stamp Scrappy Irish Chain Quilt Top

Beginning with a Postage stamp Block, attach an Around the Garden in Scraps Block. Next row, Begin with an Around the Garden In Scraps Block and attach a 36 Patch Postage Stamp Block.

Repeat until this pattern has been repeated for a total of 9 rows. Begin the next row alternating the blocks as before so that the quilt top will be in a 9 x 7 configuration.

Postage Stamp Scrappy Irish Chain Quilt Top susies-scraps.com

I call this scaffolding a quilt top. Please use the same method as making the 36 Patch Postage Stamp Blocks Tutorial.

This makes it very easy to put the quilt top together.

TIP

Use binding clips on the edges of the first row set to keep the blocksin order and prevent twisting.

Postage Stamp Scrappy Irish Chain Quilt Top susies-scraps.com

Thank you for joining me for the is fun use of scraps. If you enjoyed this post, you may also like

36 Patch Table Mat

And this great scrappy quilt block Arkansas Cross Road Quilt Block Tutorial

Scrappy Jacob’s Ladder Quilt Reimagined

Happy stitching,

Susie

© Susan Stuklis 2026
Quickstep Two Four Six Eight Block

Quickstep Two Four Six Eight Block

Hello dear Friends and Readers and welcome to today’s post. Today I would like to share with you a simple block which will use your scraps and is super easy to prepare for.

This block it’s called Courthouse Steps. It’s one of my favourites. I have seen gorgeous antique examples of this quilt block which are so inspiring. It. will use any scraps and you will be able to quickly incorporate them into a quilt or table or bed runner. Whatever is your choice, no matter what the scraps.

I have designed this block so that all of the cutting will be very simple and the only thing you will need decide, is whether your fabric is light or dark.

Alternatively, you could be choosing a more specific colour way or it can be super scrappy to use up things you already have. Scrappy is my goal on this occasion.

I have noticed over the years that sometimes with Log Cabin and Courthouse Steps there can be a lot of different sizes of lengths of fabric to measure and cut which means it can be quite confusing. However, this block is incorporating minimal and very definite lengths which are easy to cut and that’s why I have called it the Quickstep Two Four Six Eight Block, because, these are the simple measurements that you will require to make this block. and it is so easy to remember!

Let’s get to it!

Block size 8″ x 8″

Seam allowance one quarter inch 1/4″

Requirements for the Quickstep Two Four Six Eight Block

Centre squares 2″ x 2″

Cut All Strips to 1 1/2″ width.

Light strips – two each of 2″ 4″ and 6″ lengths

Dark strips – two each of 4″ 6″ and 8″ lengths

Quickstep Two Four Six Eight Block susies-scraps.com

Making the Quickstep Two Four Six Eight Block

This is a good time to check your seam allowance.

If your strips are cut correctly and your seam allow is consistent at 1/4 inch your blocks will turn out very well. This saves needing to trim the blocks too much or even not at all!

To your 2″ Centre Square sew the 2″ x 1 1/2″ light strips to two opposite sides of the centre Square. This is a good opportunity to chain piece.

Quickstep Two Four Six Eight Block susies-scraps.com

Finger or roller press the seam away from the Centre Square.

To the two other sides sew the two 4″ dark strips

Quickstep Two Four Six Eight Block susies-scraps.com

Turn the block and sew the two 4″ light strips to the block.

The light strips should be stacked on each other and the dark strips should be stacked on each other..

Finger press as before, turn the block and now stitch the two 6″ dark strips to the dark side strips.

Quickstep Two Four Six Eight Block susies-scraps.com

Turn the block and sew the 6″ light strips to the sides.

Quickstep Two Four Six Eight Block susies-scraps.com

Finger press the seams and now add the two final 8″ darker strips to the dark side of the block. That’s it! Your block should be 8″ x 8″. Now a nice pressing with the iron and you’ll have a lovely block.

Quickstep Two Four Six Eight Block susies-scraps.com

To put the blocks together, alternate the dark to light sides of the blocks as pictured here. Or you can stack them in the same direction which is what I think I will do.

Quickstep Two Four Six Eight Block susies-scraps.com

Happy stitching!

If you enjoyed this post, you may also like these related posts.

Lessons in Log Cabin Blocks

Weekend Scrappy Half Log Cabin Quilt -Vintage Inspired

Log Cabin Variation – Scrappy Housetop Log Cabin Block Tutorial

Baby Steps Quilt

© Susan Stuklis 2024

Hexagons from Circles

Hexagons from Circles

Hello Dear Friends and Readers and a warm welcome to today’s post. Recently, I had the loveliest email from a lady named Janet, who said she is 88, still quilting and loving it. She told me that she always makes her hexagons from circles. I found this very inspiring and so I thought I would follow advice from a very experienced and expert quilter and give it a try. Thank you Janet!

Maybe you are familiar with this process and although I do remember seeing it years ago, I have never used this method before and I am excited to give it a try today.

This lady said her hexies turned out perfect every time. That is an excellent recomendation! The only issue I guess, is working out the size of the circle to calculate the size of the finished hexagon.

Remembering that the hexagons are measured by the length of the side of the hexagon.

Requirements – Making Hexagons from Circles

This project will not cost you anything extra and you can recycle some things you have at home. Basic tools only are required. These are scissors for fabric and some all purpose scissors for cutting the templates, a pencil or marker, a needle and thread and your fabric scraps of course. No need to run to the shops! You can get started right away. Don’t you just love that? When inspiration strikes there is no delay!

By the way, I find this to be very gentle on the hands. No awkward cutting with rulers and rotary cutters.

Making template circles, will be my guide for cutting the fabric circles. I can honestly say this seems like a brilliant idea to me because once all the circles are marked, that can be a very nice evening project of cutting out the marked fabric circles. Also, if one was inclined to fussy cut, it would be very easy to mark circles over the right side of the fabric using a clear plastic template.

Just as an aside, In my honest opinion, cutting out actual hexagons is a bit of a pain. I have tried it and it was very time consuming. Then there is the traditional method of English Paper Piecing. I made my first ones like this Hexagons Charming Free and Easy. However paper templates are still required and it does make for quite a few extra steps.

I will use a whole lot of scraps and mark circles on them, just as you would if you were cutting out dough for scones or biscuits.

Very little thread is required to make each hexagon.

Making Templates for Hexagon Circles

I decided to make a test group of templates so that I could wok out the sizes of the circles required. In the first instance I gathered some lids and small containers to use to make the templates. I used an empty cardboard pasta box and an empty clear plastic bottle to make some experimental templates. Empty plastic milk bottles would be good too. If you wanted a non slip template you could use sandpaper sheets. Janet uses a CD as her template which is brilliant as it’s a perfect circle and easily replaceable.

Here is my collection so far.

Hexagons from Circles susies-scraps.com

I drew around the various size lids onto the cardboard and plastic circles and cut them out with all purpose scissors and measured them.

Cutting the Fabric Circles for Hexagons

Now it is a matter of using the templates of your choice to mark the fabric circles.

Lay the template on your fabric. use a pen or pencil to draw around the circle. Use small fabric scissors to cut out the circle. I cut several at a time.

Use a clear template if you wish to fussy cut. Here you can see the various template circles I made and the resulting hexagons.

Hexagons from Circles susies-scraps.com

Stitching the Hexagons from Circles

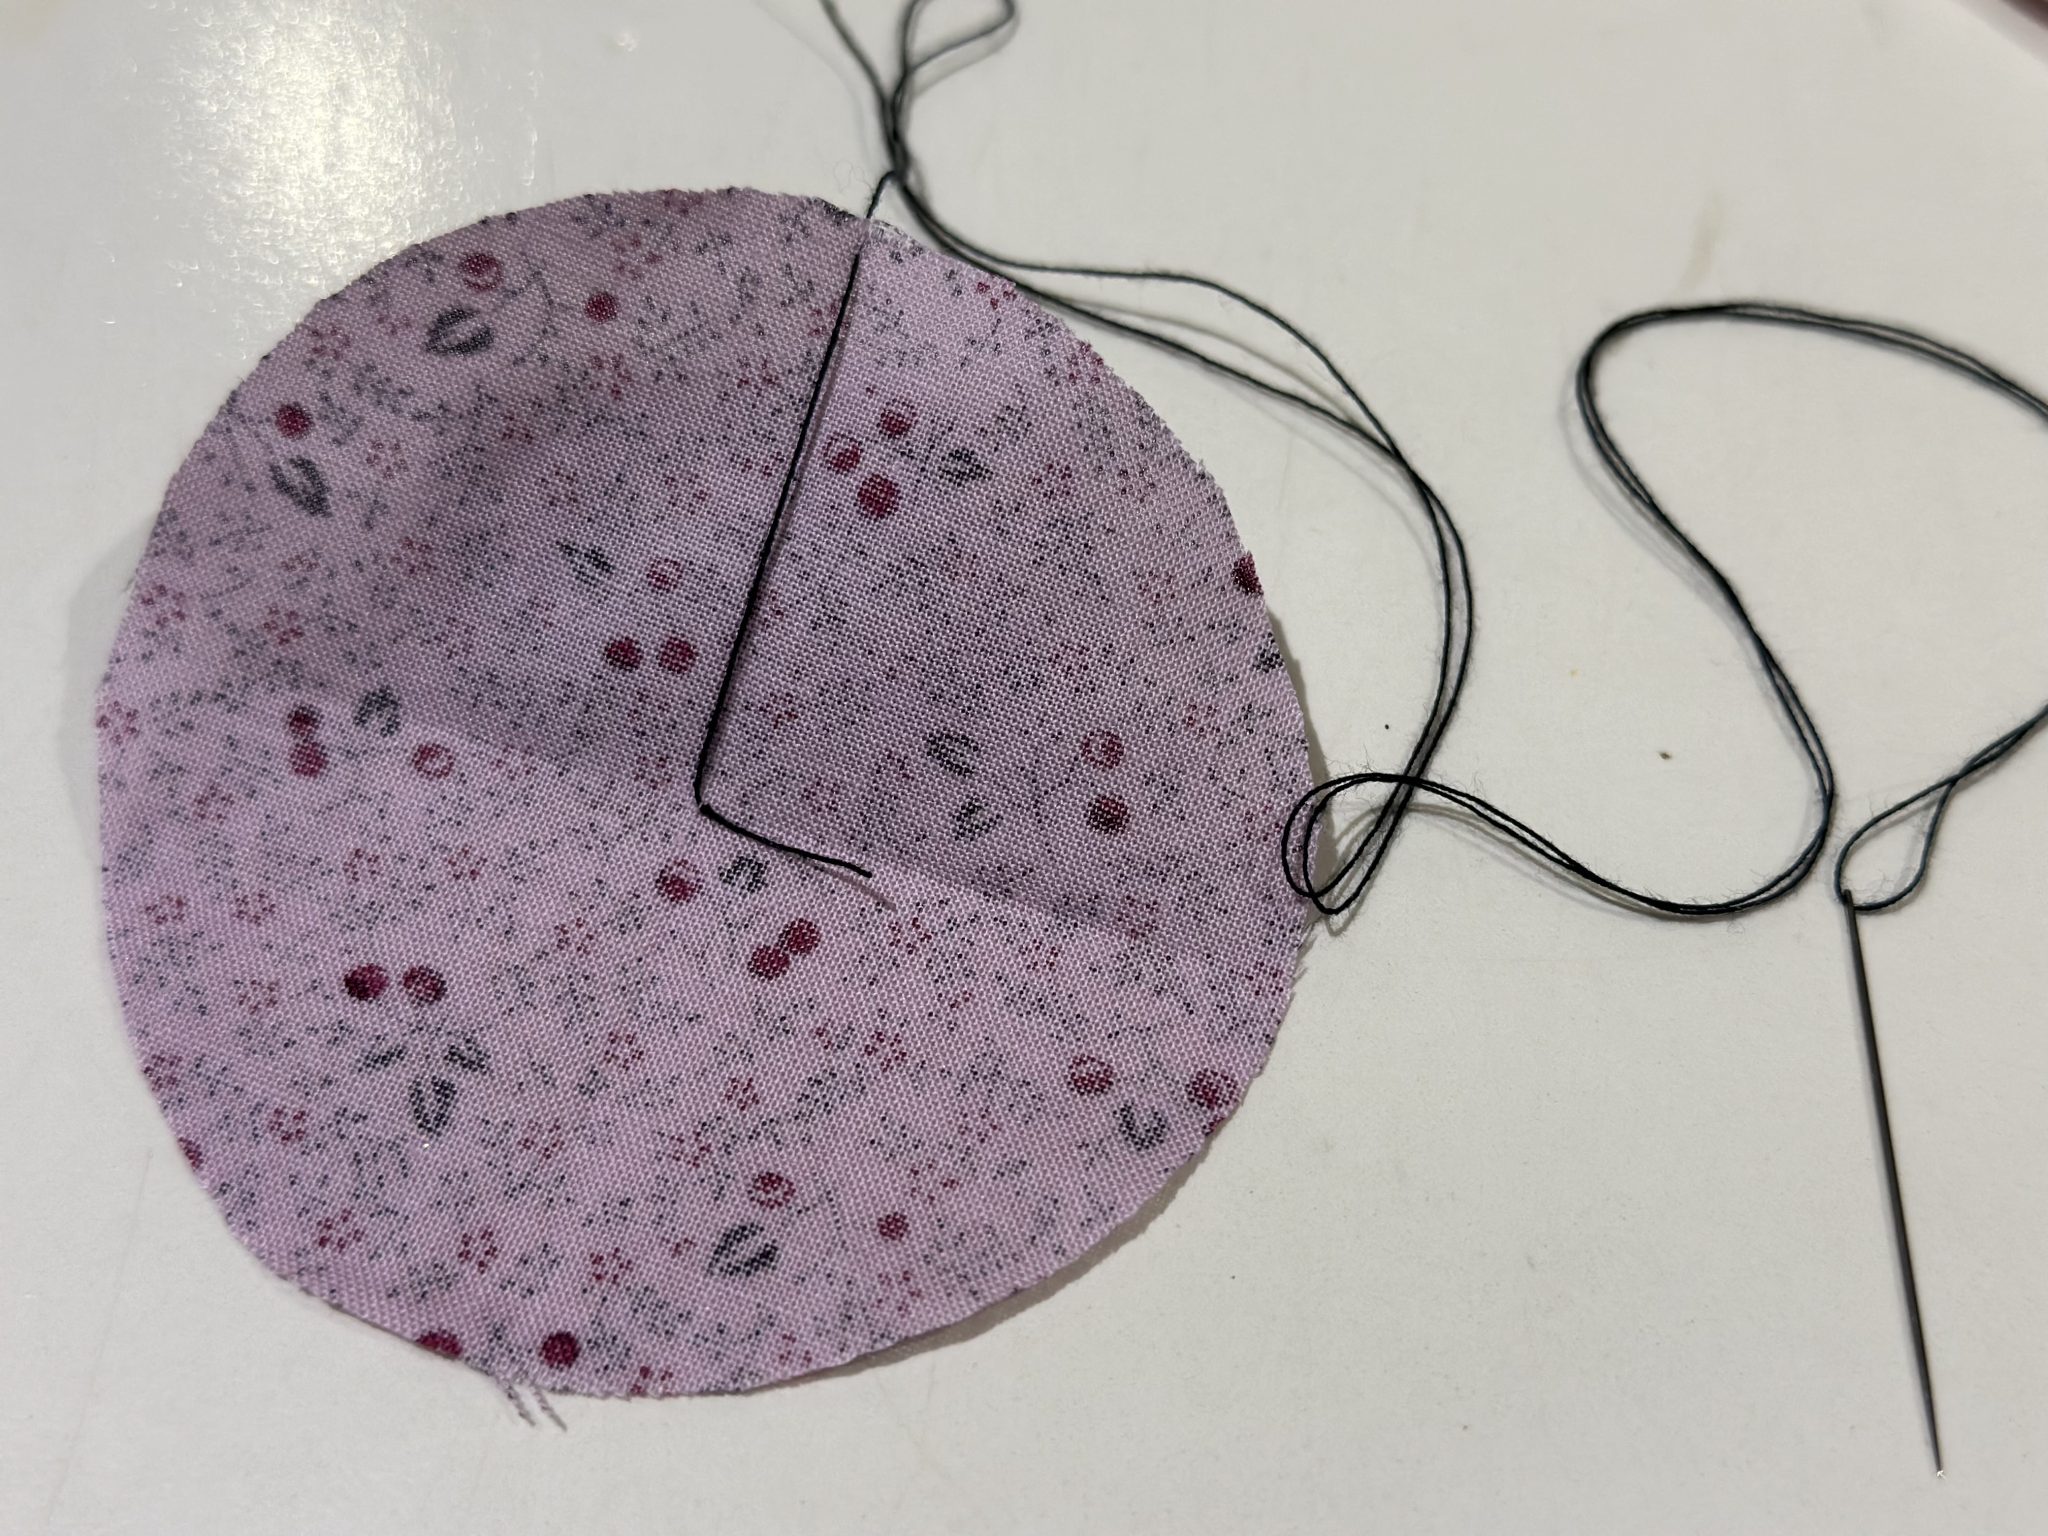
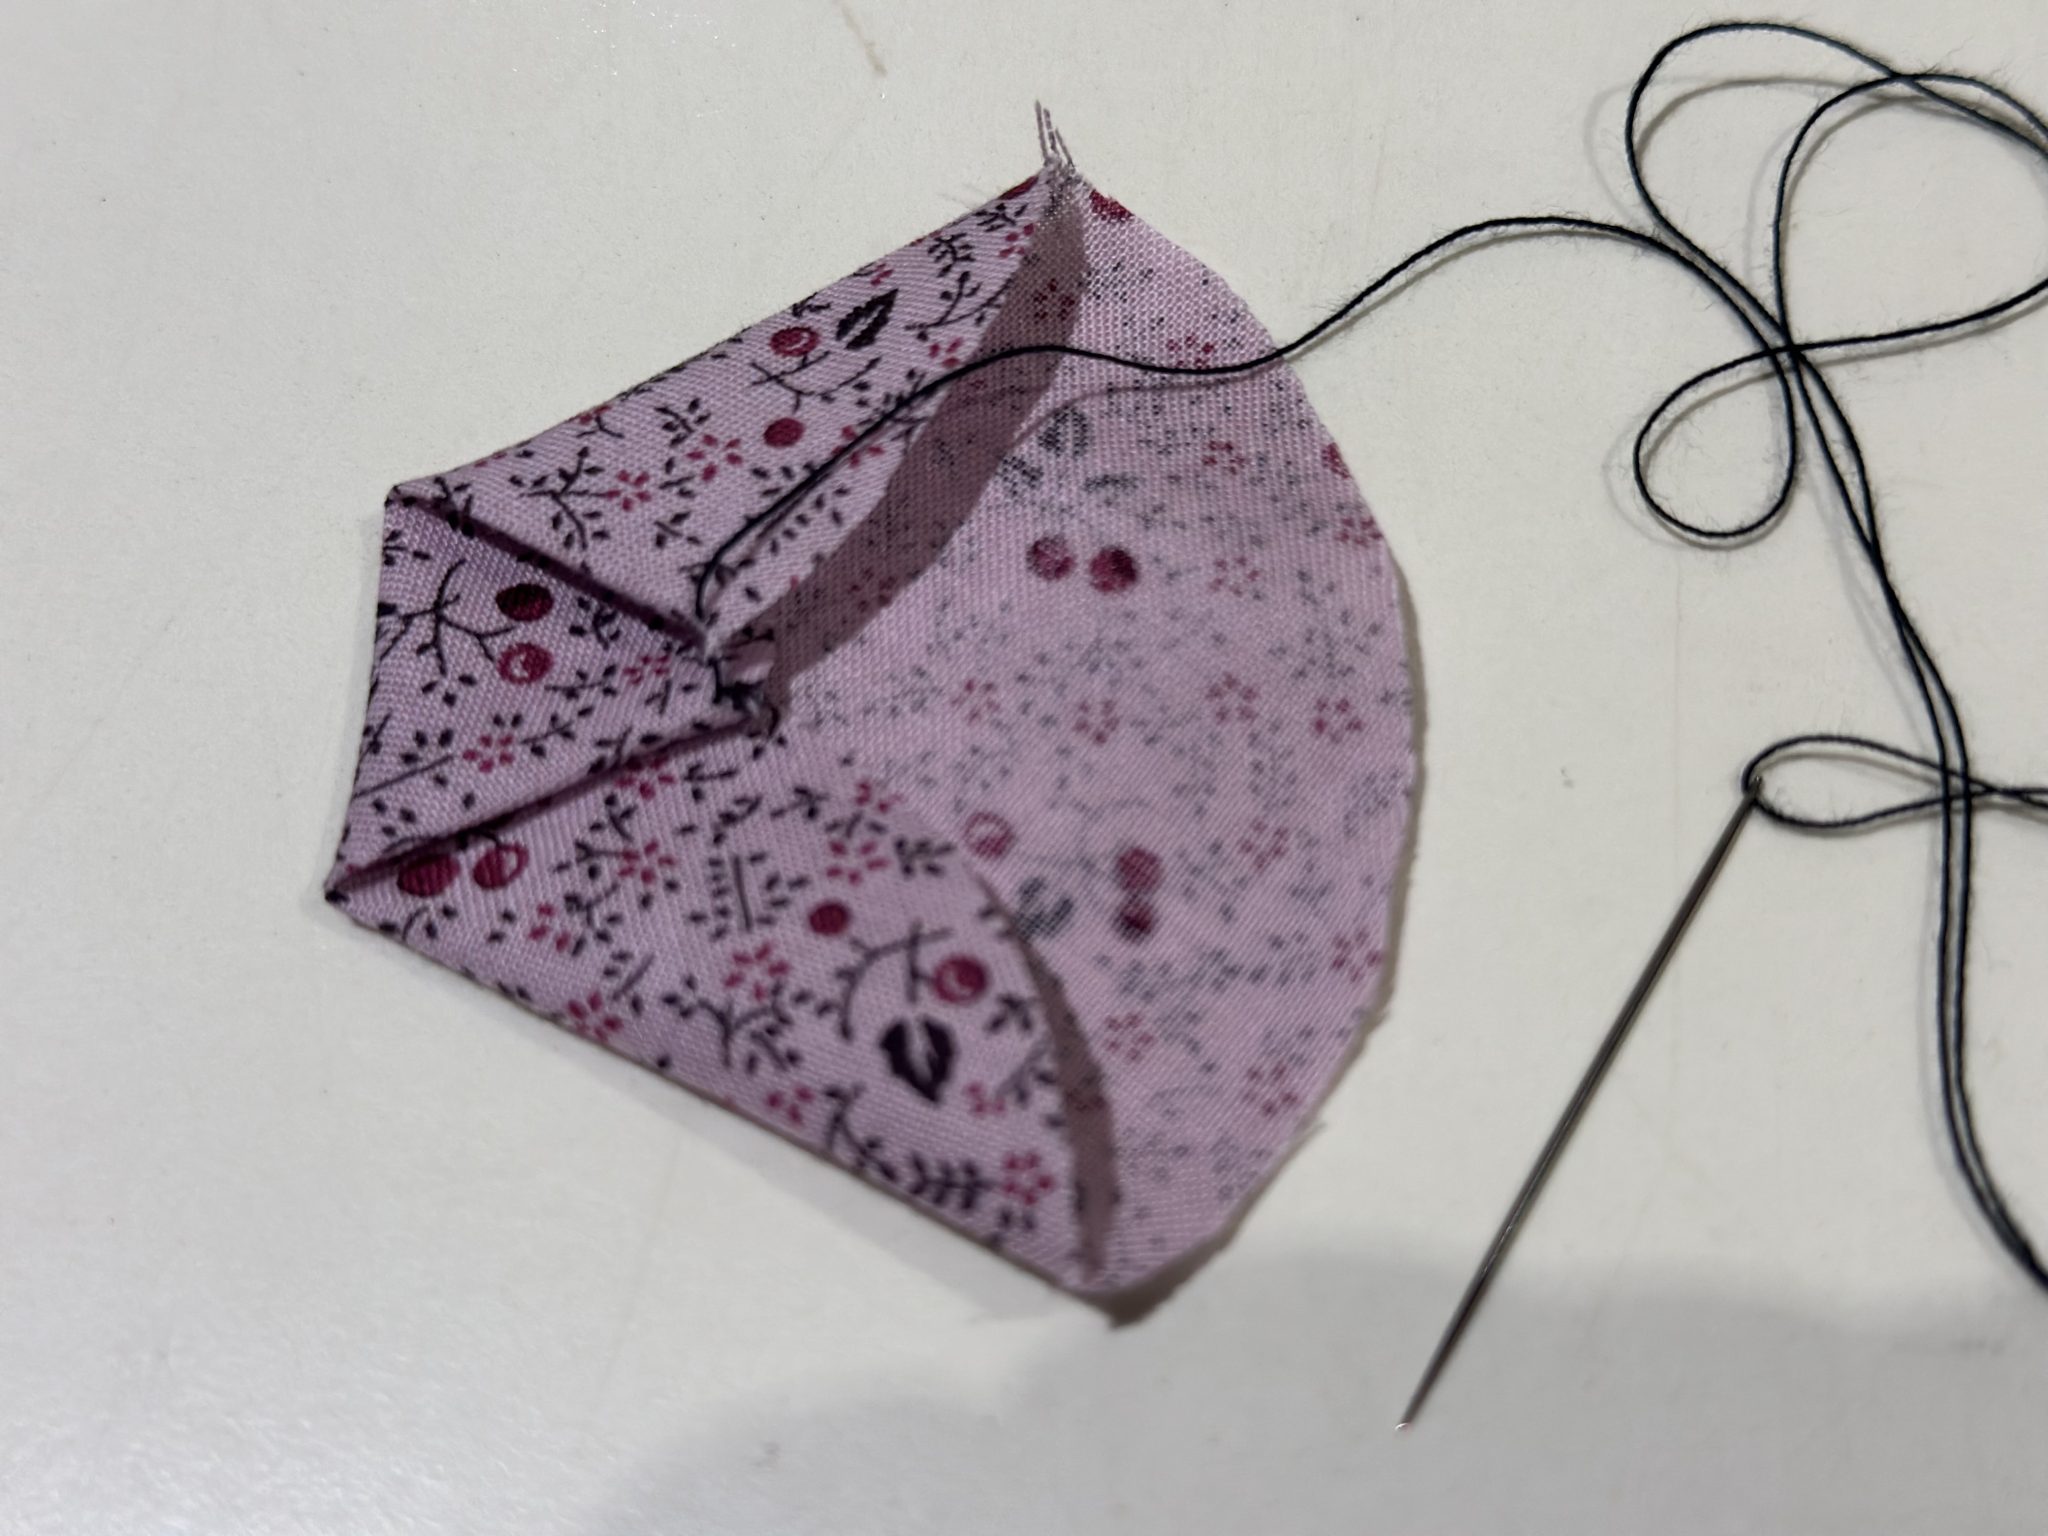
Once the circles are ready, fold each circle (only do this as you are about to sew) in half and then in quarters and lightly finger press just to find the centre of the circle.

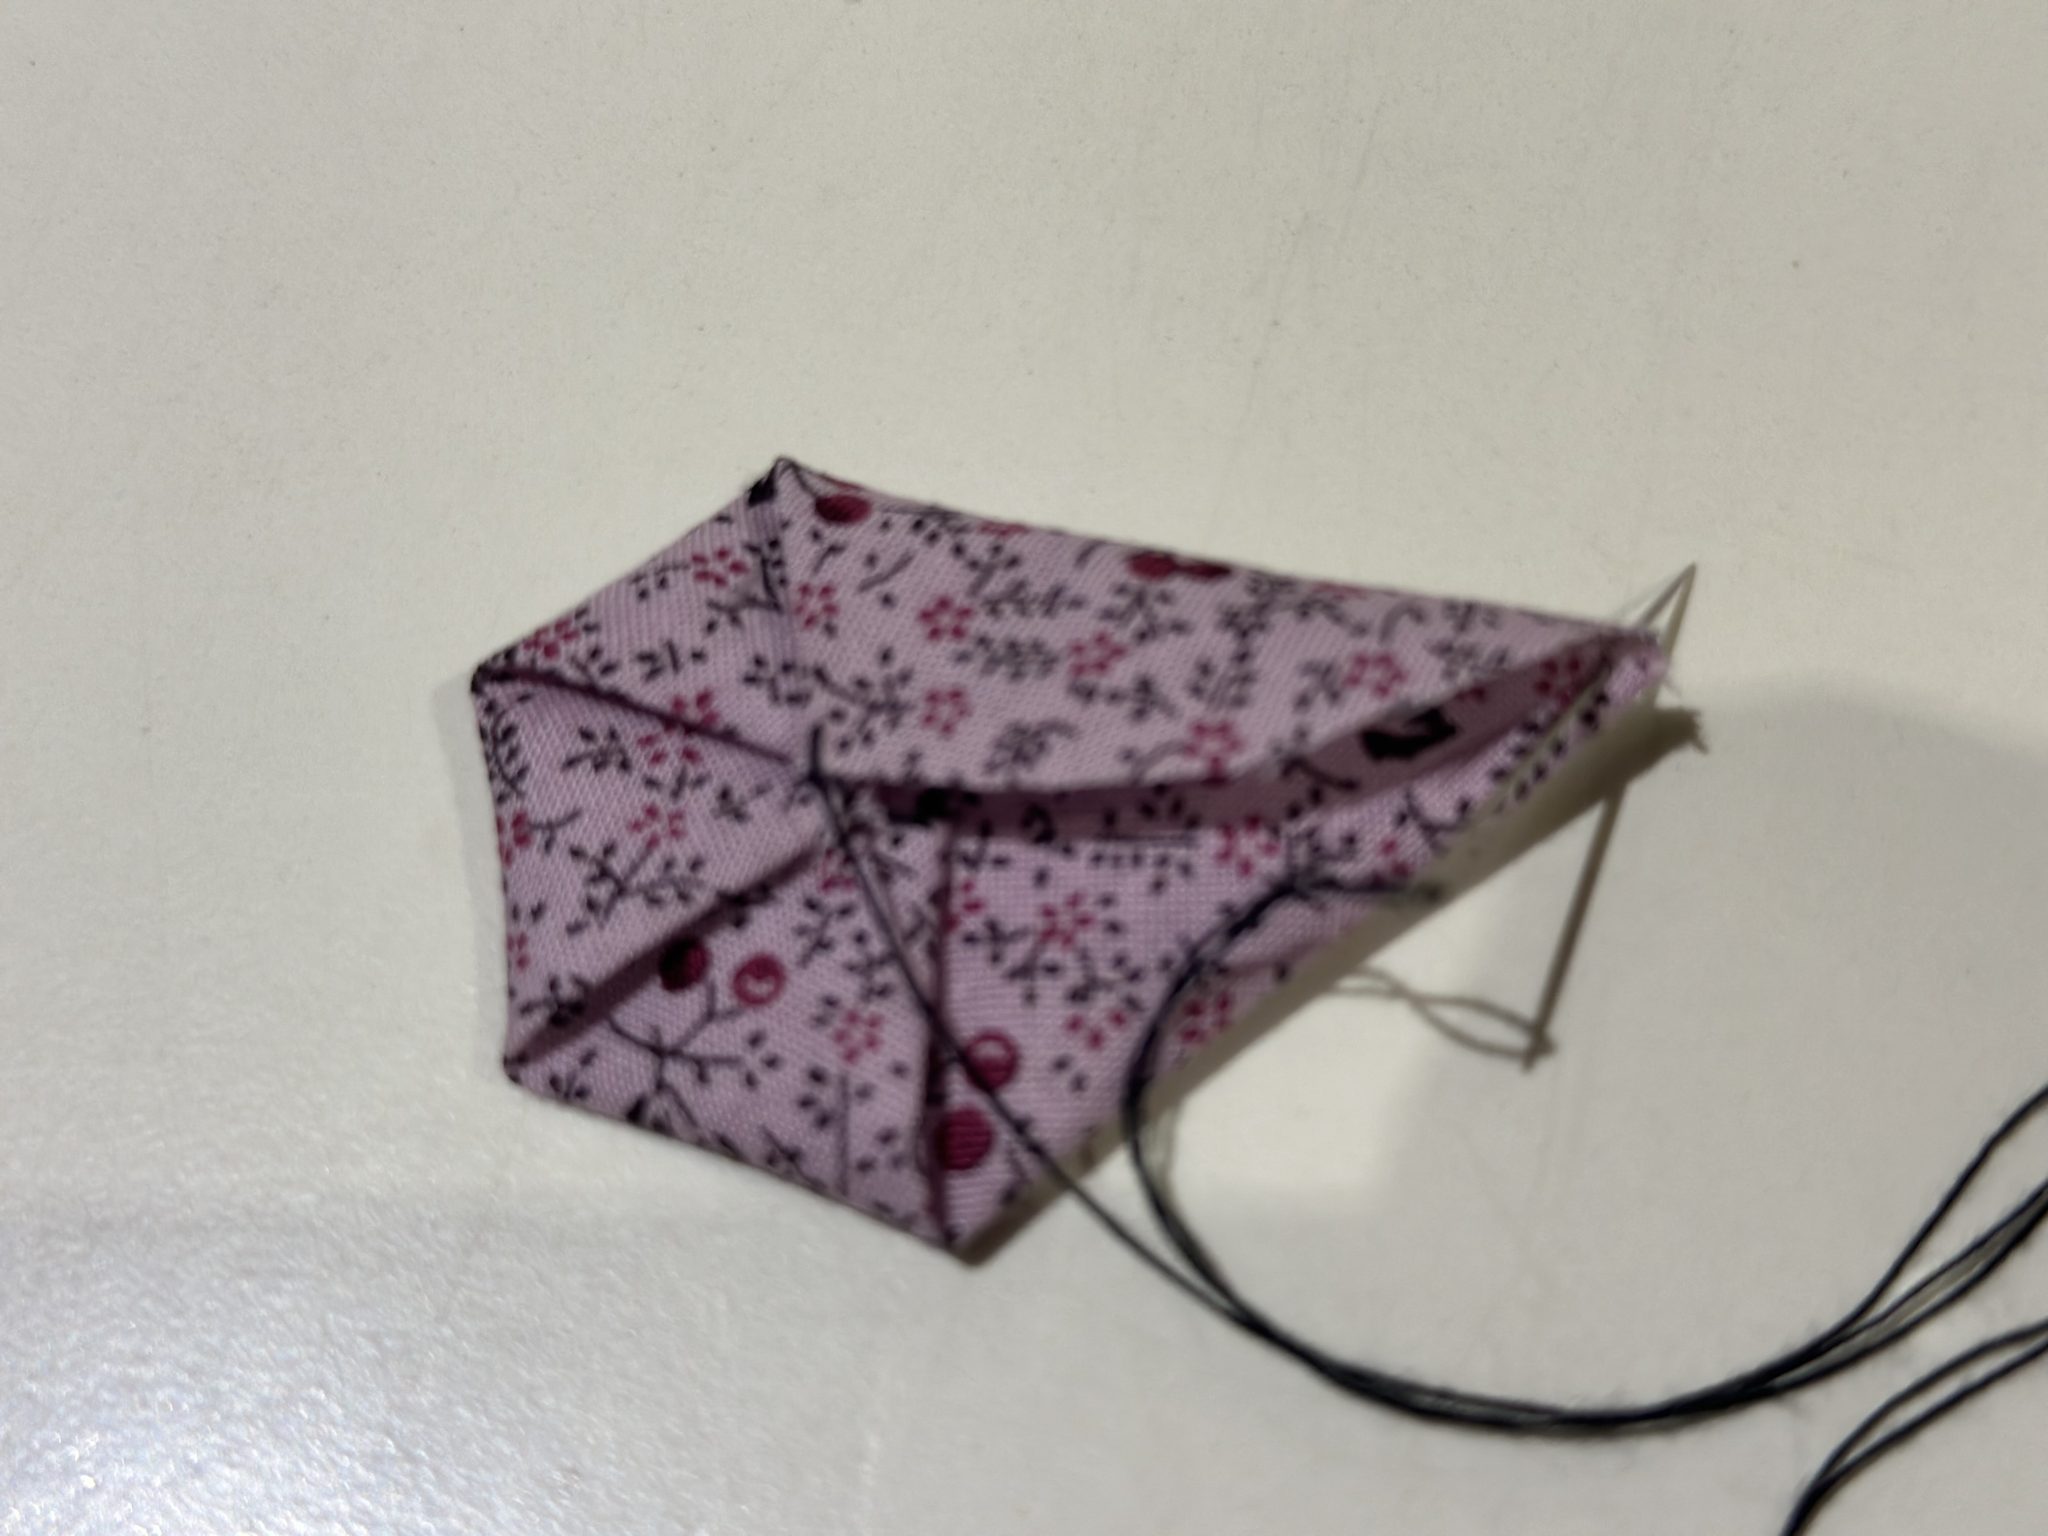
  1. With your needle and a neutral thread, thread pick up one or two threads from the centre of the circle. Secure that stitch. (I have used a black thread merely to demonstrate)
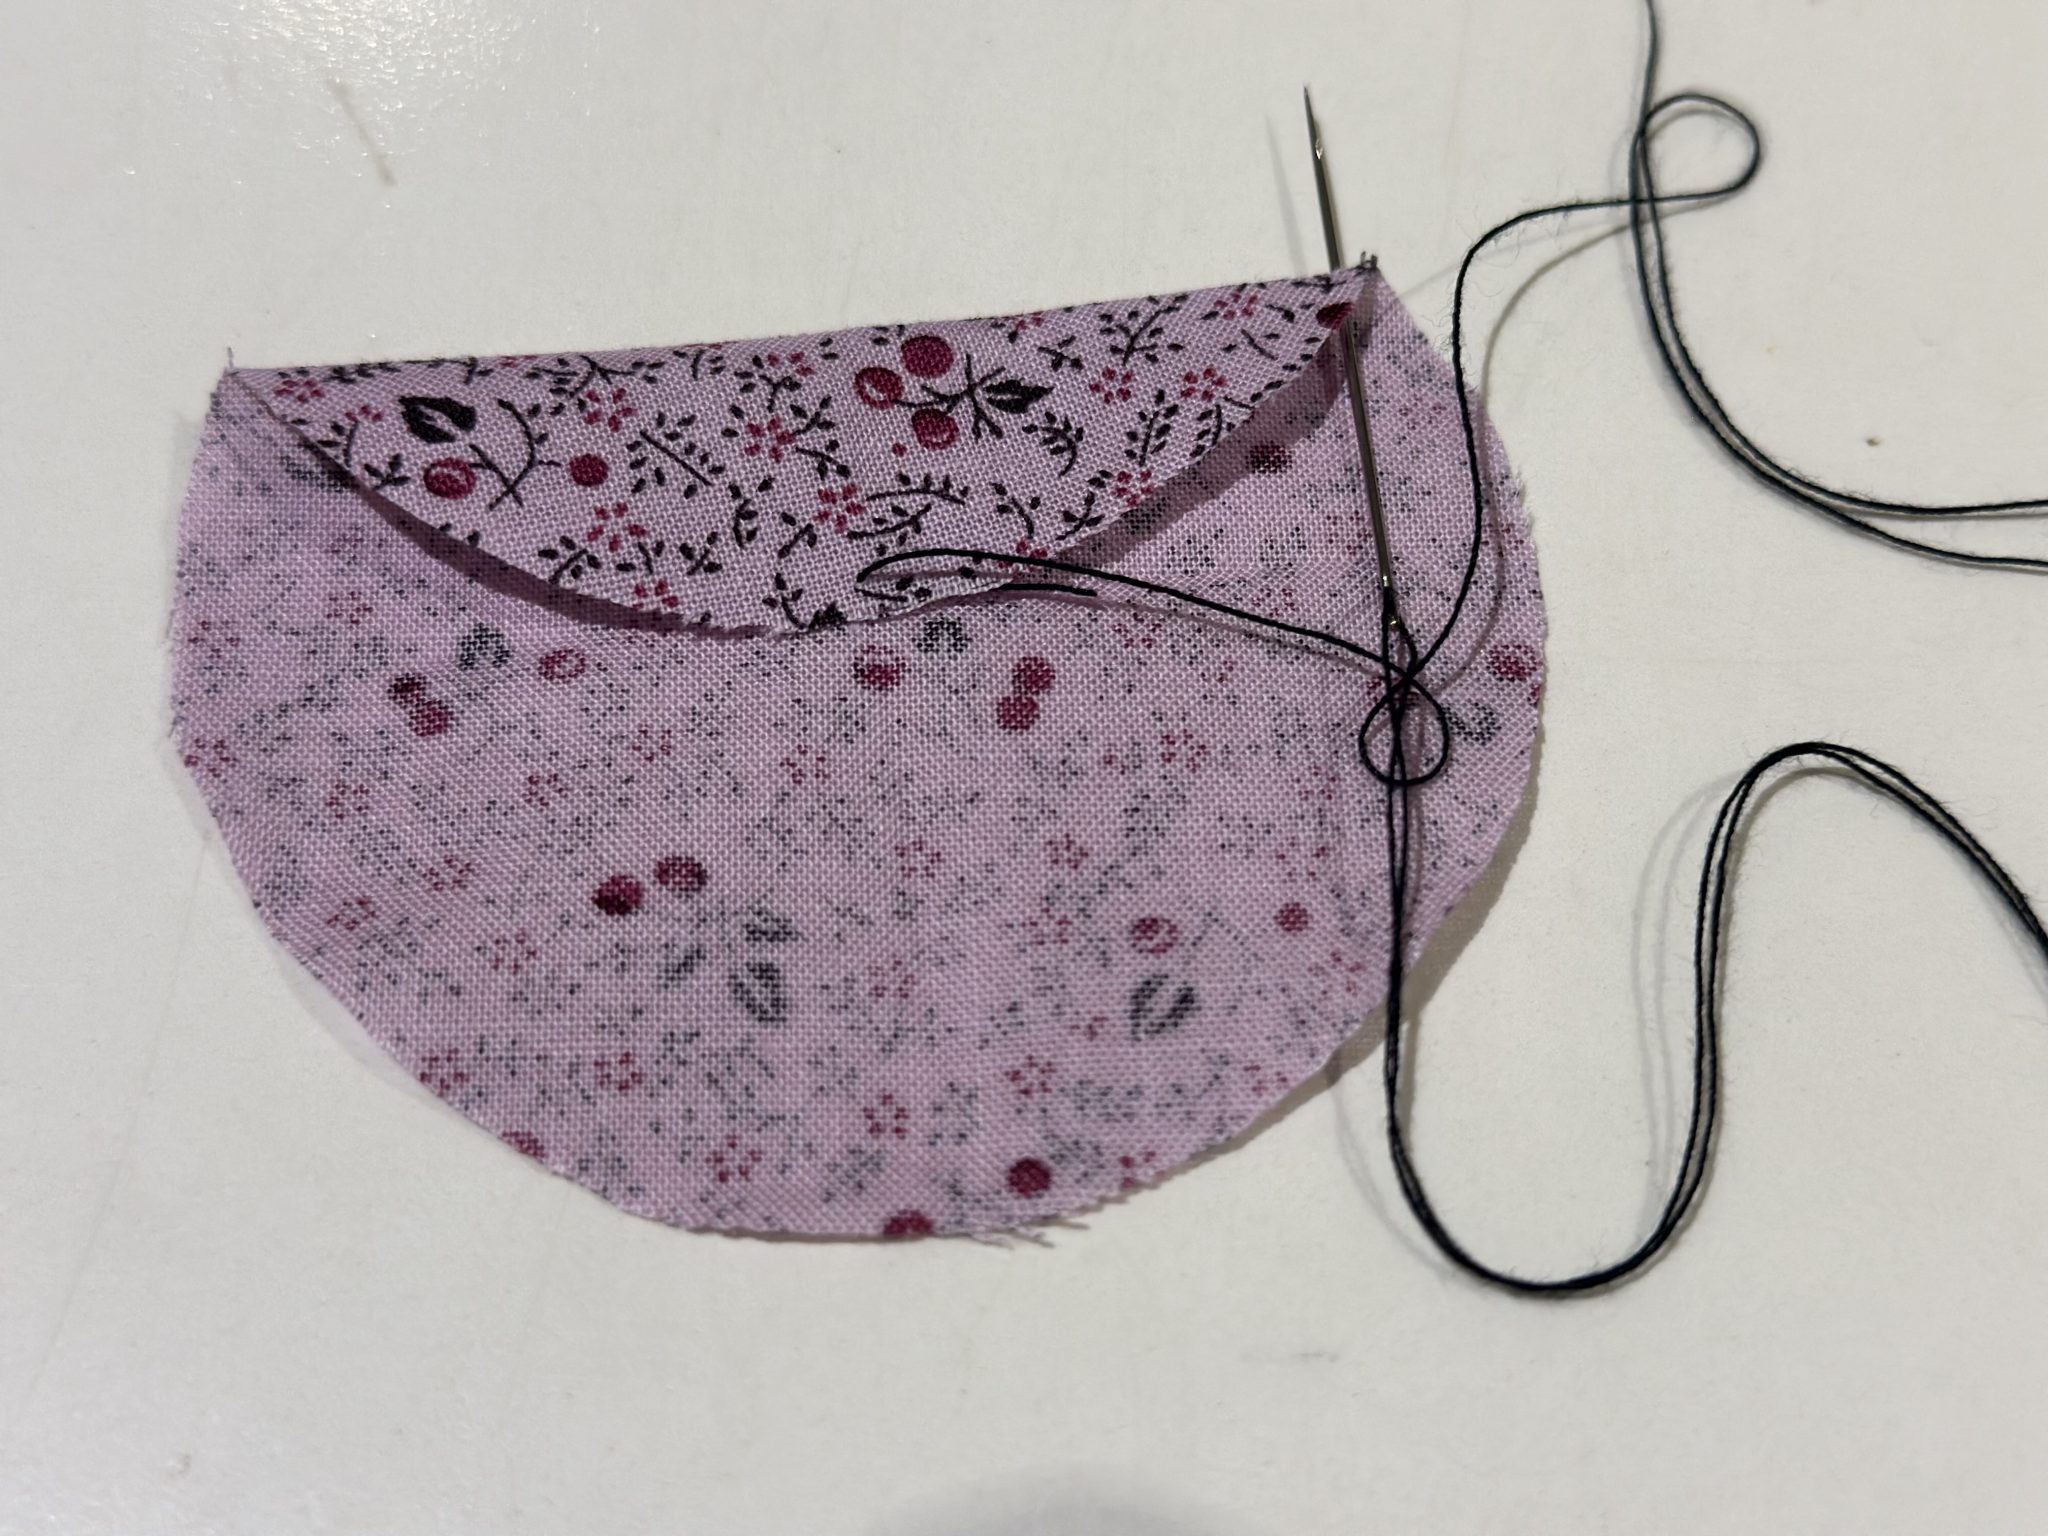
  2. Then sew through the edge of the circle just a few mm or about a 1/8″ from the edge and bring that edge to the centre.
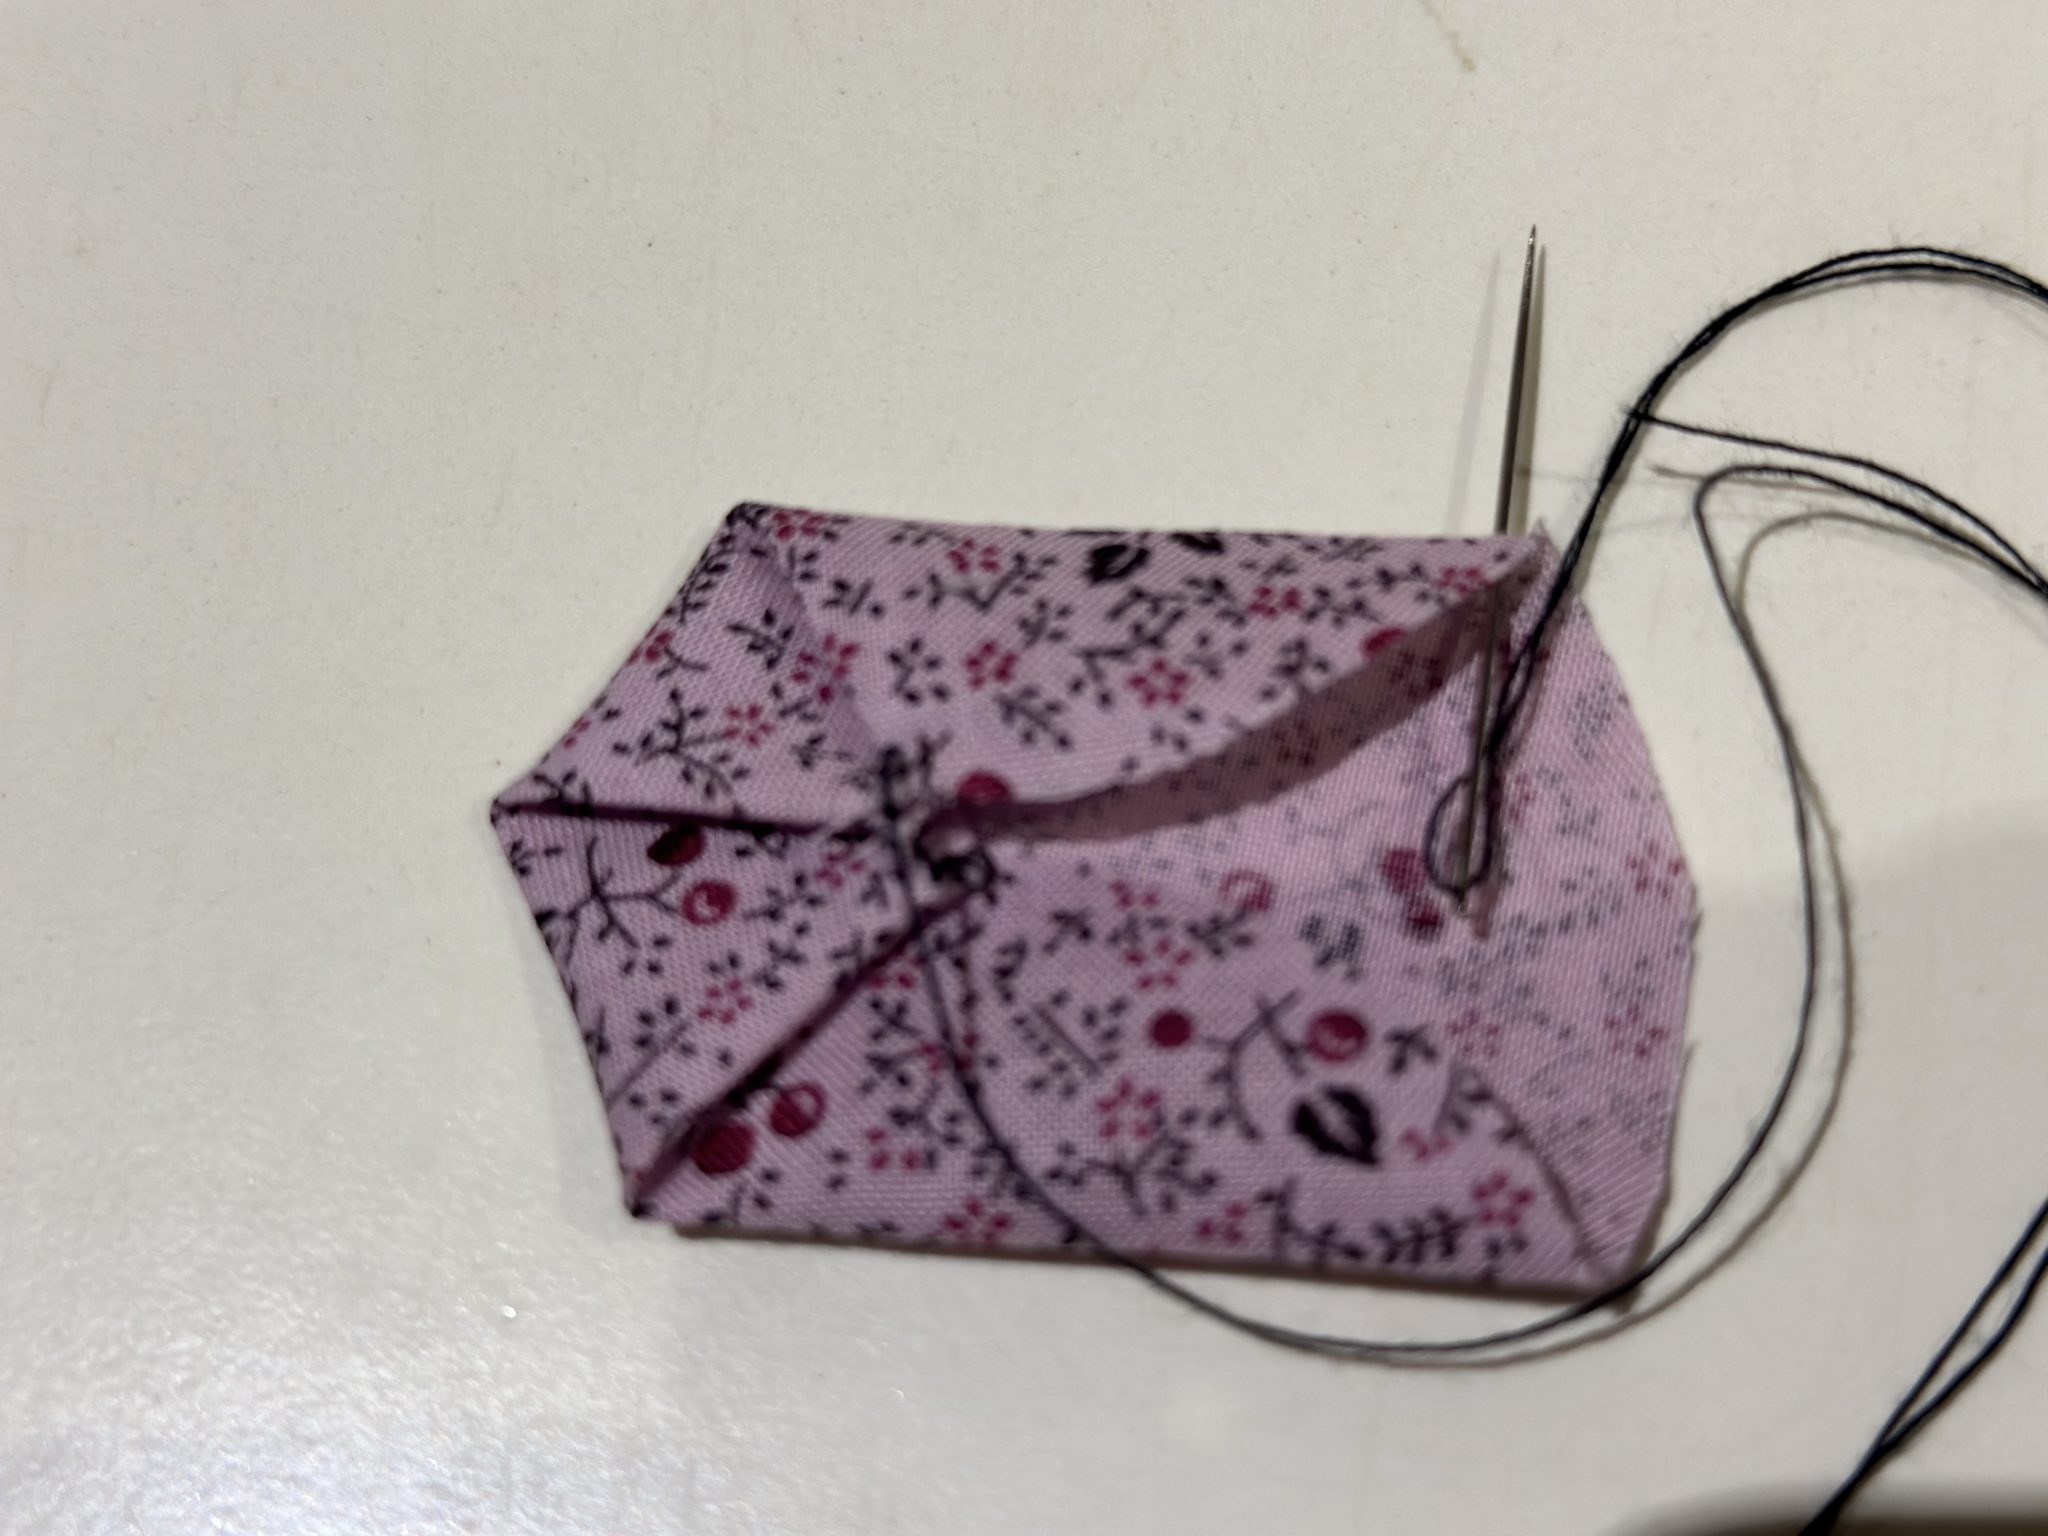
  3. Lightly finger press the fold then put your needle through the edge of the pressed fold near the point using the same distance from the edge of the fabric. Bring that to the centre. and finger press the fold. The first side is made.
  4. Repeat until all six sides of the hexagon are made.
  5. Secure your stitch.

It us also possible to leave out step one. This is a bit tricker and will require more practice to make it even.

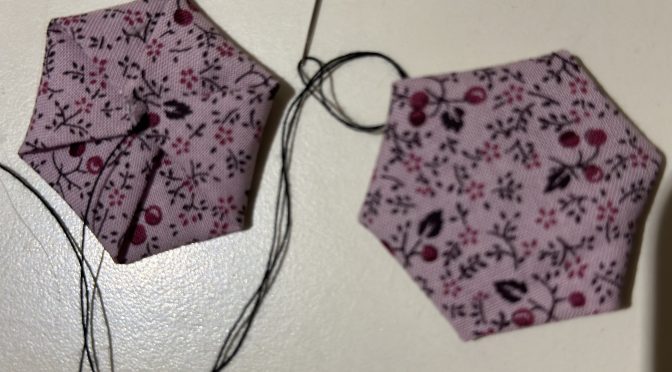
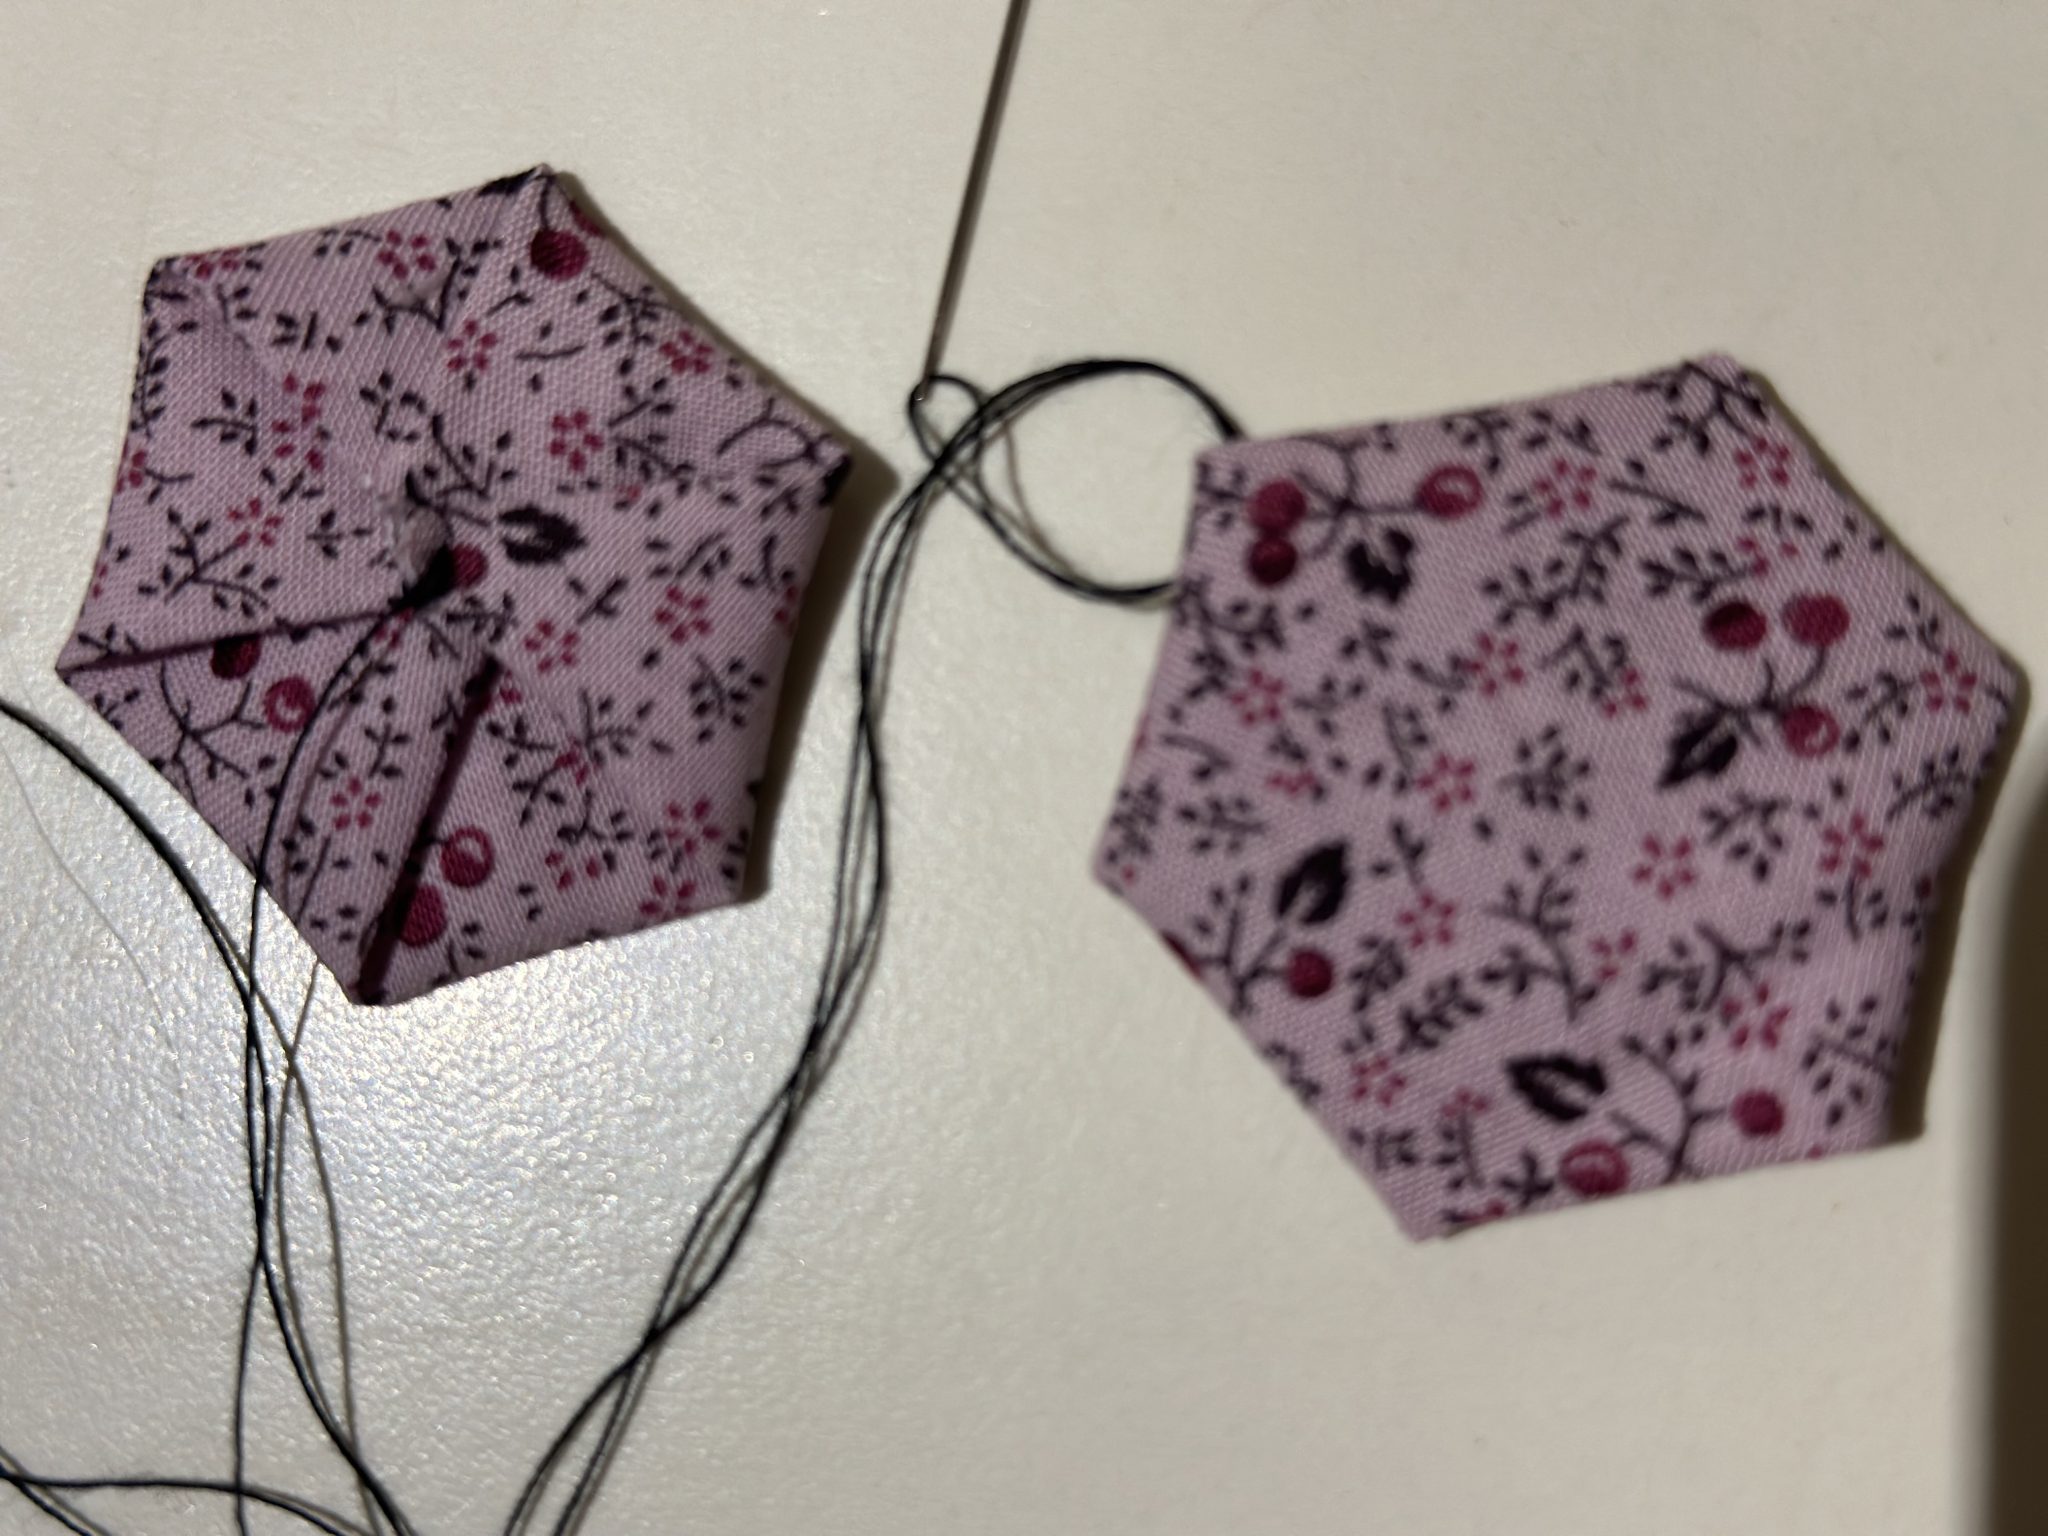
These are some of my experimental hexies. I think they turned out rather well.

Hexagons from Circles susies-scraps.com

Here is what they look like from the back. Rather neat, don’t you think?

Hexagons from Circles susies-scraps.com

NOTE There may be a slight anomaly in the size of the edges of the hexagons. Don’t worry. I believe this is due to the natural warp, weft and bias of the fabric. This will occur inherently because of the differing directional stretch of the fabric. Once they are sewn together it doesn’t matter. I think that preparation of the fabric is much more important, but that’s just me.

Here are some articles – you can decide for yourself.

To Wash or Not to Wash?….This is the Question

Wash your Pre-Cuts?

A Guide to Sizing the Hexagon Circles

Here is a rough guide to achieving the size of hexagon that you would like to make from a circle. Hexagon size is measured from the side of the hexagon, You will need to make your own test just to be sure.

1 3/4″ circle = hexagon of 1/2″

2″ circle = hexagon 9/16″

2 1/4″ circle = hexagon of 5/8″

2 1/2″ circle = hexagon of 3/4″

2 3/4″ circle = hexagon of 7/8″

3″ circle = hexagon of 15/16″

3 1/4″ circle = hexagon of 1″

3 1/2″ circle = hexagon of 1 1/8‘

4” circle = hexagon of 1 1/4” (scant)

4 1/8″ circle = hexagon of 1 1/4″

4 1/2” circle = hexagon of 1 3/8”

4 3/4″ circle = 1 3/8″ hexagon (same as Janet’s CD)

5″ circle = 1 1/2″ hexagon

Hexagons from Circles susies-scraps.com

I am happy to say that I think I have found my next portable hand piecing project! How about you?

If you enjoyed this post, you may also like

Grandmother’s Flower Garden Quilt Like Grandma Used to Make

Hexagon Stars Quilt Antique Inspired – Part 4 Diamond Circles

Hexagon Star Snowflake Trivet

Happy stitching,

Susie

Any String Goes – Pineapple Improvisational String Quilt Blocks

Any String Goes – Pineapple Improvisational String Quilt Blocks

Hello dear friends and readers! If you are new to this blog, you might be curious about what sets susies-scraps.com apart. Well, my passion lies in creating things, but I am not in the business of selling anything, nor do I want to encourage you to make purchases. Instead, I enjoy devising simple, practical solutions for crafting items, particularly quilts. This blog is a labor of love, and you’ll find hundreds of projects to create, all available to you for free.

Today, I would like to share some thoughts on string blocks. I felt inspired to create new string blocks, as I have several buckets of strings that need to be utilized. I genuinely appreciate the fact that these strings are already cut and offer a wide variety of options. Additionally, I have some waste triangles on hand, which I save for projects like this.

To be honest, I never really envisioned myself making Pineapple Blocks. You might ask why. The reason is that I was not particularly drawn to the extensive cutting involved, the numerous sizes required, and the potential waste generated. Furthermore, there is a high likelihood of inaccuracy when creating Pineapple Blocks.

Pineapple Blocks are related to Log Cabin Blocks, with the distinguishing feature being the inclusion of triangles or strips in the corners. For further information on Log Cabin Blocks that may be helpful, please refer to “Lessons in Log Cabin Blocks“.

I understand that using a foundation is often preferred, whether it be paper or fabric, and there are pre-printed papers available for purchase that can facilitate highly accurate piecing.

However, today, we will liberate ourselves from all that and simply focus on using up some scraps. Given that we are working with strings and waste triangles, there won’t be any specific measurements involved—just repurposing strings.

While it’s true that stunning patterns can be created with Pineapple Blocks by strategically placing light and dark shades, today we have no rules—just our strings and sewing machines.

Remember to finger press or roller press as you progress.

The only guideline I am following today is using a consistent element for the center squares. Keep in mind that this is also optional, and you can choose the size. I have opted for 2 ½” x 2 ½” center squares.

So, let’s get started.

Block size: 10″ x 10″ (optional)

Seams are very approximate, at about 1/4″

Requirements for Any String Goes – Pineapple Improvisational String Quilt Blocks

Fabric strings of assorted lengths

Waste triangles from other projects (or strings can be used if preferred across the corners)

Scissors, small for trimming the lengths as you go.

Centre Squares – mine are mine are 2 ½” x 2 ½

TIP

For efficiency make at least two blocks at a time. Keep your containers of strings and triangles next to your machine. By all means use a foundation if you prefer. I have opted to go without.

Any String Goes - Pineapple Improvisational String Quilt Blocks susies-scraps.com
Any String Goes – Pineapple Improvisational String Quilt Blocks susies-scraps.com

Making the Any String Goes – Pineapple, Improvisational String Quilt Blocks

Beginning with the center square, add the first strip strip to one side of the square. Add a string to the opposite side then add two more strings to the other two sides. Trim as you go.

Any String Goes – Pineapple Improvisational String Quilt Blocks susies-scraps.com

Next round, place a waste triangle, right side down across the corner of the block make sure that after stitching and folding back, that the triangle will cover the corner of the block. Continue to add triangles to the other three corners in the same manner.

Any String Goes – Pineapple Improvisational String Quilt Blocks susies-scraps.com

After adding the triangles, turn the triangles back and trim off the waste from behind each triangle corner.

Any String Goes – Pineapple Improvisational String Quilt Blocks susies-scraps.com

Next round, add strips to each side of the block in the same manner. as the first round.

Continue doing the same thing until you reach the size block that you desire. Sliver trim to size. Press.

Any String Goes - Pineapple Improvisational String Quilt Blocks susies-scraps.com
Any String Goes – Pineapple Improvisational String Quilt Blocks susies-scraps.com

Happy strings don’t you think?
If you enjoyed this post, you may also like these posts using strings.

String Feeder QAYG Bib

Pink Strings Table Mat

String Pot Holders or Trivets for Christmas

quilted Christmas scrappy string stockings

Crazy Little Strings – Diamond Charms Quilt Block and Tutorial

Strings n Things

Happy stitching,

Susie

Copyright © 2023 Susan Stuklis