Tag Archives: Log Cabin Quilts

Quickstep Two Four Six Eight Block

Quickstep Two Four Six Eight Block

Hello dear Friends and Readers and welcome to today’s post. Today I would like to share with you a simple block which will use your scraps and is super easy to prepare for.

This block it’s called Courthouse Steps. It’s one of my favourites. I have seen gorgeous antique examples of this quilt block which are so inspiring. It. will use any scraps and you will be able to quickly incorporate them into a quilt or table or bed runner. Whatever is your choice, no matter what the scraps.

I have designed this block so that all of the cutting will be very simple and the only thing you will need decide, is whether your fabric is light or dark.

Alternatively, you could be choosing a more specific colour way or it can be super scrappy to use up things you already have. Scrappy is my goal on this occasion.

I have noticed over the years that sometimes with Log Cabin and Courthouse Steps there can be a lot of different sizes of lengths of fabric to measure and cut which means it can be quite confusing. However, this block is incorporating minimal and very definite lengths which are easy to cut and that’s why I have called it the Quickstep Two Four Six Eight Block, because, these are the simple measurements that you will require to make this block. and it is so easy to remember!

Let’s get to it!

Block size 8″ x 8″

Seam allowance one quarter inch 1/4″

Requirements for the Quickstep Two Four Six Eight Block

Centre squares 2″ x 2″

Cut All Strips to 1 1/2″ width.

Light strips – two each of 2″ 4″ and 6″ lengths

Dark strips – two each of 4″ 6″ and 8″ lengths

Quickstep Two Four Six Eight Block susies-scraps.com

Making the Quickstep Two Four Six Eight Block

This is a good time to check your seam allowance.

If your strips are cut correctly and your seam allow is consistent at 1/4 inch your blocks will turn out very well. This saves needing to trim the blocks too much or even not at all!

To your 2″ Centre Square sew the 2″ x 1 1/2″ light strips to two opposite sides of the centre Square. This is a good opportunity to chain piece.

Quickstep Two Four Six Eight Block susies-scraps.com

Finger or roller press the seam away from the Centre Square.

To the two other sides sew the two 4″ dark strips

Quickstep Two Four Six Eight Block susies-scraps.com

Turn the block and sew the two 4″ light strips to the block.

The light strips should be stacked on each other and the dark strips should be stacked on each other..

Finger press as before, turn the block and now stitch the two 6″ dark strips to the dark side strips.

Quickstep Two Four Six Eight Block susies-scraps.com

Turn the block and sew the 6″ light strips to the sides.

Quickstep Two Four Six Eight Block susies-scraps.com

Finger press the seams and now add the two final 8″ darker strips to the dark side of the block. That’s it! Your block should be 8″ x 8″. Now a nice pressing with the iron and you’ll have a lovely block.

Quickstep Two Four Six Eight Block susies-scraps.com

To put the blocks together, alternate the dark to light sides of the blocks as pictured here. Or you can stack them in the same direction which is what I think I will do.

Quickstep Two Four Six Eight Block susies-scraps.com

Happy stitching!

If you enjoyed this post, you may also like these related posts.

Lessons in Log Cabin Blocks

Weekend Scrappy Half Log Cabin Quilt -Vintage Inspired

Log Cabin Variation – Scrappy Housetop Log Cabin Block Tutorial

Baby Steps Quilt

© Susan Stuklis 2024

Free Motion Quilting Feather Continuum

Free Motion Quilting Feather Continuum

Hello Dear Friends and Readers. Today I am hoping to inspire you with this simple FMQ design. For most of last year I have been hand quilting my Grandmothers Flower Garden Like Grandma Used to Make Grandmother’s Flower Garden Quilt Like Grandma Used to Make In between I have been piecing some new quilt tops too. One in particular which I wanted to get quilted is the Weekend Scrappy Log Cabin Quilt top which I finished quite a few months ago now and….oh how time flies….Weekend Scrappy Half Log Cabin Quilt -Vintage Inspired. This was an excellent way to use up so many scraps!

I put in onto my machine and got started but I think I have been quicker with the hand quilting!!

That being said …not really, lol I just wanted to share a design which I think is good for a scrappy quilt. One of the challenges with scrappy quilts is that often the quilting is lost in the ”scrappiness”, so It may seem a bit pointless to be too bogged down in the quilting design. I wanted to do something relatively quick and easy but with a good amount of quilting but not a stipple design. Nothing against stippling.

Free Motion Quilting Feather Continuum susies-scraps.com

Machine

My machine choice has been my 1948 electric Singer 201k which I bought some years ago and adapted it for free motion quilting. Free Motion Quilting – Part 1 – The Machine

One of the challenges with FMQ is preventing a mismatch with the tension of the top and bottom fabrics of the quilt which can lead to bubbling of the fabric on top or underneath.

Free Motion Quilting Feather Continuum susies-scraps.com

My experience has been that quilting around in small areas is a good way to minimise this problem and another is to have equal amounts of forward and backward motions or side to side which tends to largely ameloriate the problem. I have discussed this in Oak Leaves and Acorn Oak Leaves and Acorns Quilting Free Motion and Egg Flower Quilting . Free Motion Egg Flower Quilting

FMQ Feather Continuum

This design is based on the idea of quilting feathers. Having a long feather can often mean that there is a lot of overlaying of stitching through the centre or quill of the feather, while creating the feather shape Double feathers quilting

Starting from the centre of this very big quilt and slowly working my way out by basically doing a “feather loops ” one and then a second echo and then making the next “feather loop with an echoed loop as close to that one and so on. This keeps the fabric movement to a minimum.

This is especially important for a large quilt as the tension changes will be amplified out in the quilt leading to difficulty in keeping the whole thing flat.

Free Motion Quilting Feather Continuum susies-scraps.com

As always I think it is important to understand that it is not perfect. Each set of loops is different in size and I always adapt a “quilt to fit” motto for best results. In other words some loops will be larger and some smaller.

Free Motion Quilting Feather Continuum susies-scraps.com

I continued this pattern for the entire quilt which is quite large at 80 ½” x 90 ½”.

and this technique I regard as a success. The quilt is lovely and flat as you can see!

Free Motion Quilting Feather Continuum susies-scraps.com

I think it has given the quilt a very nice overal texture which is what I was aiming for. Well the quilting took a bit more than a weekend but piecing the top was a weekend project and I was so happy to use up quite a number of odd scraps as you can see.

If you enjoyed this post about free motion quilting, you may also like some of these ideas.

Quilting Nasturtiums – Free Motion – Singer 201K Treadle

Sashiko Free Motion Quilting For Antique Inspired Scrappy Broken Dishes Lap or Cot Quilt

Free motion quilting puffed daisies

Happy stitching,

Susie

© Susan Stuklis 2023

Any String Goes – Pineapple Improvisational String Quilt Blocks

Any String Goes – Pineapple Improvisational String Quilt Blocks

Hello dear friends and readers! If you are new to this blog, you might be curious about what sets susies-scraps.com apart. Well, my passion lies in creating things, but I am not in the business of selling anything, nor do I want to encourage you to make purchases. Instead, I enjoy devising simple, practical solutions for crafting items, particularly quilts. This blog is a labor of love, and you’ll find hundreds of projects to create, all available to you for free.

Today, I would like to share some thoughts on string blocks. I felt inspired to create new string blocks, as I have several buckets of strings that need to be utilized. I genuinely appreciate the fact that these strings are already cut and offer a wide variety of options. Additionally, I have some waste triangles on hand, which I save for projects like this.

To be honest, I never really envisioned myself making Pineapple Blocks. You might ask why. The reason is that I was not particularly drawn to the extensive cutting involved, the numerous sizes required, and the potential waste generated. Furthermore, there is a high likelihood of inaccuracy when creating Pineapple Blocks.

Pineapple Blocks are related to Log Cabin Blocks, with the distinguishing feature being the inclusion of triangles or strips in the corners. For further information on Log Cabin Blocks that may be helpful, please refer to “Lessons in Log Cabin Blocks“.

I understand that using a foundation is often preferred, whether it be paper or fabric, and there are pre-printed papers available for purchase that can facilitate highly accurate piecing.

However, today, we will liberate ourselves from all that and simply focus on using up some scraps. Given that we are working with strings and waste triangles, there won’t be any specific measurements involved—just repurposing strings.

While it’s true that stunning patterns can be created with Pineapple Blocks by strategically placing light and dark shades, today we have no rules—just our strings and sewing machines.

Remember to finger press or roller press as you progress.

The only guideline I am following today is using a consistent element for the center squares. Keep in mind that this is also optional, and you can choose the size. I have opted for 2 ½” x 2 ½” center squares.

So, let’s get started.

Block size: 10″ x 10″ (optional)

Seams are very approximate, at about 1/4″

Requirements for Any String Goes – Pineapple Improvisational String Quilt Blocks

Fabric strings of assorted lengths

Waste triangles from other projects (or strings can be used if preferred across the corners)

Scissors, small for trimming the lengths as you go.

Centre Squares – mine are mine are 2 ½” x 2 ½

TIP

For efficiency make at least two blocks at a time. Keep your containers of strings and triangles next to your machine. By all means use a foundation if you prefer. I have opted to go without.

Any String Goes - Pineapple Improvisational String Quilt Blocks susies-scraps.com
Any String Goes – Pineapple Improvisational String Quilt Blocks susies-scraps.com

Making the Any String Goes – Pineapple, Improvisational String Quilt Blocks

Beginning with the center square, add the first strip strip to one side of the square. Add a string to the opposite side then add two more strings to the other two sides. Trim as you go.

Any String Goes – Pineapple Improvisational String Quilt Blocks susies-scraps.com

Next round, place a waste triangle, right side down across the corner of the block make sure that after stitching and folding back, that the triangle will cover the corner of the block. Continue to add triangles to the other three corners in the same manner.

Any String Goes – Pineapple Improvisational String Quilt Blocks susies-scraps.com

After adding the triangles, turn the triangles back and trim off the waste from behind each triangle corner.

Any String Goes – Pineapple Improvisational String Quilt Blocks susies-scraps.com

Next round, add strips to each side of the block in the same manner. as the first round.

Continue doing the same thing until you reach the size block that you desire. Sliver trim to size. Press.

Any String Goes - Pineapple Improvisational String Quilt Blocks susies-scraps.com
Any String Goes – Pineapple Improvisational String Quilt Blocks susies-scraps.com

Happy strings don’t you think?
If you enjoyed this post, you may also like these posts using strings.

String Feeder QAYG Bib

Pink Strings Table Mat

String Pot Holders or Trivets for Christmas

quilted Christmas scrappy string stockings

Crazy Little Strings – Diamond Charms Quilt Block and Tutorial

Strings n Things

Happy stitching,

Susie

Copyright © 2023 Susan Stuklis

Scrappy Housetop Log Cabin Variation Quilt Top Vintage Inspired

Scrappy Housetop Log Cabin Variation Quilt Top Vintage Inspired

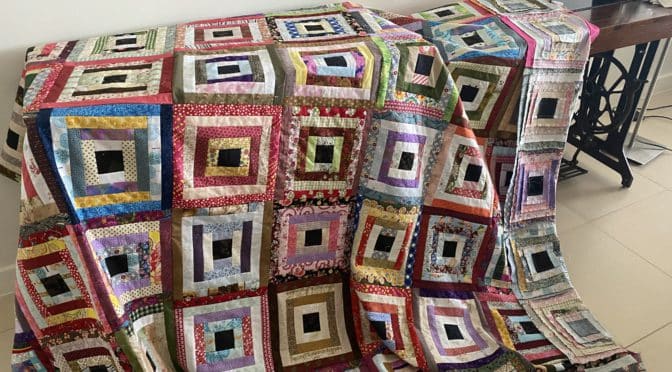
Hello Dear Friends and Readers, I know I have been on a bit of a Log Cabin fest recently, but hey, the scraps are being put to good use. If you have been joining me on this journey I would really like to encourage you to use those scraps especially the ones you don’t care for that much! They will be transformed!! ????

I have to admit to feeling a sense of accomplishment today. I have cut up lots of 1 1/2” fabric strips ready for making this Scrappy Housetop Log Cabin Variation Quilt Top Vintage Inspired. (Technically it is a Courthouse Steps variation)

Honestly this is quite a lot of fabric, collectively approximately 8 yards / metres of scraps which are going to have a home in this Scrappy Housetop Log Cabin Variation Quilt Top Vintage Inspired.

For this quilt top, my constant is the black centre squares, which are also scrappy. I have used all kinds of prints without discriminations, so it is a true scrappy quilt. In this quilt there is a myriad of prints including novelty, plaids, brights, batiks, reproductions, florals, directional prints, plaids, ginghams, shirtings, solids, moderns and Japanese prints. All I had to decide is whether they were light or dark!

Previously I posted the directions for making the block here.

Log Cabin Variation – Scrappy Housetop Log Cabin Block Tutorial

Here is what I started with. Looks like a mess, don’t you think? All the strips need to be sorted into light or dark, as best as possible.

My vintage inspiration is here, https://www.soulsgrowndeep.org/gees-bend-quiltmakers.

Block size 10 1/2“ x 10 1/2“.

Finished quilt top size 80 1/2“ x 90 1/2“.

TIP

If you can’t decide whether it is light or dark, make sure it lies next to a more contrasting fabric, OR, for example if you need light but it looks more medium, turn it over and use the reverse,

 Scrappy Housetop Log Cabin Variation Quilt Top Vintage Inspired susies-scraps.com
Scrappy Housetop Log Cabin Variation Quilt Top Vintage Inspired susies-scraps.com

Now they are all cut up and ready to go! Check it out

 Scrappy Housetop Log Cabin Variation Quilt Top Vintage Inspired susies-scraps.com
Scrappy Housetop Log Cabin Variation Quilt Top Vintage Inspired susies-scraps.com

Requirements for the Scrappy Housetop Log Cabin Variation Quilt Top Vintage Inspired

72 of black centre squares 2 ½ x 2 ½

All the strips are cut from 1 ½” width of fabric strips. The cutting goes quite quickly because we are using 2 each of each strip size and fabric for each block.

Light strips – 144 each of 2 ½, 4½”, 6 ½”, 8 ½” lenghts.

Dark Strips – 144 each of 4 ½”, 6 ½”, 8 ½” and 10 ½“ lenghts.

Follow the instructions for making the blocks as written in the post Log Cabin Variation – Scrappy Housetop Log Cabin Block Tutorial as previously mentioned. Here is how they are beginning to look after about 20 blocks.

 Scrappy Housetop Log Cabin Variation Quilt Top Vintage Inspired susies-scraps.com
Scrappy Housetop Log Cabin Variation Quilt Top Vintage Inspired susies-scraps.com

I like the dramatically visual effect that the black centres help create along with the contrasting light and dark fabrics,

Scrappy Housetop Log Cabin Variation Quilt Top Vintage Inspired susies-scraps.com

Here I have made 40 blocks. They are not put together yet. They look pretty striking.

I have been sewing all these blocks by treadle. Its very nice just being in the zone. I think its a bit like meditation. Very enjoyable and relaxing. no stress as they are just scraps!

Now I have made the 72 blocks. Here are the blocks laying out. not pressed yet.

 Scrappy Housetop Log Cabin Variation Quilt Top Vintage Inspired susies-scraps.com
Scrappy Housetop Log Cabin Variation Quilt Top Vintage Inspired susies-scraps.com

Now the blocks have been nicely pressed and I am sewing them together. Im using this Singer 201k treadle which is such a beautiful little stitcher. She sews like a dream.

Singer 201K Treadle C1947

 Scrappy Housetop Log Cabin Variation Quilt Top Vintage Inspired susies-scraps.com
Scrappy Housetop Log Cabin Variation Quilt Top Vintage Inspired susies-scraps.com

TIP

When sewing the quit together, after sewing the first column of blocks, pin the edges of the first column of blocks together. This prevents the blocks from getting tangled as the subsequent columns are added. This is a great time saver! ????

Build the Scrappy Housetop Log Cabin Variation Quilt Top Vintage Inspired

Warning!! Ha ha, this is a very easy quilt top to put together. There is very little seam matching except for joining the blocks and ensuring the seams are nicely nested!!

When laying out the blocks I have alternated the blocks so that there is no seam matching.. That is the last long 10 1/2“ strips of each block alternate, vertical horizontal vertical and so on.

 Scrappy Housetop Log Cabin Variation Quilt Top Vintage Inspired susies-scraps.com
Scrappy Housetop Log Cabin Variation Quilt Top Vintage Inspired susies-scraps.com

I like to chain sew the whole quilt top together by adding all the blocks in columns and then turning the whole top to sew all of the rows. This scaffolding technique makes building the quilt very easy and the seams lay nicely. See the tip above for a smoother experience. This link explains this technique using a small block.

36 Patch Postage Stamp Blocks Tutorial

I have set these blocks in a 8 x 9 blocks configuration. here it is coming together on my little Singer 201k treadle.

TIP

I used an extra table next to the machine to help support the weight of the quilt top.

 Scrappy Housetop Log Cabin Variation Quilt Top Vintage Inspired susies-scraps.com
Scrappy Housetop Log Cabin Variation Quilt Top Vintage Inspired susies-scraps.com

Here is my final layout of the Scrappy Housetop Log Cabin Variation Quilt Top Vintage Inspired.

 Scrappy Housetop Log Cabin Variation Quilt Top Vintage Inspired susies-scraps.com
Scrappy Housetop Log Cabin Variation Quilt Top Vintage Inspired susies-scraps.com

I think is is a a great way to use up a lot of scraps!

Scrappy Housetop Log Cabin Variation Quilt Top Vintage Inspired susies-scraps.com

If you enjoyed this post you may also like

Lessons in Log Cabin Blocks

Weekend Scrappy Half Log Cabin Quilt -Vintage Inspired

Baby Steps Quilt

Crazy Little Log Cabin Coasters

Log Cabin Free Motion Quilting

I hope you can do some sewing or cutting today.

Susie

© Susan Stuklis 2022

Crazy Little Log Cabin Coasters

Crazy Little Log Cabin Coasters

Hello Dear Friends and Readers. Did you know that Log Cabin Blocks are addictive?? Well, apparently they are!! Because I have been on something of a Log Cabin Fest lately culminating in the latest one which dived down into using one inch strips.

Yes, Crazy Little Log Cabin Coasters is what I have been making. The problem is they are just too delightful! I know…. I do love the scraps and this might seem silly, but, had I not made these little coasters Scrappy quilted coastal coasters I would not have known how much we like to use them. I used to think Coasters were a bit of a waste of time except for on nice timber furniture however, they just “feel” sooo nice that we like to use them as a preference.

Great for that cup of tea next to your bedside, underneath any glass of water or wine. And they don’t stick to the bottom of the glass when you pick it up which is irritating.

So there we are, I found myself making some more in the Log Cabin style. These can be hand or machine quilted as much or little as you like. I have tried both.

Block size approximately 4 ½” x 4 ½”

Finished coaster size 4” x 4”

All seams based on 1/4”

Here is how I did it.

Requirements for one Crazy Little Log Cabin Coaster

NB all the strips are in multiples of one. Therefore cut as many of each strip as the number of coasters you wish to make. I will just give sizes for one.

All the lengths are cut from 1″ strips.

Seam based on scant 1/4″

Centre square 1 ½” x 1 ½”

Dark Strip lengths 1½”, 2″, 2½”, 3″, 3½”, 4″

Light Strip lengths 2″, 2 ½”, 3″, 3½”, 4″, 4½”

One scrap square of batting 4 ½” x 4 ½”

One scrap square of fabric 4 ½” x 4 ½”

TIP

The strips made from straightening the edge of yardage are often about one inch wide, if not all, propably some of the strip.

If you are new to Log Cabin, here are some tips on construction.

Lessons in Log Cabin Blocks

Making the Crazy Little Log Cabin Coaster

To the Centre square 1 ½” x 1 ½” sew the dark 1″ x 1 ½” strip to one side edge of the square. Finger press.

Decide which direction to are going to turn your block to if you want them all to match. Chain piecing half a dozen at a time works well.

Today I am making these Crazy little Log Cabin Coasters on My 1902 Singer 15 treadle. Treadle Tinkering

Crazy Little Log Cabin Coasters susies-scraps.com

With the first dark strips at the top Attach the 2″ dark strip to the adjacent right side. Finger press.

To the next side attach the first 2″ light strip. If the smallest dark strip is at the top, then this strip would be at the bottom of the square.

Next attach the 2 ½” x 1″ light strip to the last side of the initial square. I am using one I made earlier as my guide.

Crazy Little Log Cabin Coasters susies-scraps.com

Next strip, is the 2 ½” dark strip to the next side. Keep going in the same manner until all the strips are used. i.e. dark dark light light from shortest to longest finishing with the longest light strip. I have cut quite a dew strips. I used my ruler as a base to keep them in order.

Crazy Little Log Cabin Coasters susies-scraps.com

This should now measure approximately 4 ½” x 4 ½”

Press the block. Place the fabric square and the Log Cabin Block right sides together. Place the batting square on top of the two. Make sure the edges are well alinged.

Crazy Little Log Cabin Coasters susies-scraps.com

Sew around the perimeter a 1/4″ seam leaving a 2″ opening on one side for turning.

Crazy Little Log Cabin Coasters susies-scraps.com

Carefully clip the corners.

Crazy Little Log Cabin Coasters susies-scraps.com

Turn to the right side as neatly as possible. Turn in the seam allowance and pin. This can now be oversewn by machine or hand sewn. Repeat for as many as you wish to make.

Crazy Little Log Cabin Coasters susies-scraps.com

Quilt as desired by hand or machine. I have done some of each.

Crazy Little Log Cabin Coasters susies-scraps.com

All In Hand – Lessons In Hand Quilting

TIPS

Machine Quilting will result in a stiffer coaster. If you have a walking foot, that would be an advantage, but not essential. A stack of six makes a delightful gift.

Crazy Little Log Cabin Coasters susies-scraps.com

Thanks for joining me today.

If you enjoyed this post, you may also like

Quilted Scrap Fabric Baskets – Tutorial

Weekend Scrappy Half Log Cabin Quilt -Vintage Inspired

Crochet Floor Rugs – Updated

Crazy Little Strings – Diamond Charms Quilt Block and Tutorial

Crazy for Cottages Quilt Block

Happy Stitching

Susie

© Susan Stuklis 2022