Tag Archives: 2” Strips for Quilts

Veterans Cross Quilt Part 5 Quilting and Binding

Veterans Cross Quilt Part 5 Quilting and Binding

Hello Dear Friends and Readers and a warm welcome to todays post. This is the final post in the Veterans Cross Quilt series. Today I will show you how I quilted this quilt.

Bear in mind this is just a suggestion. You -can quilt it any way you like.

Here is the link to previous post Veterans Cross Quilt Part 4 Making the Borders

A Reflection on the Quilting Process

Just a small reflection on the quilting process. I believe it is very easy to overthink this part of the quilting process. After all, finished is better than perfect. I think it is good to know that at the end of the day we don’t necessarily need fancy equipment to get it done.

In the interests of simplicity, I opted to use a navy wideback with a small white motif for the backing. I used lots of quilting pins to hold the layers together. The batting is cotton.

One of my favorite quilting tools are vintage sewing machines which are set into a table. You can read a bit more about this here.

Free Motion Freedom

Free Motion Quilting – Part 4 – Begin FMQ

Quilting using a Vintage Singer Treadle

This quilt top was quilted using a Vintage Singer 201k Treadle. It meets my requirements nicely. It is a treadle which means it is in a flat bed already. I always make sure the machine is well oiled before commencing. This is one of the most important maintenance tasks. It is very quick and easy.

I used a recently acquired walking foot to complete the task using straight line quilting. When I say straight line, it is a little bit tongue in cheek. This is because, maybe it should be called “somewhat” straight line quilting ha ha!! Seriously though, once the whole quilt is done, these minor imperfections are not really noticeable. I am happy with the result. This quilt is intended to be used.

Veterans Cross Quilt Part 5 Quilting and Binding susies-scraps.com

I used the same idea for quilting this quilt as described here Working with Geometry Quilting Courthouse Steps. For this quilt, I used vertical and horizontal quilting lines rather than quilting on the diagonal. There was a reason for this. Because this is a big quilt, which is a bit more challenging, I did not want to stress the bias of the quilt pieces and risk having tucks in the stitching. I hope that makes sense.

Starting from the centre of the quilt and working outwards, I can recommend quilting all the parallel lines, ie horizontal before commencing the vertical lines to create the crosshatching. This seemed to produce the most even result.

Veterans Cross Quilt Part 5 Quilting and Binding susies-scraps.com

Adding the Binding

It seemed logical to me to use a striped fabric for the binding. I chose navy and white.

Veterans Cross Quilt Part 5 Quilting and Binding susies-scraps.com

To me, it is very complementary for the overall design. Here are some posts about binding.

Quick Bind Every Time – Tutorial and Quick Bind Every Time Improved

Veterans Cross Quilt Part 5 Quilting and Binding susies-scraps.com

The Singer walking foot was used to apply the binding as well.

Veterans Cross Quilt Part 5 Quilting and Binding susies-scraps.com

Thank you for joining me on this quilting journey. Don’t forget to label your quilt. Maybe you have someone special in mind who would like a quilt like this.

I have someone special in mind.

If you enjoyed this post, you may also like

Quilting Daisies

All In Hand – Lessons In Hand Quilting

Free Motion Quilting – Part 4 – Begin FMQ

Happy Stitching,

Susie

© Susan Stuklis 2026

Veterans Cross Quilt Part 3 – Making the Sashings Block

Veterans Cross Quilt Part 3 – Making the Sashings Blocks

Hello Dear Friends and Readers. A warm welcome to today’s post. Today I would like to share with you this quilt top I have been working on for the last few months. (Amongst other projects of course) Today is the third part in the making of this Veterans Cross Quilt.

In Australia, we commemorate Anzac Day. I have this quilt in mind for this occasion. I have relatives who have served for our country and for them and for all others who put their lives on the line I am very grateful.

This is Part 3 of the Veterans Cross Quilt. Making the Sashings Blocks.

Finished block size 8” x 5”

In order to make this quilt, complete;

25 of the Veterans Cross Quilt Blocks Veterans Cross Quilt Block

Make 36 of the Nine Patch Blocks Making Nine Patches

Make 60 of the sashing blocks.

Requirements and Cutting for the Sashings Blocks

I decided on a light blue tone on tone print for the sashings blocks. Approximately 1 ½ yards/metres required.

From the light blue tone on tone fabric cut 24 of 2” Width of Fabric strips. Sub cut 120 of 8” x 2” strips.

For the centre strip use a white solid at least ½ yard/metre required. Cut 8 of 2” Width of Fabric strips. Sub cut 60of 5 “ x 2” strips.

From a navy print fabric, approximately 1/3 metre required, cut 8 of 2” Width of Fabric Strips. Sub cut 120 of 2” x 2” squares.

This photo shows what we are up to so far.

Veterans Cross Quilt Part 3 - Making the Sashings Blocks susies-scraps.com
Veterans Cross Quilt Part 3 – Making the Sashings Blocks susies-scraps.com

Making the Veterans Cross Sashings Blocks.

Sew a 2” x 2”navy print square to each end of the 5” x 2”white strip. Press. This will be the centre strip.
Sew a 8” x 2” light blue tone on tone strip to each side of the centre strip. Press.

Make 60 of these Sashings blocks.

Veterans Cross Quilt Part 3 - Making the Sashings Blocks susies-scraps.com
Veterans Cross Quilt Part 3 – Making the Sashings Blocks susies-scraps.com

Once all the sashings blocks are completed, begin to lay them all out between all the blocks and around the edges of the quilt

Veterans Cross Quilt Part 3 - Making the Sashings Blocks susies-scraps.com
Veterans Cross Quilt Part 3 – Making the Sashings Blocks susies-scraps.com

Lay out the centre part of the quilt top using the Veterans Cross Blocks as the guide, laying them out in a 5 x 5 configuration, then add the nine patch cornerstones and the sashings blocks in between.

Veterans Cross Quilt Part 3 - Making the Sashings Blocks susies-scraps.com
Veterans Cross Quilt Part 3 – Making the Sashings Blocks susies-scraps.com

Continue by adding the remainder of the sashings blocks around the perimeter of the quilt top, with the nine patches in between each sashings block.

I just love how adding these sashings blocks adds so much diagonal movement to the quilt even though all we have been doing is making straight seams!

Veterans Cross Quilt Part 3 - Making the Sashings Blocks susies-scraps.com
Veterans Cross Quilt Part 3 – Making the Sashings Blocks susies-scraps.com

I use the scaffolding method to put this quilt top together. Just the same is doing this little block 36 Patch Postage Stamp Blocks Tutorial but on a much bigger scale. I hope that makes sense. Please feel free to email me with any questions or comments.

Join me next week for Part 4 of the Veterans Cross Quilt.

If you enjoyed this post, you may also like these blocks.

Around the Garden – In Scraps – Block

Arkansas Cross Road Quilt Block Tutorial

or this little quilt, Stars and Crosses Band Quilt

Happy stitching,

Susie

Susan Stuklis © 2026

Mothers Day Mini Quilt

Mothers Day Mini Quilt

Hello Dear Friends and Readers and a warm welcome to today’s post. With Mother’s Day a rapidy approaching (here), I thought it would be nice to make something for the day. I’m feeling in the pink! So pink is what I thought I would use. I’m using scraps in various different pinks with a nice crisp tone on tone white for the background. If you decide to join in, use whatever colour you like. I really like small quilts. This could be made as a wall hanging, however. I like to use a small quilt around the kitchen or laundry as a pretty table topper, or really anywhere where you would like to have a little bit of a softer surface. It is perfect for morning or afternoon tea, especially for Mother’s Day. And Mother’s Day can be every day! I hope you consider making one for yourself.

Let’s get to it, because times a wasting.. This is designed to be a quick project. This mini quilt is made using strip piecing for speedier construction, however one could use 2” squares if preferred.

Finished quilt size approximately 20” x 23”.

Requirements for the Mother’s Day Mini Quilt

Approximately 12” of width of fabric white tone on tone, sub cut into;

5 of 2” width of fabric strips. Cut four of 2” x 17” strips for the first border.

Cut 12 of 2“ x 20“ white tone on tone strips for the checkerboard centre (or 49 of 2” x 2” white squares

12 of 2“ x 20“ assorted pink strips ( or 50 of 2” x 2” assorted scrap pink squares)

For the second border, cut four of 2” x 20 strips of a small print pink fabric

A pice of thin batting, approximately 23” x 25”

A piece of backing fabric, approximately 23” x 25”

3 of 2 1/4” width of fabric strips in medium rose pink for the binding

Making the Mother’s Day Mini Quilt

Make the Checkerboard Centre

Take the 12 each of the assorted pink strips and the white strips to the machine. Sew the strips together, alternating between the white and pink strips until you have use them all up and now have a piece of striped fabric.

Mother’s Day Mini Quilt susies-scraps.com

Press. Take to the cutting board and cut carefully across the strips into long 2” width strips.

Mother’s Day Mini Quilt susies-scraps.com

You will now have a lot of little squares in strips.

Mother’s Day Mini Quilt susies-scraps.com

The strips will now be reattached together to make a checker board pattern, by turning the strips alternately from top to bottom, so that white is against pink and pink is against white, as pictured.

Mother’s Day Mini Quilt susies-scraps.com

Arrange the strips into a checkerboard pattern in a 9 x 11 configuration, ensuing that each of the four corners begins with a pink square.

If necessary, you may need to unpick one or two squares from the lengths if you need to change the position of a colour or if you have used scraps to make up your strips, as I did.

Mother’s Day Mini Quilt susies-scraps.com

Sew all the rows together. Sewing from one side to the other, this will make sure that the seam allowances will all be facing the same direction for each row. This will make pressing a breeze. Press. Here is what the back looks like.

Mother’s Day Mini Quilt susies-scraps.com

Adding Borders to the Mother’s Day Mini Quilt

First Border

Using the 4 of 2” x 17” white tone on tone strips. Sew a strip to the long side of the checkerboard centre. Repeat on the opposite side. Now sew the remaining two strips to the two shorter sides.

Second Border

Using the 4 of 2” x 20” pink small print fabric, sew one 20” x 2” strips for the to the long side of the quilt. Repeat for the opposite side. Sew the remaining two strips to the two shorter sides. Press.

Mother’s Day Mini Quilt susies-scraps.com

Optional Appliquéd Heart

If desired, use a scrap 2” x 2” pink leftover square to make a heart. Fold in half and cut into a heart shape. Clip the curves and then use needle turn appliqué to attach to the centre of one white border.

Mother’s Day Mini Quilt susies-scraps.com

Quilt and Bind

Lay out the backing fabric right side down, top with the piece of batting and the quilt top right side up. Smooth all layers. Pin baste. Quilt as desired. I used my newly acquired walking foot to quilt the top through all the white squares along the diagonals. Walking it Through Plaid Lozenges Quilt

Mother’s Day Mini Quilt susies-scraps.com

Attach the binding to the front edges of the quilt. Turn to the back and hand stitch in place. Quick Bind Every Time Improved

Happy Mother’s Day. Happy Tea time!

Mother’s Day Mini Quilt susies-scraps.com

If you enjoyed this post, you may also like,

Tea Time for Alice Mini Quilt

Kettle Quiltlet and Tutorial

All Heart – Mothers Day Quilt and Pattern

Hexagons Charming Free and Easy

Happy Stitching,

Susie

© Susan Stuklis 2025

Rings Eternal Quilt Block

Rings Eternal Quilt Block

Hello Dear Friends and Readers and a warm welcome to today’s post.

I never ceased to be amazed at how the oddest old scraps can come together and create a thing of beauty. In a previous post Sixteen Across Quilt Block I put together 2 ½” scrap squares to make the block. The only decision ,was to decide whether a scrap was light or dark.

Today I am starting to put these together to make a larger block which I have named Rings Eternal Quilt Block.

Again, this is put together quite simply, however, I believe it yields a very nice result. I am using a selection of scraps of various blues and greys to make the background sashing strips. When it is complete, the ring is formed from the dark scraps through the diagonal of each block.

So let’s get to it.

Block size 18“ x 18“

Seams based on 1/4”

Requirements for one Rings Eternal Quilt Block

Four of the 16 across quilt blocks

Four 8 1/2“ x 2“ strips in various blues and greys for the sashings

One of 2“ x 2“ white on the white square for the centre

Rings Eternal Quilt Block susies-scraps.com

Making the Rings Eternal Quilt Block

Making the Rings Eternal Quilt Block
Rings Eternal Quilt Block susies-scraps.com

Lay out the four Sixteen across Quilt Block in a square. The four blocks are placed so that the dark diagonal of the centre creates the shape of a ring.

Place the various blue and grey sashing pieces between the blocks. They should all be different pieces. Place the white square in the centre.

Stitch together like a nine patch. I have been making these blocks on my trusty Singer 201K treadle. Singer 201K Treadle C1947

Rings Eternal Quilt Block susies-scraps.com

Place a sashing strip,right side down onto the top right hand side of the first Sixteen Across Block. Continue chain piecing and place the white centre square right side down on the next sashing strip and sew down. Follow with the next Sixteen Across Quilt block and place a sashing strip right side down and sew the seam.

Rings Eternal Quilt Block susies-scraps.com

Next row. Sew the next Sixteen Across Quilt Block to the sashing strip. Then sew the end of the next sashing strip to the white centre square.

Follow with the next Sixteeen Across Quilt Block. The diagonal of each block rotates around the centre square to form the ring.

Rings Eternal Quilt Block susies-scraps.com

Turn the whole Rings Eternal Quilt Block. Pin the remaining seams. Ensure that all the seam allowances are sitting correctly. Sew down each side of the centre sashings.

Press the Rings Eternal Quilt Block.

Here is the finished block. It is a nice big block.

Rings Eternal Quilt Block susies-scraps.com

Thank you for joining me today.

If yiou enjoyed this post you may also like to

Arkansas Cross Road Quilt Block Tutorial

Scrap Double Four Patch Quilt Block Tutorial

Mum’s Garden Quilt

Four Patch baby quilt “Where’s Teddy”

Happy stitching,

Susie

© Susan Stuklis 2023

Woven Star Quilt Block Made Easy

Woven Star Quilt Block Made Easy

Hello Dear Friends and Readers and welcome to today’s post. This is the result of a comment I had from Ginny, who had seen my Arrowhead Block Made Easy.

The Arrowhead Quilt Block Made Easy

I think she felt inspired to be able to make this block, and she also requested that I explain how to make a Woven Star Block. I had a look at some of the blocks online, and they seemed somewhat overly complicated, with way too many pieces and too many seams and points to match.. So I decided to take on the challenge and make it in an easier fashion….. at least I hope so.

It also happened that I have a bunch of homeless scraps which were perfect for this project.

After studying the block briefly, initially I thought that it could be made by using strip piecing and some other quick units. So I gave that a go but I was not happy with the result. Too many bias edges ….so I decided to sleep on it….

Following some rest and contemplation, I considered making it like the way that a French Braid Quilt would be made. This also took a few more tries to get it right.

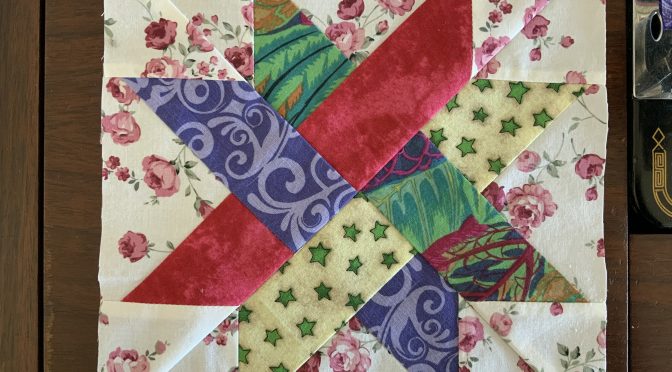
This is what I came up with. In the end it is really like a four patch of triangles. No bias edges on the outside of the block with less pieces and seams. That’s a winner for me!

My suggestion would be to use four fabrics, which have good contrast, either in colour or dark and light and a background fabric which will contrast with them all.

By the way, I have no idea where this block originated from.

As always all my fabrics were pre washed.

The blocks are approximately 8 ½” x 8 ½”

Seams based on 1/4”

Requirements for the Woven Star Quilt Block Made Easy

For the Woven Star Cut

Four of 2” x 3 1/2” strips (one of each colour)

Four of 2” x 5” strips (one of each colour)

From the Background Fabric Cut

One of 2 1/2” width of fabric strip – Subcut using your ruler on the 45 degree line to cut four base triangles ( The hypotenuse should measure 5”)

Four of 3” x 3” squares cut once on the diagonal to make 8 corner setting triangles.

Woven Star Quilt Block Made Easy susies-scraps.com

Making the Woven Star Block Made Easy

Now we will lay out the pieces to make the block.

Lay out the base triangles as shown below. To the right side of each base triangle add one of the short 2” x 3 1/2” coloured strips. Then place each of the 2” x 5” strips to the other side of each triangle so that they oppose the strip of the same colour.

Woven Star Quilt Block Made Easy susies-scraps.com

Note that we are keeping the setting triangles on the side for the moment.

Woven Star Quilt Block Made Easy susies-scraps.com

Sew a 2” x 3 1/2” strip, right sides together to the right side of a base triangle. Repeat for the other base triangles. Finger press toward the strip.

Woven Star Quilt Block Made Easy susies-scraps.com

TIP replace each unit to the original position of the layout before adding the next strip to make sure they are in the correct position.

Sew the 5” x 2 “ strip to the left side of the base triangle. Press toward the strip. Repeat for the other three units.

Woven Star Quilt Block Made Easy susies-scraps.com

Now there should be four units which look like this. Note how each colour strip is opposing the same colour strip to make the weave pattern.

Woven Star Quilt Block Made Easy susies-scraps.com

Now we will add two of the corner setting triangles to each unit.

With the base triangle at the bottom, put a corner setting triangle right sides together so that the right angle of the triangle is sitting adjacent to the bottom of the seam intersection of the base triangle and the 3 ½” strip. The hypotenuse of the corner setting triangle should follow the same line as the 5” strip. ( I hope that makes sense) Check the photo below.

Pin if desired.

Woven Star Quilt Block Made Easy susies-scraps.com

Sew the right side of the corner setting triangle to the unit using 1/4” seam.

Woven Star Quilt Block Made Easy susies-scraps.com

Fold the triangle back and finger press. Add a second corner setting triangle to the other side of the unit in the same manner.

NOTE The unit should now be a triangle

Woven Star Quilt Block Made Easy susies-scraps.com

Trim out the excess fabric from behind each unit and trim off the doggy ears.

Make sure each unit is in the correct position then put right sides together matching the star seams. Handle carefully at this stage as the corner triangles are on the bias.

Woven Star Quilt Block Made Easy susies-scraps.com

Sew together like a triangular four patch.

Woven Star Quilt Block Made Easy susies-scraps.com

Press and sliver trim if necessary. Here is the Woven Star Block Made Easy

Woven Star Quilt Block Made Easy susies-scraps.com

This block is calling Christmas to me!

If you enjoyed this post, you may also like

Uneven Four Patch Block Tutorial or

Ohio Star Blocks and Tutorial or

Six Pointed Hexagon Stars Antique Inspired Part 2

Susie

© Susan Stuklis 2023