Tag Archives: Hexagons Free

Hexagon Stars Diamond Circles Quilt – Part 5 Making the Columns

Hexagon Stars Diamond Circles Quilt – Part 5 Making the Columns

Hello Dear Friends and Readers and welcome to today’s post. I am excited to be putting this quilt top together now. Here is the link to the previous post Hexagon Stars Quilt Antique Inspired – Part 4 Diamond Circles

For those of you who may have missed earlier posts, I started this top as a portable hand piecing project two years ago. Stitching by the Pool – Six Pointed Stars Antique Inspired

That might seem like a long time but it also shows the cumulative benefit of time and what can be done in spare moments. In all honesty I have really enjoyed the process. The trick is to make sure that some pieces are prepared and organised into a little project bag which is ready to go at any time. Here is a link to the project bags I use.

Patchwork Celebration Bags – Antique Japanese Style – Tutorial

During the last 18 months when my MIL was ill, it was a comforting therapy to have with me as we often travelled interstate to help her whilst she was ill and to be with her.

I can highly recommend having a hand piecing project within easy reach, as we never know what lies ahead……

Anyhow, this is not a negative post, I have just returned from a yoga retreat, which was a true challenge for sure. My aim is to try and stay as fit and flexible as possible so that I can keep on doing the things I love including maintaining this blog and making quilts which I can share with you all. Whilst on retreat I was able to put my columns together in the evenings.

Hexagon Stars Diamond Circles – Making the Columns

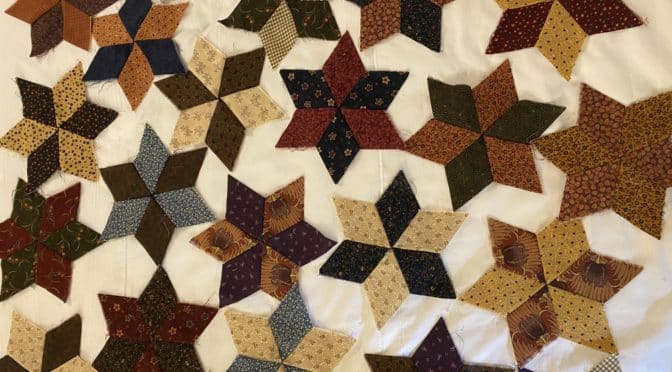
I have made seven columns and in the last post I showed how I added three of the four patch diamonds to most of the stars like this. Hexagon Stars Quilt Antique Inspired – Part 4 Diamond Circles

Hexagon Stars Diamond Circles Quilt - Part 5 Making the Rows susies-scraps.com

There will be four full columns of six stars alternating with three columns of five stars with a half star at each end. Here are the two different columns.

Hexagon Stars Diamond Circles Quilt - Part 5 Making the Rows susies-scraps.com
Hexagon Stars Diamond Circles Quilt – Part 5 Making the Rows susies-scraps.com

In order to finish the columns of five star blocks I cut a star block in half with the rotary cutter.

Hexagon Stars Diamond Circles Quilt - Part 5 Making the Rows susies-scraps.com
Hexagon Stars Diamond Circles Quilt – Part 5 Making the Rows susies-scraps.com

It is just a matter of stitching the stars together into the columns, then the seven columns are ready to be stitched together.

Hexagon Stars Diamond Circles Quilt - Part 5 Making the Rows susies-scraps.com
Hexagon Stars Diamond Circles Quilt – Part 5 Making the Rows susies-scraps.com

These are added to the ends of the three columns of five stars.

Hexagon Stars Diamond Circles Quilt - Part 5 Making the Rows susies-scraps.com
Hexagon Stars Diamond Circles Quilt – Part 5 Making the Rows susies-scraps.com

Here are all the seven columns laid out ready to be sewn together.

Hexagon Stars Diamond Circles Quilt - Part 5 Making the Rows susies-scraps.com
Hexagon Stars Diamond Circles Quilt – Part 5 Making the Rows susies-scraps.com

Hexagon Stars Diamond Circles – Finishing the Sides

I cut four of the rose pink and white diamonds in half to fill in at the ends of the four columns of six stars.

Hexagon Stars Diamond Circles Quilt - Part 5 Making the Rows susies-scraps.com
Hexagon Stars Diamond Circles Quilt – Part 5 Making the Rows susies-scraps.com

I understand that this may not be the most correct way to finish these ends, however, the truth is, that I ran out of the rose pink fabric so it was the best solution. Finished is better than perfect! Besides that it simplifies the process.

For the sides I added leftover triangles previously cut from making the hexagon stars. and a half triangle at the four corners to square it up.

Hexagon Stars Diamond Circles Quilt - Part 5 Making the Rows susies-scraps.com
Hexagon Stars Diamond Circles Quilt – Part 5 Making the Rows susies-scraps.com

Hand Stitching the Seven Columns Together

I found it most helpful to use binding clips to hold the columns together while I was stitching them. It’s way easier than using pins and it avoids being pricked by the pins during the process. Because it’s necessary to pivot along each column to accommodate the triangles and diamond shapes, the binding clips hold the fabric in place nice and firmly. this makes the process very easy and enjoyable.

Hexagon Stars Diamond Circles Quilt - Part 5 Making the Rows susies-scraps.com
Hexagon Stars Diamond Circles Quilt – Part 5 Making the Rows susies-scraps.com

I will be looking forward to hand quilting this top.

I hope you are enjoying some stitching today.

Ifyou enjoyed this post, you may also like,

Scrappy Diamonds Blocks

Grandmother’s Flower Garden Quilt Like Grandma Used to Make

Scrappy Diamonds Kaleidoscope Beauty Star Medallion Quilt – Part 3

Susie

© Susan Stuklis 2024
Hexagons from Circles

Hexagons from Circles

Hello Dear Friends and Readers and a warm welcome to today’s post. Recently, I had the loveliest email from a lady named Janet, who said she is 88, still quilting and loving it. She told me that she always makes her hexagons from circles. I found this very inspiring and so I thought I would follow advice from a very experienced and expert quilter and give it a try. Thank you Janet!

Maybe you are familiar with this process and although I do remember seeing it years ago, I have never used this method before and I am excited to give it a try today.

This lady said her hexies turned out perfect every time. That is an excellent recomendation! The only issue I guess, is working out the size of the circle to calculate the size of the finished hexagon.

Remembering that the hexagons are measured by the length of the side of the hexagon.

Requirements – Making Hexagons from Circles

This project will not cost you anything extra and you can recycle some things you have at home. Basic tools only are required. These are scissors for fabric and some all purpose scissors for cutting the templates, a pencil or marker, a needle and thread and your fabric scraps of course. No need to run to the shops! You can get started right away. Don’t you just love that? When inspiration strikes there is no delay!

By the way, I find this to be very gentle on the hands. No awkward cutting with rulers and rotary cutters.

Making template circles, will be my guide for cutting the fabric circles. I can honestly say this seems like a brilliant idea to me because once all the circles are marked, that can be a very nice evening project of cutting out the marked fabric circles. Also, if one was inclined to fussy cut, it would be very easy to mark circles over the right side of the fabric using a clear plastic template.

Just as an aside, In my honest opinion, cutting out actual hexagons is a bit of a pain. I have tried it and it was very time consuming. Then there is the traditional method of English Paper Piecing. I made my first ones like this Hexagons Charming Free and Easy. However paper templates are still required and it does make for quite a few extra steps.

I will use a whole lot of scraps and mark circles on them, just as you would if you were cutting out dough for scones or biscuits.

Very little thread is required to make each hexagon.

Making Templates for Hexagon Circles

I decided to make a test group of templates so that I could wok out the sizes of the circles required. In the first instance I gathered some lids and small containers to use to make the templates. I used an empty cardboard pasta box and an empty clear plastic bottle to make some experimental templates. Empty plastic milk bottles would be good too. If you wanted a non slip template you could use sandpaper sheets. Janet uses a CD as her template which is brilliant as it’s a perfect circle and easily replaceable.

Here is my collection so far.

Hexagons from Circles susies-scraps.com

I drew around the various size lids onto the cardboard and plastic circles and cut them out with all purpose scissors and measured them.

Cutting the Fabric Circles for Hexagons

Now it is a matter of using the templates of your choice to mark the fabric circles.

Lay the template on your fabric. use a pen or pencil to draw around the circle. Use small fabric scissors to cut out the circle. I cut several at a time.

Use a clear template if you wish to fussy cut. Here you can see the various template circles I made and the resulting hexagons.

Hexagons from Circles susies-scraps.com

Stitching the Hexagons from Circles

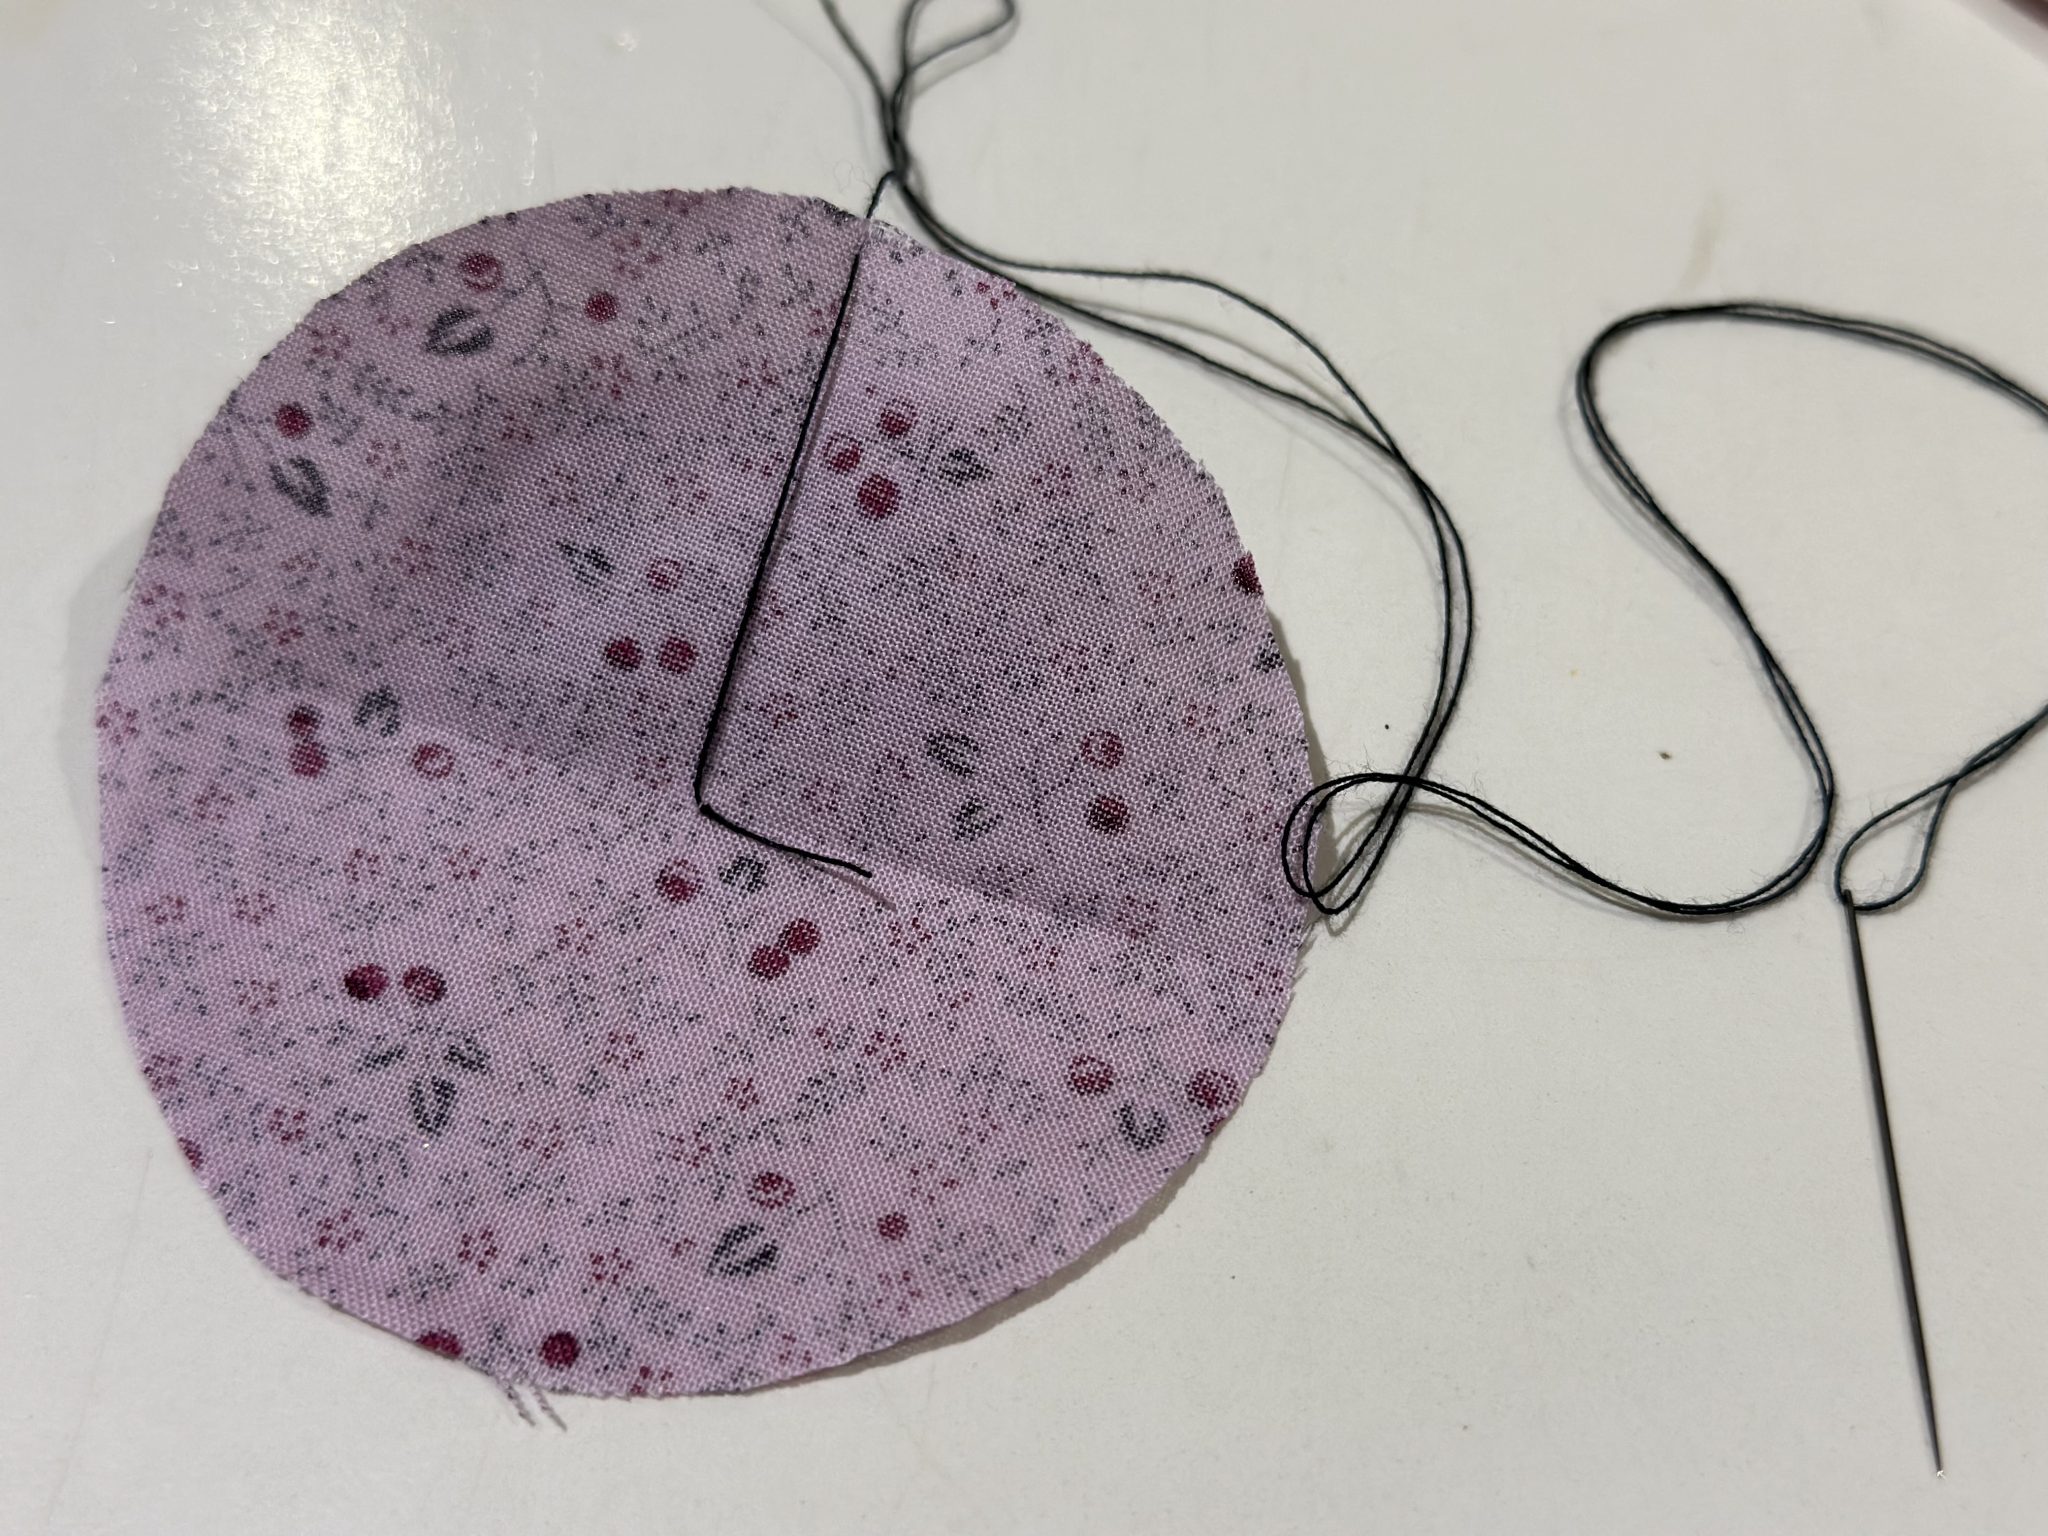
Once the circles are ready, fold each circle (only do this as you are about to sew) in half and then in quarters and lightly finger press just to find the centre of the circle.

  1. With your needle and a neutral thread, thread pick up one or two threads from the centre of the circle. Secure that stitch. (I have used a black thread merely to demonstrate)
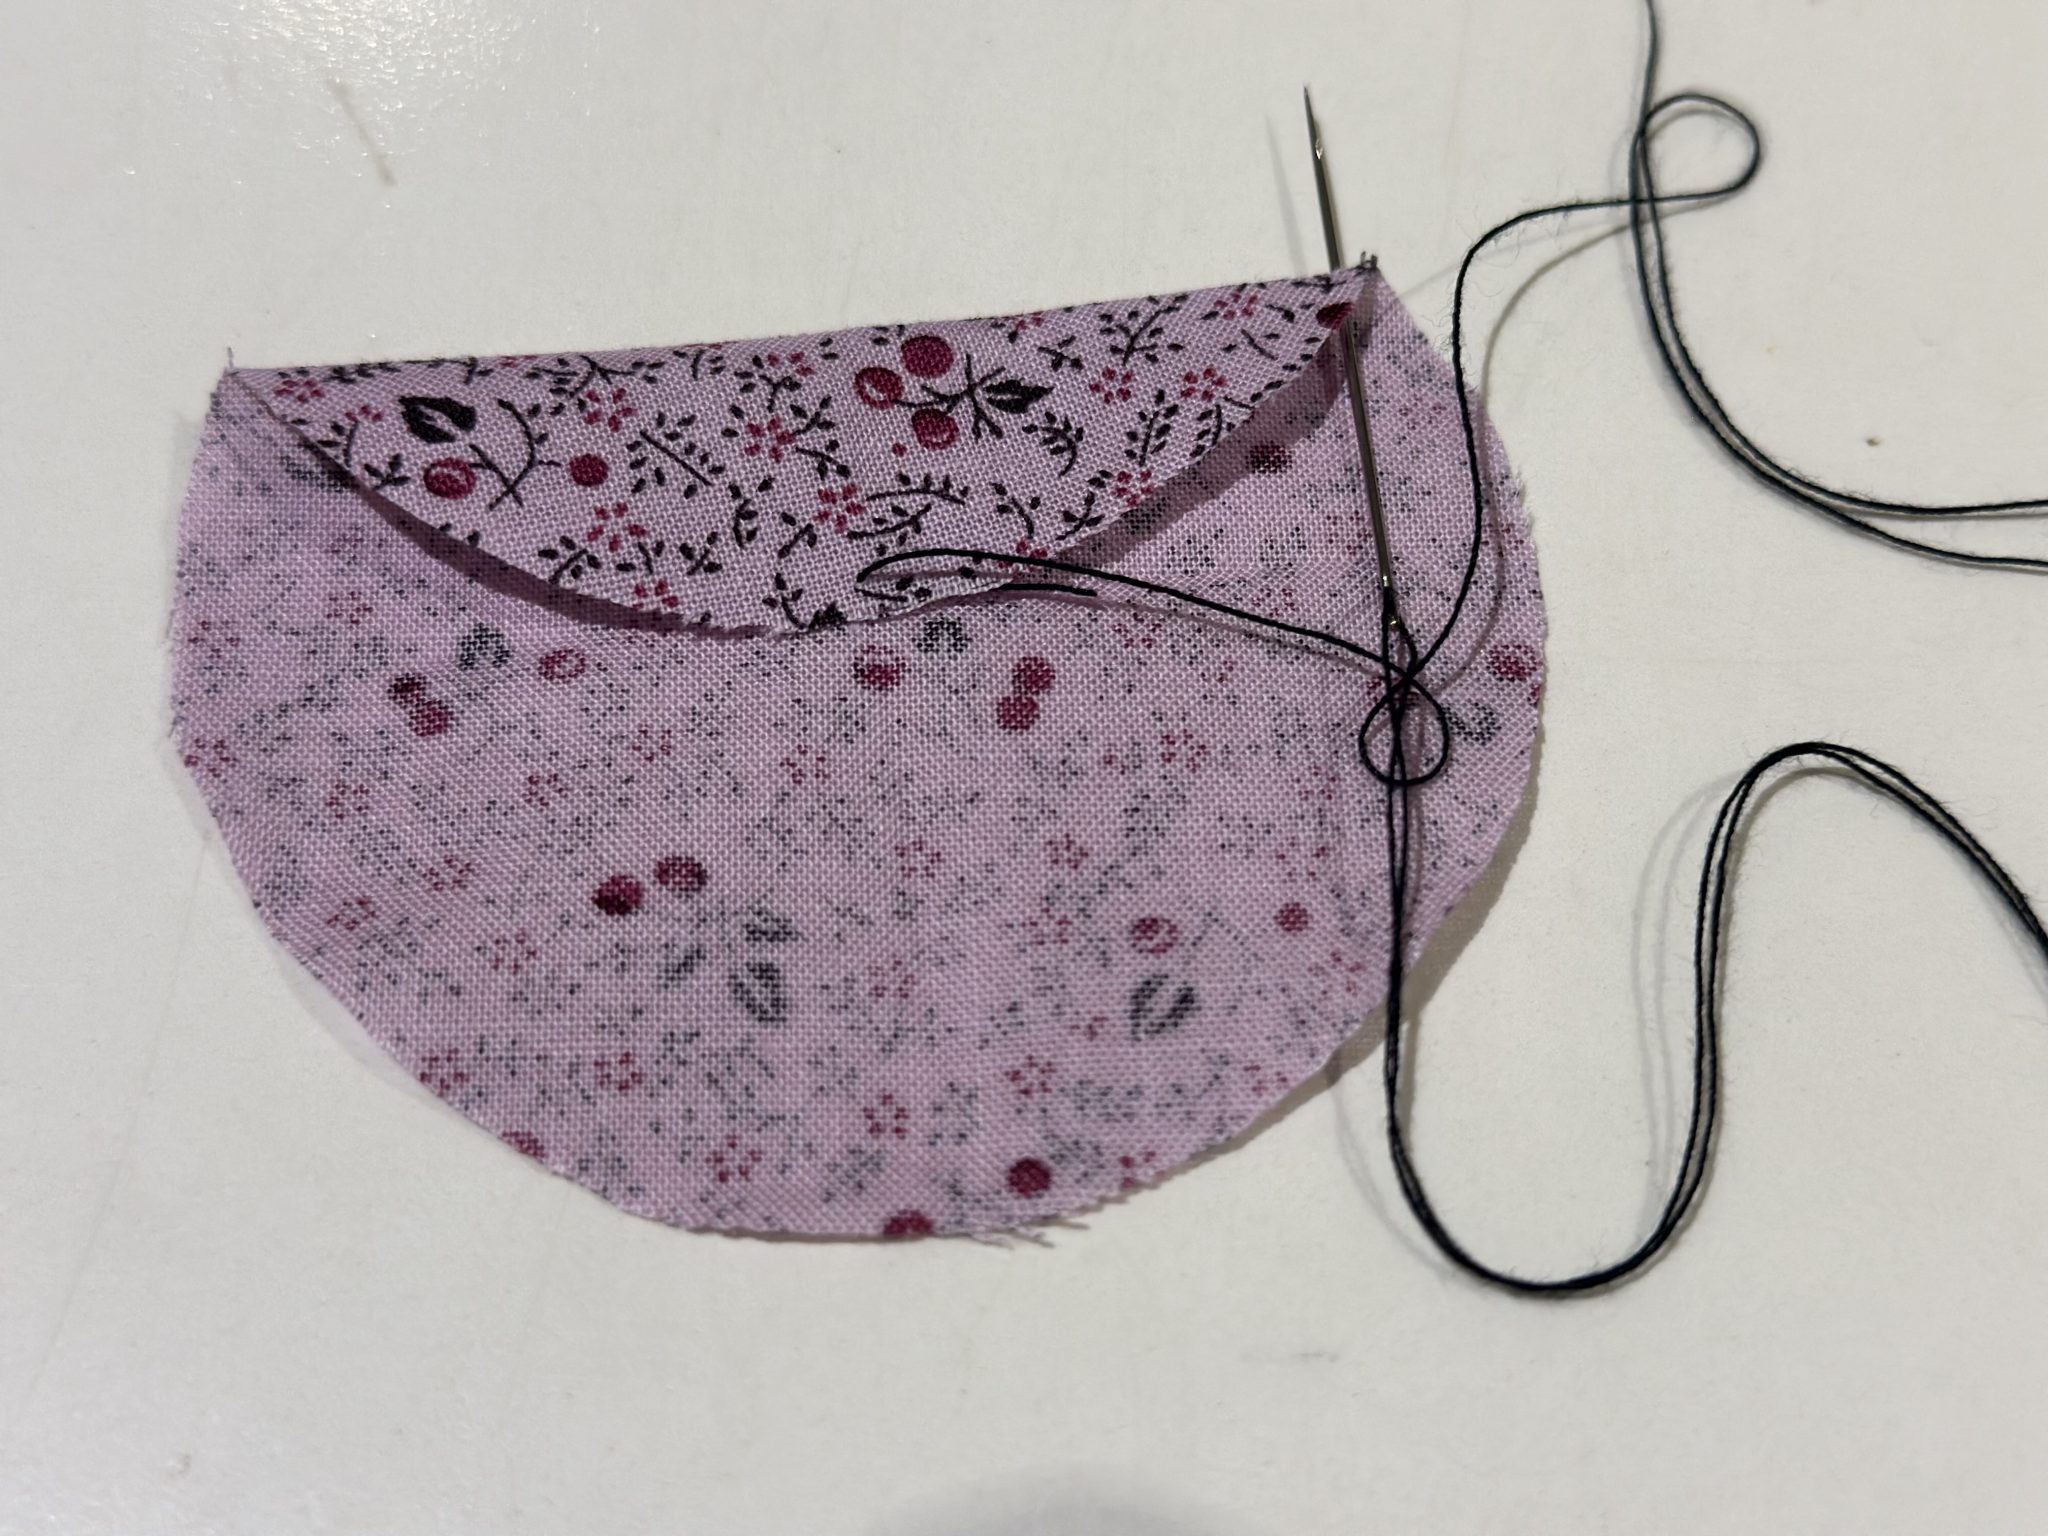
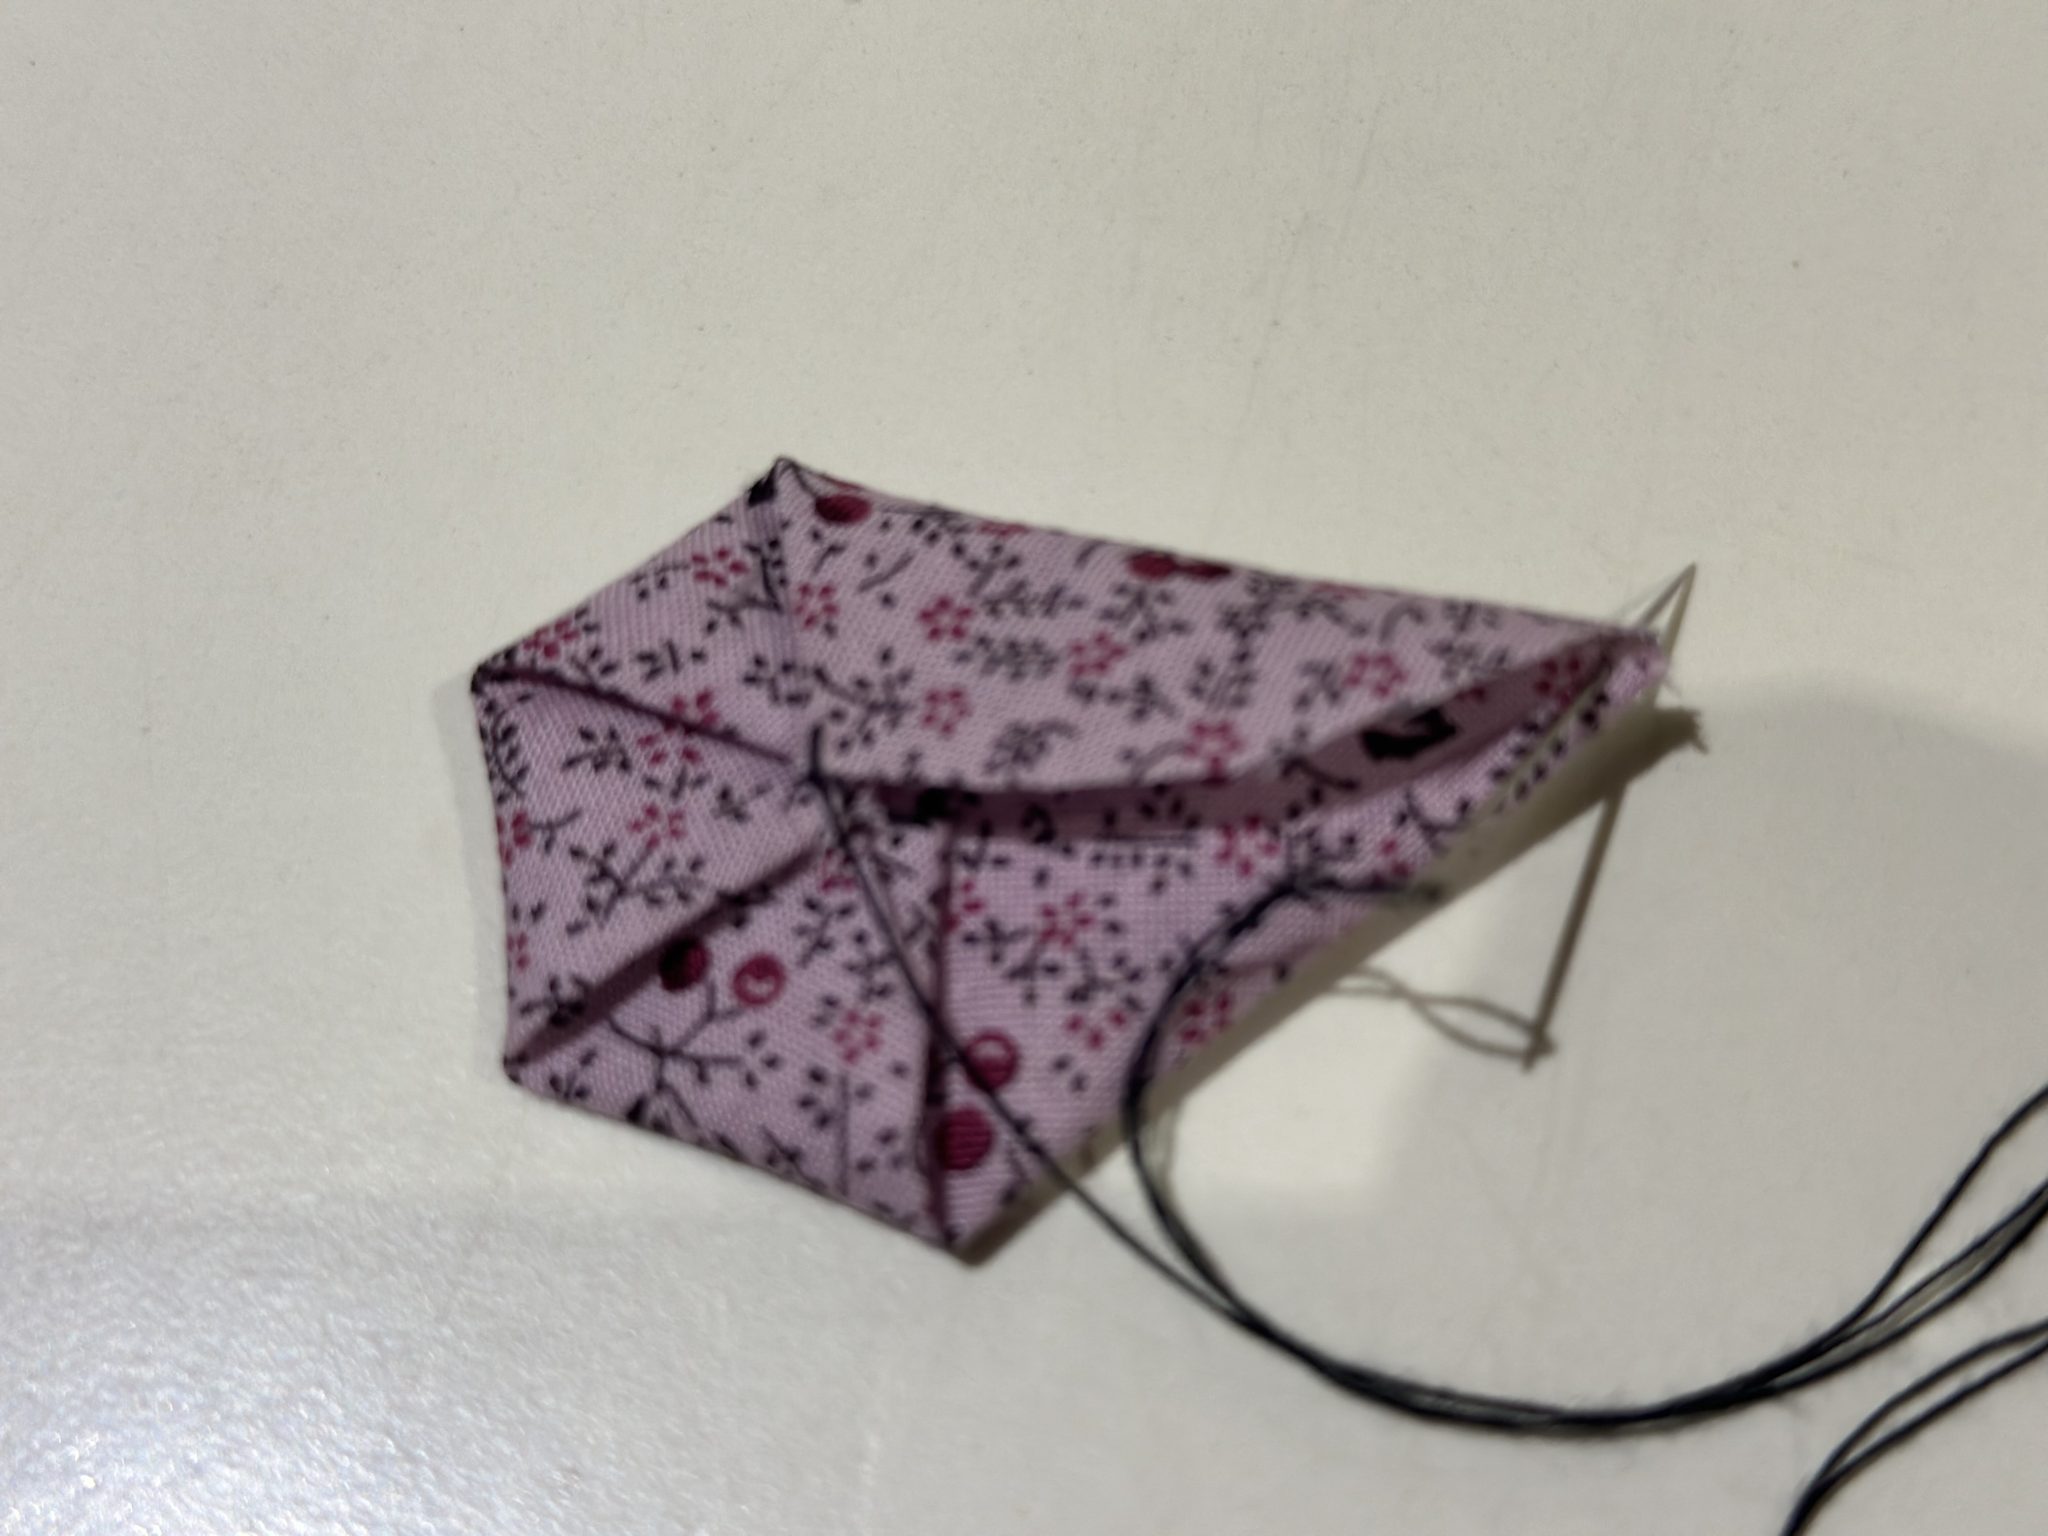
  2. Then sew through the edge of the circle just a few mm or about a 1/8″ from the edge and bring that edge to the centre.
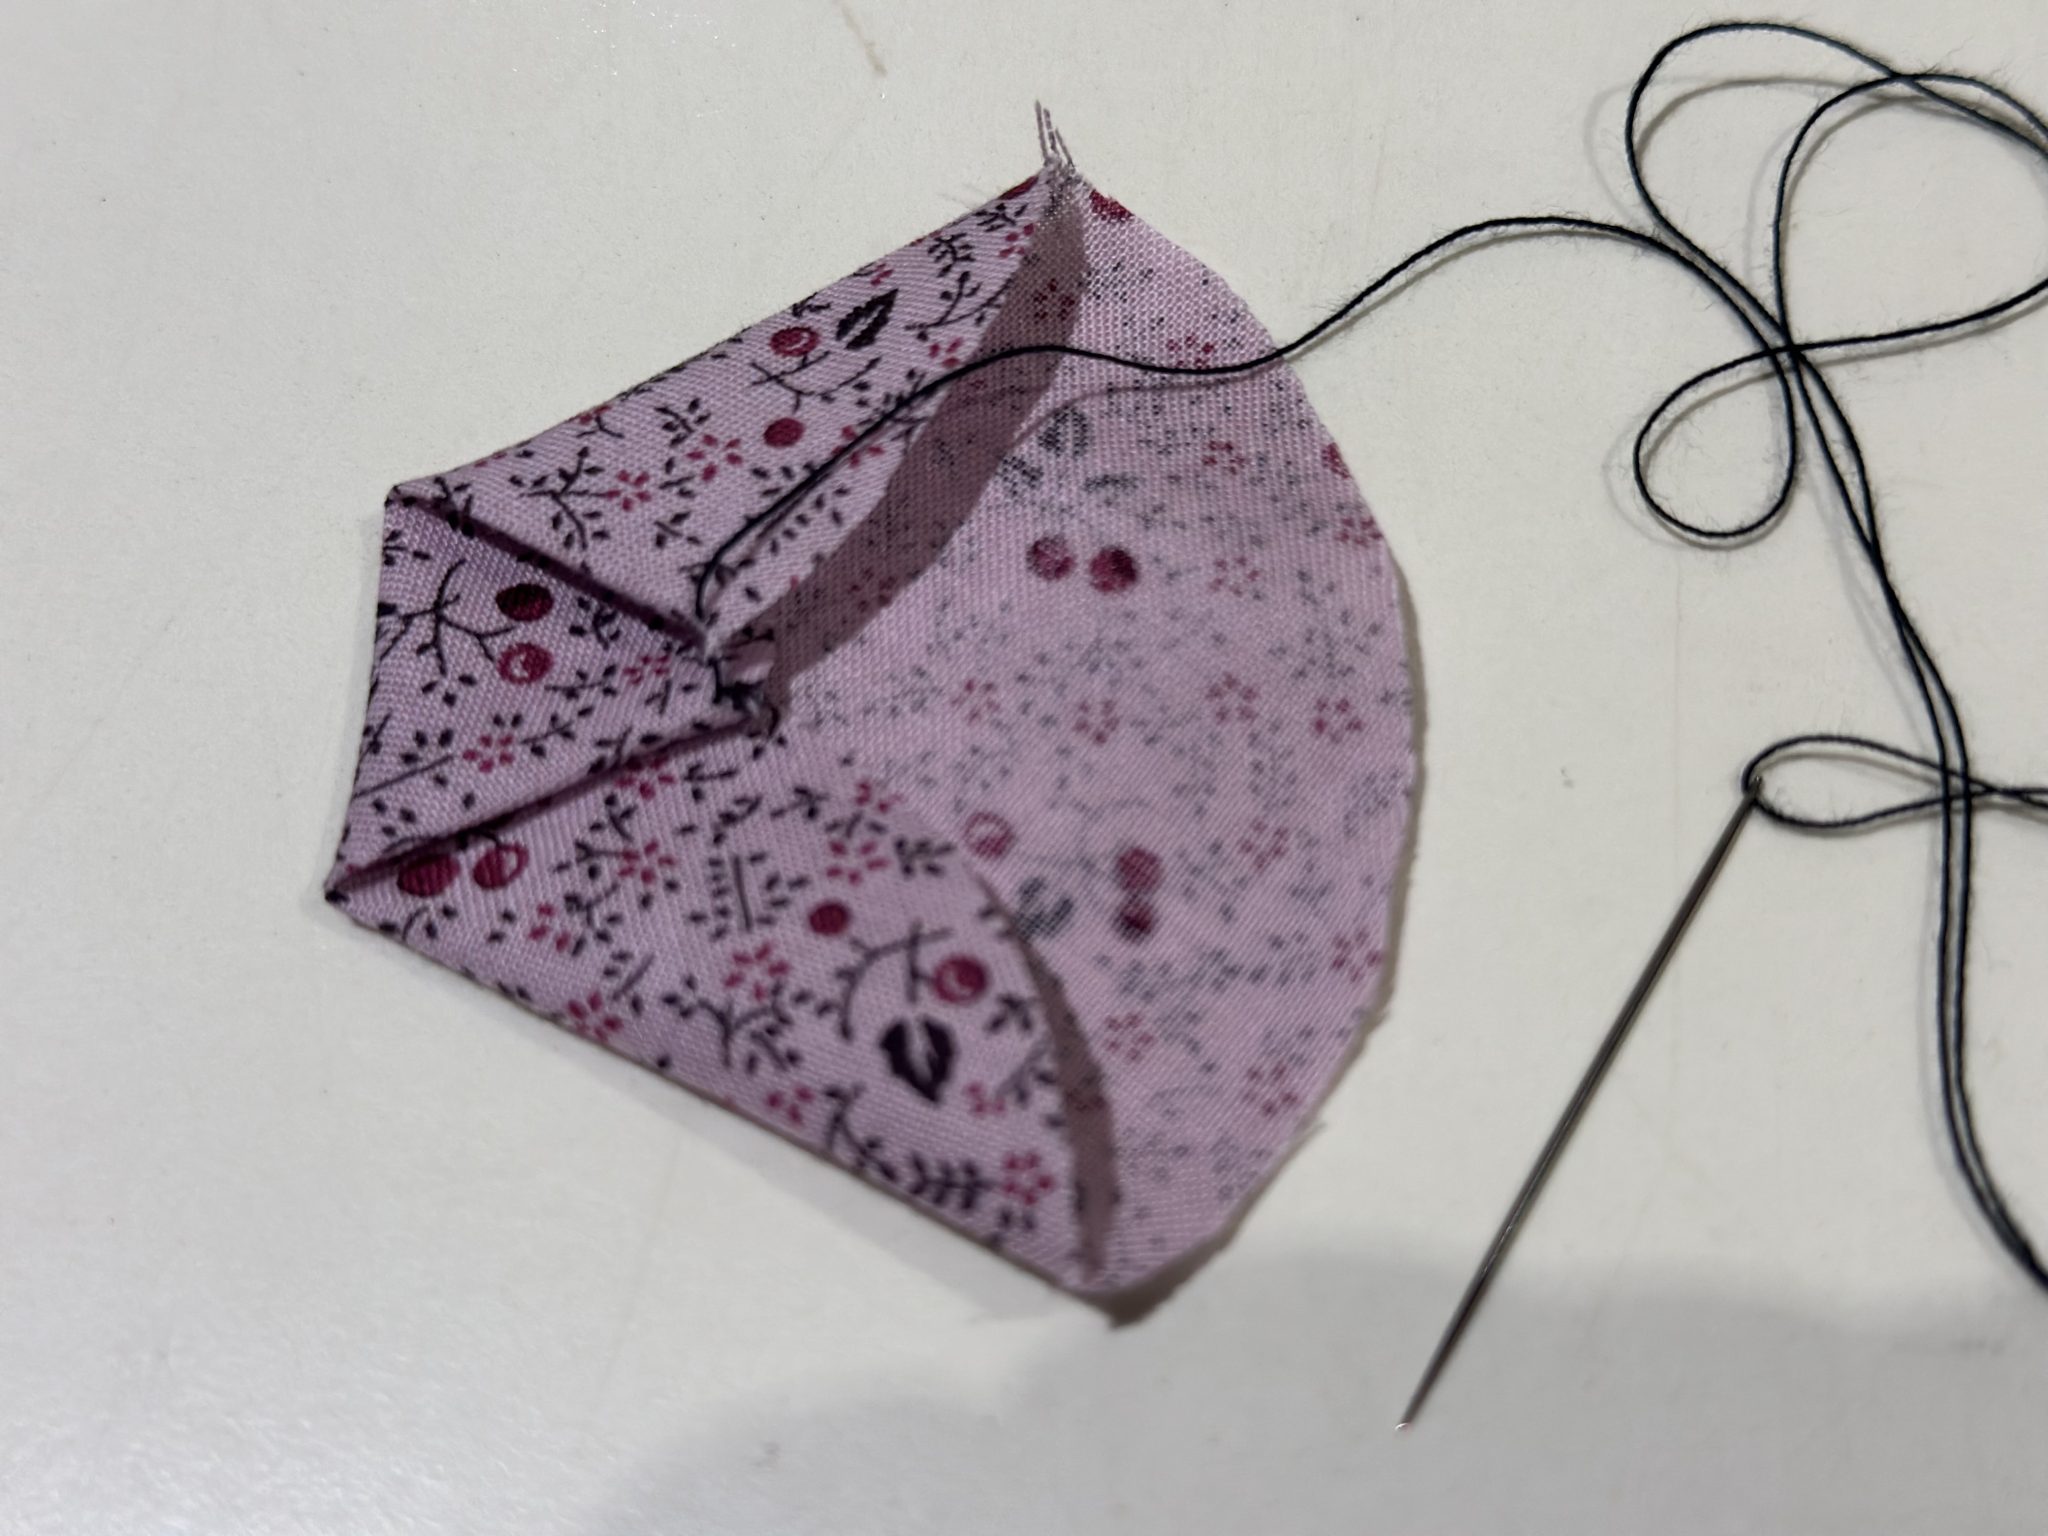
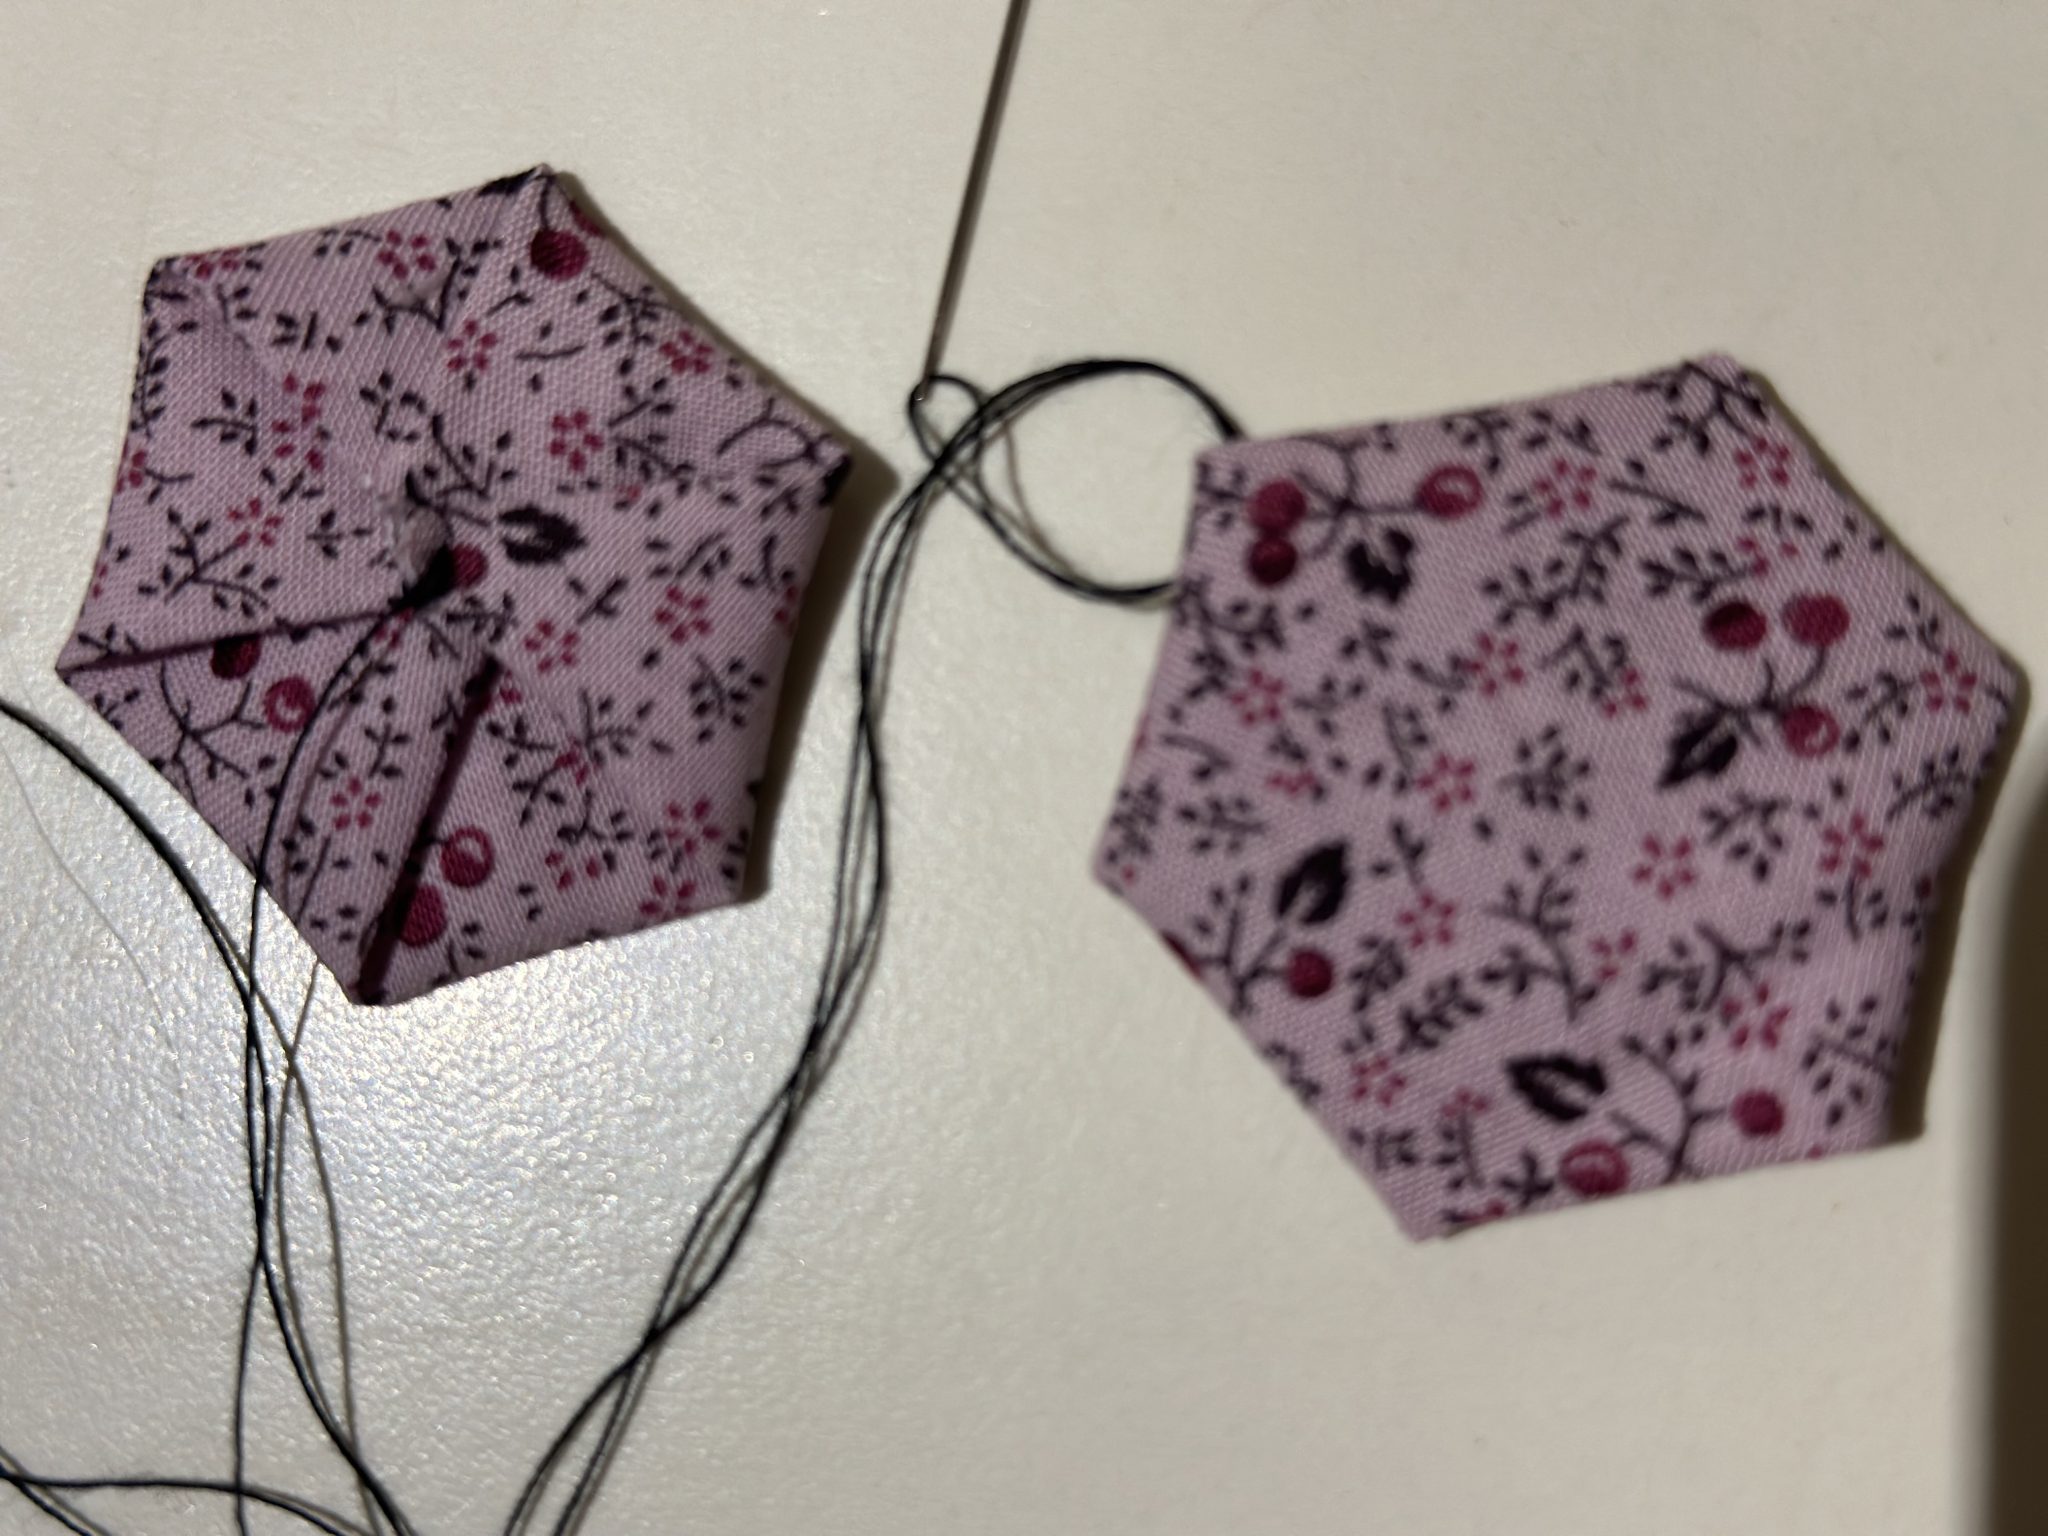
  3. Lightly finger press the fold then put your needle through the edge of the pressed fold near the point using the same distance from the edge of the fabric. Bring that to the centre. and finger press the fold. The first side is made.
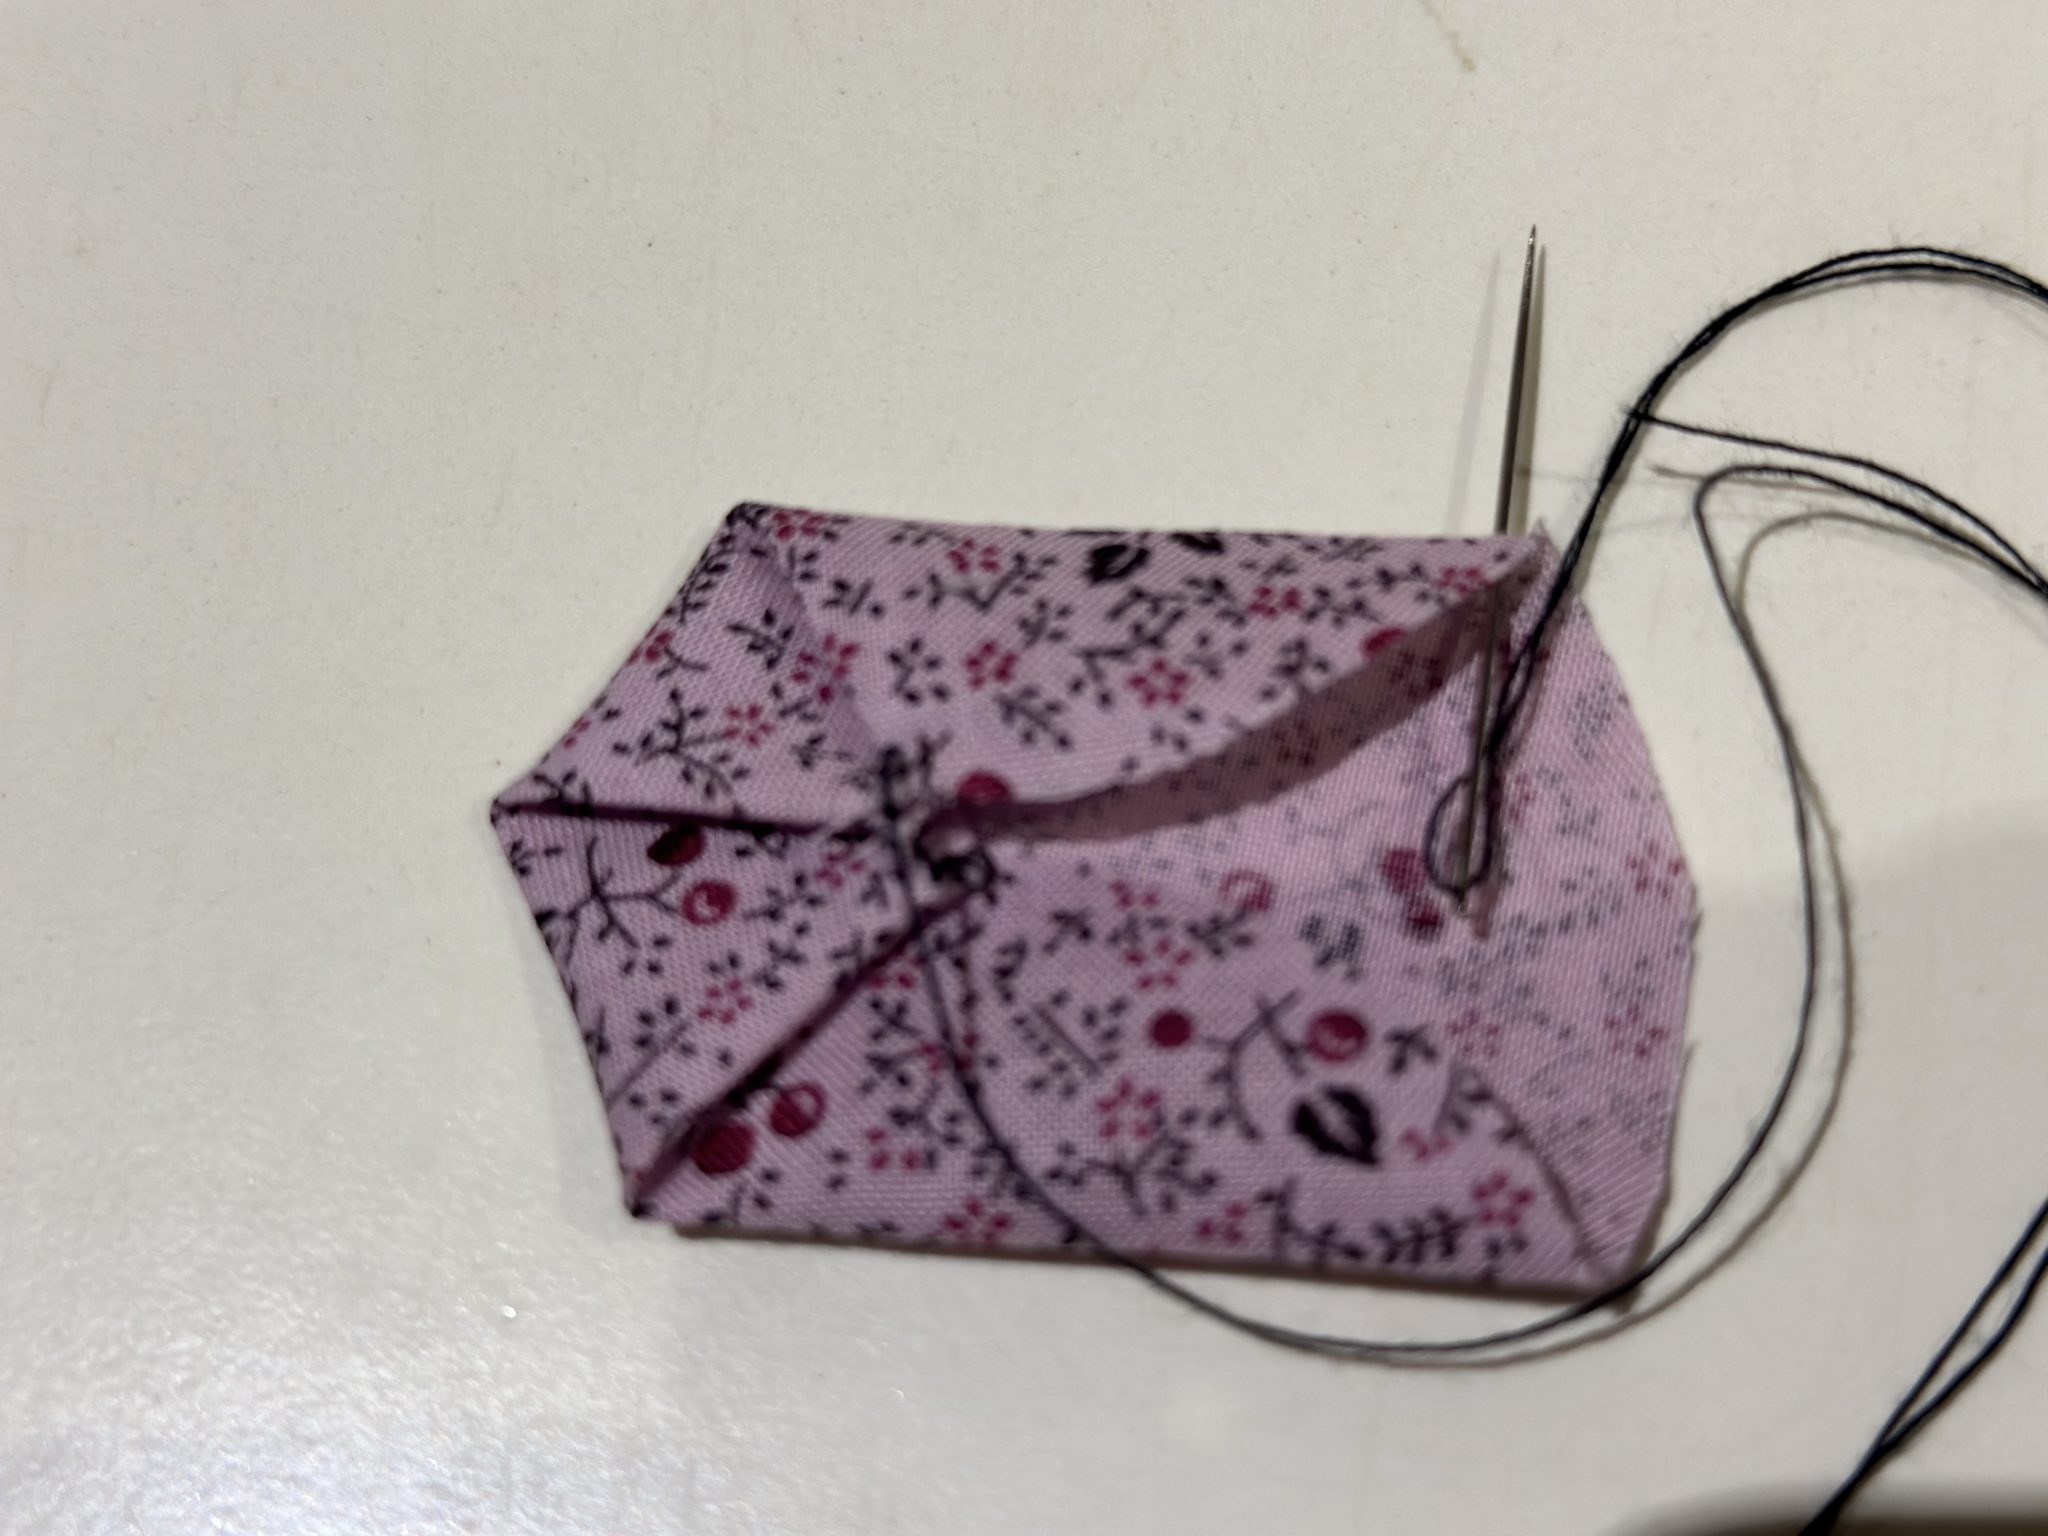
  4. Repeat until all six sides of the hexagon are made.
  5. Secure your stitch.

It us also possible to leave out step one. This is a bit tricker and will require more practice to make it even.

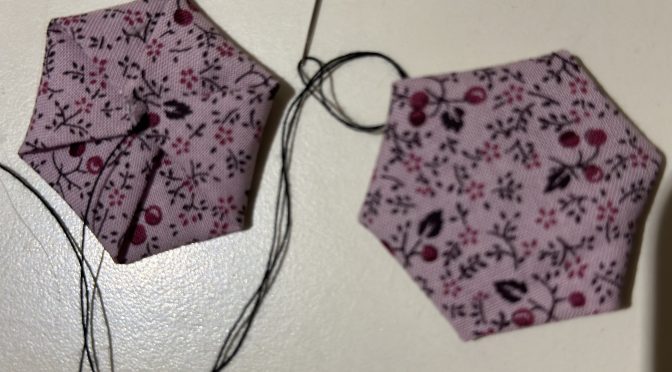
These are some of my experimental hexies. I think they turned out rather well.

Hexagons from Circles susies-scraps.com

Here is what they look like from the back. Rather neat, don’t you think?

Hexagons from Circles susies-scraps.com

NOTE There may be a slight anomaly in the size of the edges of the hexagons. Don’t worry. I believe this is due to the natural warp, weft and bias of the fabric. This will occur inherently because of the differing directional stretch of the fabric. Once they are sewn together it doesn’t matter. I think that preparation of the fabric is much more important, but that’s just me.

Here are some articles – you can decide for yourself.

To Wash or Not to Wash?….This is the Question

Wash your Pre-Cuts?

A Guide to Sizing the Hexagon Circles

Here is a rough guide to achieving the size of hexagon that you would like to make from a circle. Hexagon size is measured from the side of the hexagon, You will need to make your own test just to be sure.

1 3/4″ circle = hexagon of 1/2″

2″ circle = hexagon 9/16″

2 1/4″ circle = hexagon of 5/8″

2 1/2″ circle = hexagon of 3/4″

2 3/4″ circle = hexagon of 7/8″

3″ circle = hexagon of 15/16″

3 1/4″ circle = hexagon of 1″

3 1/2″ circle = hexagon of 1 1/8‘

4” circle = hexagon of 1 1/4” (scant)

4 1/8″ circle = hexagon of 1 1/4″

4 1/2” circle = hexagon of 1 3/8”

4 3/4″ circle = 1 3/8″ hexagon (same as Janet’s CD)

5″ circle = 1 1/2″ hexagon

Hexagons from Circles susies-scraps.com

I am happy to say that I think I have found my next portable hand piecing project! How about you?

If you enjoyed this post, you may also like

Grandmother’s Flower Garden Quilt Like Grandma Used to Make

Hexagon Stars Quilt Antique Inspired – Part 4 Diamond Circles

Hexagon Star Snowflake Trivet

Happy stitching,

Susie

Bias Binding for Hexagon Quilt

Bias Binding for Hexagon Quilt

Hello Dear Friends and Readers. and welcome to todays post. I thought I would share with you my bias binding finish for the Grandmothers Garden Quilt like Grandma Used to make. I have noticed over the years reading posts about hexagon quilts, that one of the questions often asked is “How will I finish the edges of my quilt?“because obviously they are for the most part not straight.

I think from my point of view there are a few options. I think it will also depend on the size of the hexagons to some extent.

One method is to appliqué the edges to a finishing border, which is a great idea especially if the quilt needs to be a bit bigger or you feel like it needs “framing“.

The next method would be to just straighten the edges using a rotary cutter. Personally I didn‘t want to do that. Or, on a similar note, make partial hexagons to fill in the edges to make them straight. This is what I opted to do for two of the sides where there were empty half hexagon shapes and that seemed logical for those two sides.

The next method is to let the hexagon shapes be the feature and just bind the zig zag edges. This is what I did for the other two sides. I just finished hand quilting this quilt. Here is the link All In Hand – Lessons In Hand Quilting

Obviously the bias binding is cut on the bias. Rather thasn reinventing the wheel, here is a nice short video on how to fold and cut the fabric. I used this method from Red Hart Quilts.. https://www.youtube.com/watch?v=_dgB4Hc_Xe4

Bias Binding for Hexagon Quilt susies-scraps.com

Requirements for the Bias Binding for Hexagon Quilt

I cut at least 10 metres of bias binding for finishing the

Grandmother’s Flower Garden Quilt Like Grandma Used to Make All the links are in the post for details on how I made this quilt.

Bias Binding for Hexagon Quilt susies-scraps.com

Joining the pieces together was a cinch as all the ends were already cut at a 45 degree angle.
My binding strips are 2 1/2″ wide.

Bias Binding for Hexagon Quilt susies-scraps.com

After joining all the lengths together and rolling up the length it was time to attach it to the quilt edges.

Attaching the Bias Binding to an Uneven Edge

Bias Binding for Hexagon Quilt susies-scraps.com

When applying the binding I sewed up to “V“ point keeping the needle down then pivoting the binding fabric to realign it with the quilt edge.

Bias Binding for Hexagon Quilt susies-scraps.com

Then sew to the point of the hexagon stopping 1/4“ from the corner, needle down and pivot the quilt and the binding fabric to realign the edges again continuing in this manner until all the binding was applied.

Bias Binding for Hexagon Quilt susies-scraps.com

It was not necessary to make any folds in the binding edge as would normally be done for right angle corners. that is the beauty of making bias binding which has some stretch.

Then it was just a matter of handstitching the binding to the back of the quilt.

Bias Binding for Hexagon Quilt susies-scraps.com

Here is the finished quilt.

Bias Binding for Hexagon Quilt susies-scraps.com

It is a pretty good day finishing a hand made quilt. ????

Bias Binding for Hexagon Quilt susies-scraps.com

Thank you for joining me today. If you enjoyed this post, you may also like

Quick Bind Every Time – Tutorial

Prepare binding strips for quilts – Tutorial

Hand Sewing the Binding on a Quilt Tutorial

This quilt was indeed a slow stitching project which i loved doing, however sometimes we need to make a quilt really quickly, here is one. Quickest Queen Quilt Ever & Tutorial of a Rag Quilt

Thanks for joining me on this quilting journey of Grandmother’s Flower Garden Quilt Like Grandma Used to Make

Have a great day,

Susie

Stitching by the Pool – Six Pointed Stars Antique Inspired

Stitching by the Pool – Six Pointed Stars Antique Inspired

Hello hello Dear valued Friends and Readers. Welcome to today’s post. I just love stitching! I feel like it is such a privilege to have you all visit! My mission is to inspire you to make something today. And to use something you already have. Don’t go shopping. Go to your cupboard. Really. There will be something you can use. This project is done by hand stitching. Even if that is not your regular thing, I believe it is really lovely to have at least one hand stitching project in progress. Why you may ask? Well, for one thing, it is extremly relaxing, Hand stitching is a quiet and rather theraputic pursiut which also travels well, especially when it is small. I always try to take a hand stitching project with me on a holiday or if I have to be somewhere waiting. While We Wait Another advantage is, it lends itself to stitching shapes which may not be machine friendly.

Having said that, these stars could be machine pieced with a lot of care….

The inspiration was provided when my friend Ellie, sent me some of her beautiful scraps. Thank you Ellie! Amoungst them was some jelly roll strips which appear to be antique reproduction prints, at a guess. As I have always wanted to make some six pointed stars it seemed like a logical and obvious use for the strips. So, I cut some delicious diamonds and packed them nicely to take on holidays with me and escape the winter cold for a little while.

Requirements for the Six Pointed Stars Antique Inspired

Do you have some 2 1/2” strips lying around? Or……an “aging” jelly roll somewhere? These are easy to cut into diamonds for this Six Pointed Star Block – Antique Inspired.

Are you ready…the cutting is easy. Nothing special required. Just a cutting ruler with a 60 degree line on it and a rotary cutter.

Cutting the 2 1/2″ strips

It is important that the strips are accurate in their 2 1/2″ width. When I say that I am referring to 2 1/2″ width of fabric strips.

Lay out a strip on the cutting board. A few can be stacked if preferred. If you want to fussy cut – then stick with one at a time.

Make sure the strip/s are as straight as possible. Position the ruler with the 60 degree line aligned with the top edge of the strip. For the first cut make sure the ruler is near the beginning end of the strip. Make the first cut.

Stitching by the Pool – Six Pointed Stars Antique Inspired susies-scraps.com

Move the ruler so that it is 2 1/2″ from the first cut maintaining the 60 degree line at the top edge and the ruler edge is parallel with the first cut. I hope that makes sense.

Stitching by the Pool – Six Pointed Stars Antique Inspired susies-scraps.com

Continue cutting in the same way for the rest of the strip. At least six diamonds should be able to be cut from one width of fabric strip.

It certainly gives a feeling of accomplishment having a nice stack of diamonds ready for hand piecing.

Stitching by the Pool – Six Pointed Stars Antique Inspired susies-scraps.com

They can be packed into a nice little bag ready to take with you. I’m using this one. This Patchwork Celebtion Bag can be easily made from scraps. This is the smaller version.

Patchwork Celebration Bags – Antique Japanese Style – Tutorial

Stitching by the Pool – Six Pointed Stars Antique Inspired susies-scraps.com

Stitching the Six Pointed Star Antique Inspired

Now for the yummy stitching. Choose six diamonds three each of two different fabrics.

Stitching by the Pool – Six Pointed Stars Antique Inspired susies-scraps.com

Put two different diamonds right side together. Using a quarter inch seam allowance and beginning the seam approximately 1/4″ to 3/8” from the diamond end, use a small running stitch to hand stitch the seam along one side and finish with a couple of locking stitches 1/4″ from the end.

Stitching by the Pool – Six Pointed Stars Antique Inspired susies-scraps.com

Open the two and place the next diamond alternating the fabrics and taking care to match each new diamond with the previous one.

Stitching by the Pool – Six Pointed Stars Antique Inspired susies-scraps.com

Sew the remaining five seams in the same manner.

Stitching by the Pool – Six Pointed Stars Antique Inspired susies-scraps.com

Continue until the six diamonds are used and the star is complete.

Stitching by the Pool – Six Pointed Stars Antique Inspired susies-scraps.com

Actually quite simple.

These Six Pointed Stars stitch up surprisingly quickly!

Stitching by the Pool – Six Pointed Stars Antique Inspired susies-scraps.com

And indeed it is so relaxing. Stitching by the pool!

Stitching by the Pool – Six Pointed Stars Antique Inspired susies-scraps.com

Here is the link to part 2

Six Pointed Hexagon Stars Antique Inspired Part 2
If you enjoyed this post, you may also like

Hand Pieced Spool Blocks with Instructions

Starmania Trip Around The World quilt challenge

Holiday Stars Quilt and Pattern

Orange Peel Quilt with Charms – Journey so Far

Grandmother’s Flower Garden Quilt Like Grandma Used to Make

Hexagon Star Snowflake Trivet

Happy Hand Stitching,

Susie

© Susan Stuklis 2022

Grandmother’s Flower Garden Quilt Like Grandma Used to Make

Grandmother’s Flower Garden Quilt Like Grandma Used to Make

Hello Dear Friends and Readers, today I will share my journey and the instructions for making a simple Grandmother’s Flower Garden Quilt Like Grandma Used to Make. I have been at this project for years, and although that may seem like a negative, in fact, that is not the case. I kind of call this a Clayton’s Quilt. (That is code for the quilt you make, when you are not making a quilt). You may ask, how can that be? Well this started life as a hand work / travel project. This was done at times when I would not have been able to sew, certainly not with a machine. These moments being when travelling or watching television and other times when just waiting for some reason. So you can see that although it may have taken a long time, in fact I could have been idle at those times and instead I have this top.

I feel like it was a good learning experience too. My initial thoughts were to make this quilt top as our foremothers may have been made years ago. I wanted to experience that process myself, rather than buying precut papers or fabrics. I used the English Paper Piecing method. I cut all my own papers from brochures. I made the hexagons as 2” hexagon because I thought that might be quicker. Here is how I did that.

Hexagons Charming Free and Easy

You can cut your papers from brochures too or print some out and cut those. If you don’t want to cut your own papers, I noticed in a quilt shop today that you can buy them for about $10- for 100 papers.

I used fabric from my stash and picked out fabric which I feel somewhat emulates Art Deco style fabrics like feedsacks. Bright but with limited colour schemes and often with white in the design.

I thought about how these quilts would have been made in the past and I decided to use 5” x 5” squares of fabric. Somehow, that seemed logical to me and I imagined that maybe most ladies would not have necessarily cut out the hexagon shapes from the fabric . Today by chance I read a tale about someone finding a vintage / antique Grandmother’s Flower Garden quilt which was incomplete and still had the papers in it. Guess what….??? The maker used squares of fabric too! It made me feel quite justified in my decision. Actually, I found it helpful to have that bit of extra fabric when wrapping it around the papers prior to sewing them together.

Well now I have put the last stitches into the top and prepared it for quilting. I made a bit of a day of it as i have done before. I call it backing day!

Backing Day!

I had some fabric which I thought would be ideal for this quilt. It has lots of green and tan in a very stylised pattern. I was able to join the fabric easily matching the pattern (sometimes this is a pain) but not this time.

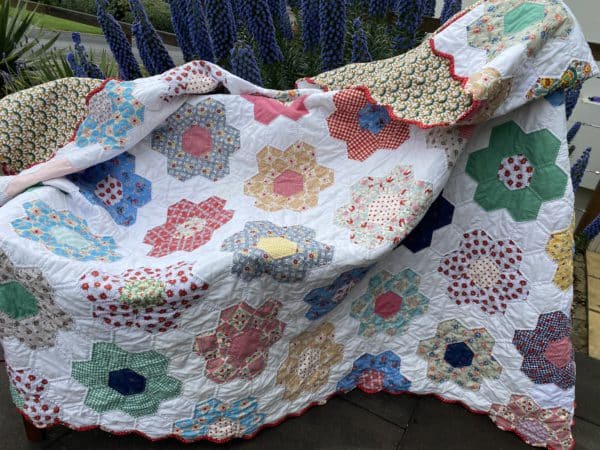
Here she is, all layed out. It will probably take some time to quilt but thats okay with me because the journey has been pleasurable so far.

If you would like to make one, here are the requirements and instructions. It is a good size.

Finished size 77” x 96”

This is a hand piecing project. All fabric was washed and lightly pressed prior to commencement

Previous posts about this quilt.

Growing Grandmother’s Garden

Here is a lovely article which outlines the history fo Grandmother’s Flower Garden Quilts.

http://www.womenfolk.com/quilt_pattern_history/mosaic.htm

Grandmother’s Flower Garden Quilt Like Grandma Used to Make susies-scraps.com

Requirements for Grandmother’s garden Quilt Like Grandma Used to Make

7 1/2 yards / metres of solid white background fabric like white homespun

1/3 yard / metre of 24 assorted fabrics. I chose bright simple prints with white in the background OR 32 assorted fat quarters (or the equalivent in scraps)

675 of 2” paper hexagons (2″ is the measure of each side)

Cutting the fabric for the Grandmother’s Garden Quilt Like Grandma Used to Make

From the solid white homespun – cut 35 of 5” strips across the width of the fabric. Subcut 273 of 5” x 5” squares.

Cut 3 of 3” strips across the width of the fabric. Subcut 24 of 3” x 5” oblongs,

From the assorted fabrics, cut 5” strips across the width of the fabric. Subcut390 of 5” x 5” squares.

Making the Hexagons

See this post for making the hexagon templets and stitching the fabric squares over the templets. Hexagons Charming Free and Easy

Sewing the Hexagons into Flowers

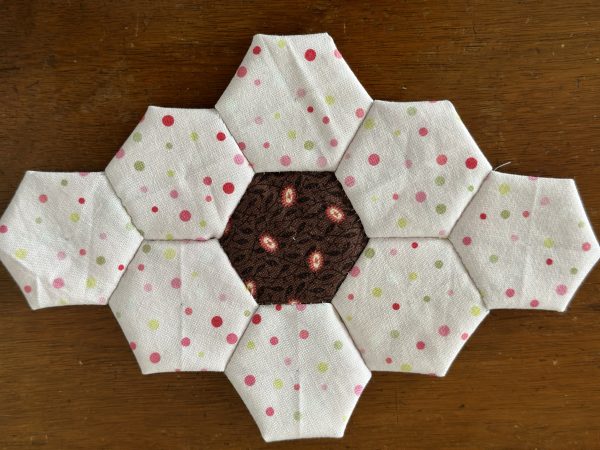
From the assorted fabrics make 50 flowers of 7 hexagons each, with one in the centre being different and the surrounding six hexagons in the same fabric like this.

Grandmother’s Flower Garden Quilt Like Grandma Used to Make susies-scraps.com

Make eight half flowers of one centre hexagon and four hexagons of matching surrounding fabrics.

Grandmother’s Flower Garden Quilt Like Grandma Used to Make susies-scraps.com

Make 273 white hexagons.

Make 24 white half hexagons using 24 of the papers folded in half and using the 3” x 5” pieces of fabric to wrap the half hexagons.

Sewing the Grandmother’s Garden Like Grandma Used to Make together

Hexagons are amazing shapes when you consider the potential for the infinite and ingenious patterns which can be created. Just ask the bees. https://www.scientificamerican.com/article/the-surprising-architecture-in-bees-honeycombs/

For this quilt, it is a very simple layout. I found it easiest to make the quilt in long rows with three white hexagons in between each flower as pictured below. Then add in the missing background white hexagon and join the long rows together. Each row is offset from the previous row.

Grandmother’s Flower Garden Quilt Like Grandma Used to Make susies-scraps.com

Make Five rows of six flowers with three white hexagons in between each flower and each end of the row.

Make four rows of five hexagons with three hexagons in between each flower and add one of the half flowers to each end of the row of five.

Grandmother’s Flower Garden Quilt Like Grandma Used to Make susies-scraps.com

Alternate the rows beginning and ending with a row of six whole flowers, filling in the missing background white hexagons as you go. Nine rows altogether.

To finish, sew in the 24 half hexagons on the outside of the two end rows to make the edge straight.

Grandmother’s Flower Garden Quilt Like Grandma Used to Make susies-scraps.com

There it is. A simple Grandmother’s Flower Garden Quilt top Like Grandma Used to make.

Now I have backed this top and I’m about to start Hand quilting it.

From small beginnings. This quilt top could also be mede with scraps that you have in your stash.

Here is the link to the quilt after it was hand quilted and bound.

Bias Binding for Hexagon Quilt

If you enjoyed this post, you may also like

Hexagon Star Snowflake Trivet

Orange Peel Quilt Blocks Pattern

Hand Pieced Spool Blocks with Instructions

Hope you can make something in times when you might not have thought you could.

While We Wait

Happy stitching

Susie

©️ Susan Stuklis 2022