Tag Archives: Pinwheel block

The Spinner Quilt – Part 3

The Spinner Quilt – Part 3

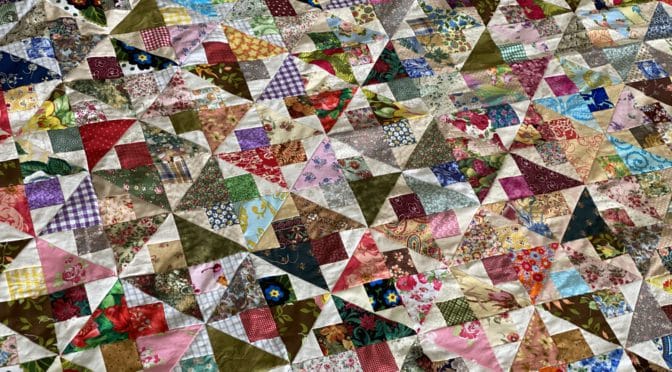
Hello Dear Friends and Readers, welcome to todays post which is the final of The Spinner Quilt construction. It is a reality that sometimes it just takes some time before the light comes on about how a quilt should progress or indeed finish. This one is no exception as it has languished in a pile for sometime without direction. It just needed something….????

Here is the links to part one and two which will give all the details so far.

The Spinner Blocks Made Easy – Part 1

The Spinner Quilt – Part 2

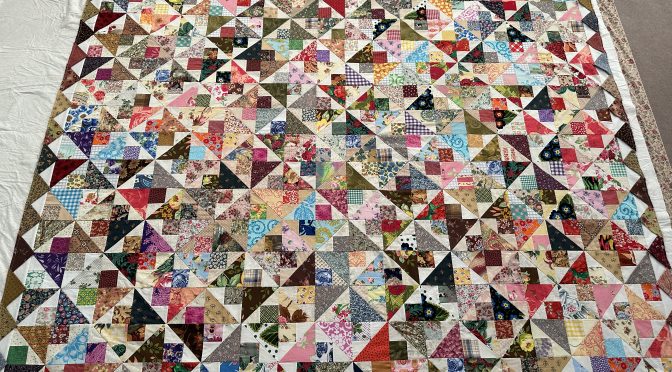
Then yesterday, the illumination did occur. I realised that it needed some kind of framing and so I set about doing that by then adding prairie points to the perimeter which I think really sets it off by giving some colour and diagonal movement which compliments the design without competing with it. This is how I did it.

This quilt top measures approximately 76” x 84 1/2” including the prairie points.

The Spinner Quilt - Part 3 susie’s-scraps.com
The Spinner Quilt – Part 3 susie’s-scraps.com

Requirements for the Border and the Prairie Points

8 of cream/white 2 1/2” width of fabric strips

72 of 5” x 5” scrap squares

I then added the 2 1/2” cream/white borders to the perimeter of the quilt as pictured above.

Make the Prairie Points

Press each of the 72 squares once on each diagonal to form a triangle.

The Spinner Quilt - Part 3 susie’s-scraps.com
The Spinner Quilt – Part 3 susie’s-scraps.com

Placing the Prairie Points

With raw edges all aligned, evenly place the prairie points around the perimeter of the quilt edge. 17 each along the short sides and 19 on each of the longer sides.

The Spinner Quilt - Part 3 susie’s-scraps.com
The Spinner Quilt – Part 3 susie’s-scraps.com

Here all the prairie points are laid out and pinned ready to sew.

The Spinner Quilt - Part 3 susie’s-scraps.com
The Spinner Quilt – Part 3 susie’s-scraps.com

Carefully machine stitch 1/4” away from the edge to fix all of the points in place.

The Spinner Quilt - Part 3 susie’s-scraps.com
The Spinner Quilt – Part 3 susie’s-scraps.com

Now all the points are stitched on the the top is laid our ready for quilting. Obviously once the quilt is quilted the points will be along the free edge and the raw edges will be slipped stitched into the quilt back.

Here is a smaller example of a quilt finished with praire points. I love the way they give some three dimensionality to the quilt and also can add some extra weight.

Little Star Baby Quilt

If you enjoyed this post, you may also like,

Scrappy Pinwheel in a Square

I Spy Pinwheels Quilt and Pattern

Scrappy Thousand Pyramids Quilt and Lessons in Pyramids

Happy sewing as always,

Susie

© Susan Stuklis 2023

Glowing Pinwheels Quilt and Pattern (not quite Amish)

Glowing Pinwheels Quilt and Pattern (not quite Amish)

Hello Dear Friends and Readers, welcome to todays post.

If you are like me and you have from time to time admired the antique and vintage quilts made by Amish women, you might have noticed how bold their designs can be even though their propensity for plainness of fabric dominated their quiltmaking. And in fact, how some of the designs seem to literally glow. Well I believe that is attributed to use of solid colours. https://www.quiltingdaily.com/this-old-quilt-unmistakably-amish-quilts/

We can also incorporate that sort of concept into our quilts by the use of plain and solid coloured fabric. This can present as a conundrum as we are literally bombarded with soo many beautiful fabrics to choose from. As scraps are what I prefer to use, there is no reason that we cannot combine the two to make some potentially striking quilt designs.

Moving forward, I was given a slection of Polka Dot scrap fabric strips by my friend Wendy. I washed them all and had them ready in rolled up strips but I really didnt know what I was going to do with them. Eventually I decided that because it is a fun design, they would look well being in a fun block like Pinwheels!

That is when I decided to create these blocks Pinwheels On Point Blocks – Made Easy. For each block I decided to use a solid background colour to make the pinwheels stand out.

Then when there was the arrival of a new baby grandson I decided between other projects to gradually make these blocks and here is the result of how I have put them together. Funnily enough I recently mentioned that I do not often use black in my quilts Scrappy Housetop Log Cabin Variation Quilt Top Vintage Inspired but there is certainly a place for it and I think this has contributed greatly to the impact of this quilt. Technically this could be called a Band Quilt or Row Quilt.

Finished quilt size 35 1/2“ x 46 1/2“

Requirements for the Glowing Pinwheels Quilt

30 of the Pinwheels on Point Blocks. All of the background fabrics must be in assorted solid fabrics to get the quilt to glow.

To make these Pinwheels on Point blocks, you will need:

30 of 5 1/2“ x 5 1/2“ assorted solid / homespun fabrics.

60 of light coloured polka dot or patterned fabrics each 3“ x 3“

60 of dark coloured polka dot or patterned fabrics each 3“ x 3“

Then to put the quilt together;

4 of dark strips I used black with white polka dots each 3“ x 30 1/2“

2 of dark strips 3“ x 46 1/2“ for the sides

Backing fabric 40“ x 50“

Batting piece same size as the backing fabric

5 of 2 1/2“ Width of Fabric strips in a stripe for the binding.

Constructing the Glowing Pinwheels Quilt

Use the 30 of Pinwheels on Points Blocks to make 3 panels each containing 10 of the blocks set into a 5 x 2 arrangement.

Glowing Pinwheels Quilt and pattern (not quite Amish) susies-scraps.com

Alternate the colours of each block in the panel so that there is good colour distribution.

TIP

Please be careful not to stretch the bias edges until the blocks are sewn together.

Glowing Pinwheels Quilt and pattern (not quite Amish) susies-scraps.com

Lay out the three panels as pictured below using the dour 3“ x 30 1/2“ black strip at either end and between the panels.

Glowing Pinwheels Quilt and pattern (not quite Amish) susies-scraps.com

Sew the strips to the panels. then sew the two remaining long black 3“ x 46 1/2“ strips to the sides of the quilt top. See how the pinwheels glow!

Glowing Pinwheels Quilt and pattern (not quite Amish) susies-scraps.com

I layered it for quilting using a cotton batting and a delightful print which has a myriad of the same colours as the front.

Now for the quilting. As the focus of the quilt was polka dot fabrics, I decided to quilt the whole quilt with little loops, using my vintage Singer 201K C1948. Vintage Singer 201K and FMQ

Glowing Pinwheels Quilt and pattern (not quite Amish) susies-scraps.com

Trim the waste from the edge of the quilt after quilting. Prepare the striped binding strips into one long length and sew to the front of the quilt. Quick Bind Every Time – Tutorial

Glowing Pinwheels Quilt and pattern (not quite Amish) susies-scraps.com

And here is the finished quilt.

Glowing Pinwheels Quilt and pattern (not quite Amish) susies-scraps.com

And here is my dear little recipient. One year old.

Glowing Pinwheels Quilt and pattern (not quite Amish) susies-scraps.com

I had lots of fun making this quilt. If you enjoyed this quilt story and pattern, you may also like some of these other baby/lap quilt and Pinwheel inspired designs.

Baby Love Quilt and Pattern Part 2

Scrappy Broken Dishes Quilt – Antique Inspired

Baby Steps Quilt

I Spy Pinwheels Quilt and Pattern

Sugar Plum Fairy Baby Quilt

Stars and Crosses Band Quilt Pattern

On the Tiles Baby Quilt

Disappearing Nine Patch Baby Quilt

Solid Bold Pinwheels Quilt Pattern

Framing Pinwheels Quilt and Pattern

Matilda’s Quilt and Pattern

Happy sewing.

Susie

© Susan Stuklis 2022

Pinwheels On Point Blocks – Made Easy

Pinwheels On Point Blocks – Made Easy 

Hello Dear Friends and Readers,   I do not think I ever tire of pinwheels.  Do you?  They are especially nice when the points are clean and  they are quick to make!.  Pinwheels are always so cheery and create movement in a quilt.  I wasn’t really planning on making any at the moment….. however, have just had a lovely email from Michelle.  Her request, was whether it is possible to make a quick pinwheel block, similar to Scrappy Pinwheel in a Square, but not scrappy, as seen in this post.

Scrappy Pinwheel in a Square

I was immediately intrigued myself.  As you know putting blocks on point will require more work when setting the blocks.  Of course it would be nice to set them on point without much effort.,,,,,   So I had a think about it, and this is what I came up with.   However, I must remind you that this is an unconventional block construction because it means that the edges will be on the bias, however if you treat them gently it will work well and come together very quickly.  Also the pinwheel points always come out so nice and crisply.  For that reason, I love it.

For this tutorial, you will need to make two blocks at a time.  Also the pinwheels will each flow in the opposite direction.  Fun!!!

Anyhow, this is how I did it..

All seams based on 1/4”.

Makes two blocks 6 1/2“ x 6 1/2”.

Requirements for two Pinwheels On Point Blocks – Made Easy 

4 of 3″ x 3 ” dark squares

4 of 3″ x 3″ light squares

2 of 5 1/2″ x 5 1/2″ background squares

susies-scraps.com
Pinwheels On Point Block – Made Easy

Arrange the eight 3” x 3″ squares into two four patches alternating the dark and light fabric in each block. Sew the four patches together.

susies-scraps.com
Pinwheels On Point Block – Made Easy

Turn over and cut the little connecting thread at the intersection and spin your seams.

Press.

susies-scraps.com
Pinwheels On Point Block – Made Easy

lLay a four patch right sides together with the 5 1/2″ x 5 1/2” background square.  Sew a 1/4″ seam around the perimeter.

susies-scraps.com
Pinwheels On Point Block – Made Easy

Take to the cutting board.  Carefully cut once on each diagonal.

susies-scraps.com'
Pinwheels On Point Block – Made Easy

Remove the excess little triangles from the centre. .

susies-scraps.com
Pinwheels On Point Block – Made Easy

Open the units. Finger press. Trim off the doggy ears.

susies-scraps.com
Pinwheels On Point Block – Made Easy’

Use two units from each of the sets and arrange into two pinwheel blocks.

susies-scraps.com.
Pinwheels On Point Block – Made Easy

Sew together like a four patch.

susies-scraps.com
Pinwheels On Point Block – Made Easy

Tun over and spin the seams at the back to make the blocks nice and flat.

susies-scraps.com
Pinwheels On Point Block – Made Easy.

Gently press the blocks.

susies-scraps.com
Pinwheels On Point Block – Made Easy

There we are.  That was fun!  Nice and quick too.  I feel another baby quilt coming on……I hope you enjoy them.

If you liked this post you may also like,

Endless Scrappy Pinwheels Block

Scrappy Yankee Puzzle Block Made Easy

Half Square Triangle Units Fast and Multiple – Tutorial

and here are three other Pinwheel Quilts you might like.

I Spy Pinwheels Quilt and Pattern

Framing Pinwheels Quilt and Pattern

and

Solid Bold Pinwheels Quilt Pattern

Happy stitching,

Susie

© Susan Stuklis 2021

The Spinner Quilt – Part 2

 The Spinner Quilt – Part 2

Hello Dear Friends and Readers,

Wishing you all a happy and healthful festive season!  Now that the hubbub of the Christmas period is drawing to a close I’m feeling good about getting back to some sewing!  I hope you are too!  This has to be a really good time in history to be a quilter, dont you think?

Whenever possible (not much ????) I have been slowly working on the blocks for The Spinner Quilt.  It really is super scrappy.  I have tried to put this together fairly indiscriminately without too much thought of the fabrics.  Just aimed to use up some scraps, and my only real consideration was contrast of light and medium/dark fabrics.

For a simple block, many secondary patterns are created when it comes together.  There are the pinwheel blocks, and double pinwheels, there are strong diagional movements like zig zags running backwards and forwards,and there are hourglasses when you look again.

In case you missed it here is the link to the block.

The Spinner Blocks Made Easy – Part 1

I thought I had enough blocks a while back but then I decided it should be bigger.  Even now I am considering whether I should add another row???  But for the moment I will show you what I have done so far.

To date, the finished size is 68” x 76 1/2”

Although this quilt is very scrappy it would also look amazing as a two colour quilt in solids like red or as a themed colour like blue, brown, pink, or in plaids or your fabric style preference.

Use the link for instructions to make each of the  The Spinner Blocks.  The Spinner Blocks Made Easy  Part 1

I will give the fabric amount for scraps and also for yardage so you can choose, scrappy or otherwise.

All fabrics were prewashed and lightly pressed.

Requirements and Cutting for The Spinner Quilt from Scraps

144 of 5” x 5”  medium to dark scraps squares cut once on the diagonal

288 of 2 1/2” x 2 1/2” medium to dark squares

288 of 3” x 3” light coloured squares cut once on the diagional

Requirements and Cutting for The Spinner Quilt from Yardage

2 3/4 yards/metres of medium to dark fabric, cut 18 of 5” WOF (width of fabric) strips and cross cut 144 of 5” x 5” squares.  Cut each 5” square once on the diagional.

1 1/3 yards/metres of medium to dark fabric, cut 18 of 2 1/2” WOF strips.  Then crosscut 288 of 2 1/2” x 2 1/2” squares

2 yards/metres of light coloured fabric.  Cut 22 of 3” WOF strips.  Cross cut 288  of 3” x 3” squares.  Cut each square once on the diagonal.

Making The Spinner Quilt

Make 72 of The Spinner Blocks Made Easy

Here is the first few blocks as they were coming together.  The diagonal relief of the pattern is starting to show.  All of these blocks were sewn by treadle.

susies-scraps.com
The Spinner Quilt – Part 2.

Lay out The Spinner Blocks in a 9 x 8 configuration.

susies-scraps.com
The Spinner Quilt – Part 2

Here is the quilt coming together.  Use a 1/4 seam to sew all the blocks together.  They have been scaffolded together to keep it neat.  For more information about this, see this post Nesting Quilt Block Seams

Make sure to nest the seams and  line up the blocks as they are sewn together.

susies-scraps.com
The Spinner Quilt – Part 2

Now all the blocks are sewn together.

susies-scraps.com
The Spinner Quilt – Part 2

I’m loving that diagonal movement!

susies-scraps.com
The Spinner Quilt – Part 2

Lots of fun!! Lots of scraps!!

susies-scraps.com
The Spinner Quilt – Part 2

Happy New Year!  Take care.

If you enjoyed this post you may also like

It Feels Like Rain

Road to Tennessee Quilt

Scrap Spinning Flower Blocks

All the best,

Susie

© Susan Stuklis 2021

The Spinner Blocks Made Easy – Part 1

The Spinner Blocks Made Easy – Part 1

Hello Dear Friends and Readers,

It seems we are living in very challenging times….  The Corona virus, (now named SARS-CoV-2) is changing the world as we know it at a rapid pace.  I really hope you are all taking care of yourselves and staying home as much as possible until the storm passes.

It is also worrying to see line ups in stores and restrictions on essential items.  As scrap quilters, I believe we are very good at making the best of what we have available.  Before we start on todays block, I would like to add that if you have potatoes, you can always make something.  They are a very versatile and nutritional food.  They have seen many populations through very difficult times in history.  One of my favourite ways to use them is by making Gnocchi.   They are easy, filling, and I always find so satisfying to make.   Here is a link to how to make them in case you would like to.

What’s Cooking? Making Gnocchi

Today I think it would be prudent to use something you already have so that there is no need to go out!  I know you are always looking for great ways to use your scraps, and this block is absolutely no exception.   I really believe this design would work well with any style of fabrics providing there is  sufficient contrast of the small triangles.  This block can be used with scraps you already have.  If you have some already cut out it will make good use of them!

A long long time ago, I made some of these blocks.  The problem was, I couldn’t decide how to set them.  I chose to challenge myself because it does contain triangles, but with an easy method of construction. The method is good.  It requires only minimal trimming if at all.  However, the block looks quite busy with scraps.

The Spinner block pattern was published by Nancy Page in the 1930’s, however I believe the design predates the publication.  Recently I saw an antique quilt in which these blocks had been set like pinwheels, as later published by Nancy Page,  When they are put together it is so much easier to see the secondary pattern coming through.

I think I really have a renewed love for this block as I have soooo many 2 1/2” squares, 3” squares and 5” squares, already cut so why not sew up some more!

Block size 9 1/2” x 9 1/2”

Requirements for one Spinner Block Made Easy

4 of 5”’ x 5” squares in medium to dark fabrics, cut once on the diagonal (use four for a block, keep four for another block)

4 of 3” x 3” squares in a light fabric cut once on the diagonal

4 of 2 1/2” x 2 1/2” squares in medium to dark fabric.

Making The Spinner Block Made Easy

The Spinner Block is made up of four units.  The main thing is to make sure that when you set the units, that they are all facing in the same direction, just as you would for any Pinwheel Block.

Lets get started.

To make one of the units.

Using a scant 1/4” seam, sew the short side of one one light triangle to one side of a 2 1/2” square.  Finger press the seam.

Sew a second light triangle to the adjacent side of the 2 1/2” square so that the hypotenuse of both triangles will line up once the triangle is turned back.

Finger press, I use my wooden thing, to turn back the second triangle.  Do not trim yet.

Place this pieced triangle on top of the larger triangle which was cut from a 5” square.  Sew a more generous 1/4” seam so that your seam allowance is close but not completely intersecting the point where the pieces all join.

Turn back.  Finger press.  Trim off the doggy ears.  The unit should measure 4 1/2” x 4 1/2”.

Quite sharp.  Repeat to make four units altogether.

Place in a pinwheel arrangement.  Make sure that the pinwheels are all facing in the same direction.  Sew together using a 1/4” seam allowance, like a four patch.

Definitely a good scrappy project!

This is how they look when they are put together.  You can see that secondary diagonal pattern crossing through.

If you are ready to make some more of these Spinner Blocks, here is the link to Part 2

The Spinner Quilt Part 2

If you enjoyed this post, I believe you may also like,

Treadling on Monkey Wrench Blocks + Tutorial

Endless Scrappy Pinwheels Block

Irregular Triangle Foundation & Tutorial

Take care,

Susie