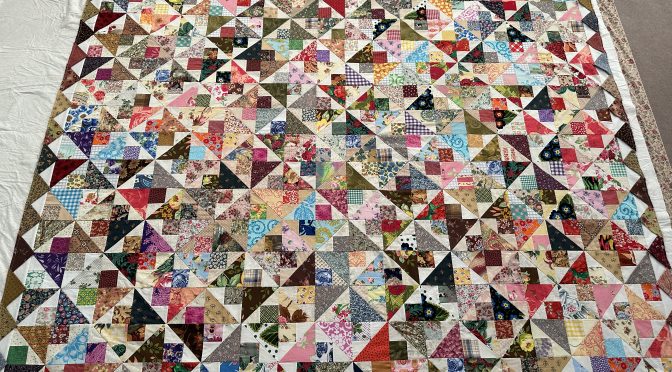
Hello Dear Friends and Readers, welcome to todays post which is the final of The Spinner Quilt construction. It is a reality that sometimes it just takes some time before the light comes on about how a quilt should progress or indeed finish. This one is no exception as it has languished in a pile for sometime without direction. It just needed something….????
Here is the links to part one and two which will give all the details so far.
Then yesterday, the illumination did occur. I realised that it needed some kind of framing and so I set about doing that by then adding prairie points to the perimeter which I think really sets it off by giving some colour and diagonal movement which compliments the design without competing with it. This is how I did it.
This quilt top measures approximately 76” x 84 1/2” including the prairie points.
The Spinner Quilt – Part 3 susie’s-scraps.com
Requirements for the Border and the Prairie Points
8 of cream/white 2 1/2” width of fabric strips
72 of 5” x 5” scrap squares
I then added the 2 1/2” cream/white borders to the perimeter of the quilt as pictured above.
Make the Prairie Points
Press each of the 72 squares once on each diagonal to form a triangle.
The Spinner Quilt – Part 3 susie’s-scraps.com
Placing the Prairie Points
With raw edges all aligned, evenly place the prairie points around the perimeter of the quilt edge. 17 each along the short sides and 19 on each of the longer sides.
The Spinner Quilt – Part 3 susie’s-scraps.com
Here all the prairie points are laid out and pinned ready to sew.
The Spinner Quilt – Part 3 susie’s-scraps.com
Carefully machine stitch 1/4” away from the edge to fix all of the points in place.
The Spinner Quilt – Part 3 susie’s-scraps.com
Now all the points are stitched on the the top is laid our ready for quilting. Obviously once the quilt is quilted the points will be along the free edge and the raw edges will be slipped stitched into the quilt back.
Here is a smaller example of a quilt finished with praire points. I love the way they give some three dimensionality to the quilt and also can add some extra weight.
Today I would love to share an update of how it is progressing.
I spent some time just doing the cutting of the 5” squares. I decided to cut squares from a colour scheme of browns, blacks, greens, blues, and a touch of pink and red with an assortment of differing light fabrics to off set them. I was thinking of quietly kayaking or canoeing, along a creek or river overhung with trees, and where dappled light filters through the branches and the magical and quiet reflections of the trees look back at you from the dark waters. Or paddling through Mallee country negotiating their snare like roots which quietly spread out from the banks of creeks and rivers. I captured this beautiful image in a secluded creek on a recent trip, which embodies some of those feelings for me.
Crossed Canoes Quilt Blocks susies-scraps.com
Here is my nice stack of 5” x 5” squares ready to be dissected.
I then bundled them up into little bags to keep them in their little groups all ready for stitching.
This block is in its essence a four patch. But really its a four patch in a four patch, so is it an uneven double four patch? Previously I have discussed this concept too in Uneven Four Patch like this Uneven Four Patch Block Tutorial
Crossed Canoes Quilt Blocks susies-scraps.com
It really is nice to have them set out ready at the machine to begin sewing. I am using one of my trusty old treadles. Singer 15 C1902.
Crossed Canoes Quilt Blocks susies-scraps.com
So far I have made 20 blocks. I think they are looking great. I think my accuracy of the piecing has improved from the first one too. Everything has a learning curve, don’t you think?
Crossed Canoes Quilt Blocks susies-scraps.com
I will make some more and get back to you with the progress.
Crossed Canoes Quilt Block Antique Inspired Made Easy
Hello Dear Friends and Readers, and a very warm welcome to all my new subscribers to susies-scraps.com. Oh boy, am I excited to show you this great new way of constructing this old block! Are you ready? And guess what? No templets. No paper piecing! Just some simple cuts!
Now for a little bit of a preamble. You do not have to read this bit if you don’t want to. We will get straight into the method in a moment. However, I do like to document and explain how I arrive at these methods. From the reseach I have done, it would appear that usually this block is made by using templets, or by paper piecing, where the lines are pre printed on paper, and pieces of fabric are stitched onto each of the lines.
So, the other day I was studying some antique quilts which included one with the “Crossed Canoes” blocks. Suddenly looking at the colour placement I realised that maybe, just maybe, with some simple cuts and interchanging of the pieces it just might be possible to construct this block with much more ease.
So of course that is what I did. Straight to the cutting board and I was super pleased with the results. I did make several iterations of it to get it as perfect as I could. You will also note that using this method, there is absolutely minimal waste. Also there will be no bias edges on the outside of the block which is an advantage, although not essential. It just depends on how traditional you are. I know there are “rules” for everything, and sometimes its good to challenge them. But in this case it is not necessary. It is actually a simple block with only three seams for each unit of the block.
Please note that for best results chose colours that are opposing on the colour wheel or light and dark for good contrast. Here are some tips on using a colour wheel.
Requirements for making the Crossed Canoes Quilt Block Antique Inspired Made Easy
4 of 5” x 5” squares of two opposing colours or light and dark. For example two green and two orange or brown. Here I have used two brown and two cream.
Crossed Canoes Block Antique Inspired Made Easy susies-scraps.com
Marking the fabric for the Crossed Canoes Quilt Block Antique Inspired Made Easy
You can choose to stack the fabrics or mark them individually, that is up to you. Just bear in mind that more accurate cuts will yield a better result. I have stacked the four squares.
In order to cteate the pieces for each unit of the block, 5 marks need to be made on the fabric. I have placed the squares on the diagonal for ease of explanation. Make a mark on the side, 1 1/2” from bottom corner. Make a mark 1 1/2” from the other side of this same corner. On the diagonally opposing top corner, make a mark 3/4” from each side of the edge of that corner. Now centring the ruler along the diagonal of the square make a mark 1 1/2” from the bottom corner as pictured below.
Crossed Canoes Block Antique Inspired Made Easy susies-scraps.com
Cutting the fabric for the Crossed Canoes Quilt Block Antique Inspired Made Easy
Using your rotary cutter, cut diagonally from the first two marks on each side of the bottom corner to the top corner.
Leaving everything in place now cut off the top corner between the two marks which are 3/4” from the top corner.
Moving the side pieces away, place the ruler along the centre diagonal of the centre piece (which now looks like a tie) Cut across the bottom corner off the centre, at the 5th mark which is 1/½” up from the bottom corner.
Crossed Canoes Block Antique Inspired Made Easy susies-scraps.com
Now you should have four pieces which look like this. And a tiny bit of waste which you can see at the top.
Crossed Canoes Block Antique Inspired Made Easy susies-scraps.com
Seperate the pieces and lay them out being mindful of their position, but interchanging only the centre piece to an opposing colour, like this.
Crossed Canoes Block Antique Inspired Made Easy susies-scraps.com
Position the four units, so that the smallest units are facing toward the centre.
Crossed Canoes Block Antique Inspired Made Easy susies-scraps.com
Sewing the Crossed Canoes Block Antique Inspired Made Easy
Now, just so you know, at this stage, you can choose to machine piece or hand piece these blocks. I am just mentioning this, because it would be a delightful hand piecing project, if you are looking for a portable project.
Working backwards, now attach the the bottom pentagon shape to the centre piece. Finger press.
Crossed Canoes Block Antique Inspired Made Easy susies-scraps.com
Carefully position a side piece to the centre unit matching the top corners and sew together. TIP Make sure that when you open it, the block will be square. Finger press.
Crossed Canoes Block Antique Inspired Made Easy susies-scraps.com
Repeat for the other side. Open the unit. Press.
Crossed Canoes Block Antique Inspired Made Easy susies-scraps.com
Repeat sewing the seams for the remaining three units.
Crossed Canoes Block Antique Inspired Made Easy susies-scraps.com
Trim each unit to 4” square beginning from the two sides which will be innermost, ensuring that for those two inner sides of each unit, the distance of the seam allowance where the two colours meet on each side is as close as possible to 1/4” as pictured. Actually, looking at the enlarged photo, now I can see that mine is a little too wide.
Crossed Canoes Block Antique Inspired Made Easy susies-scraps.com
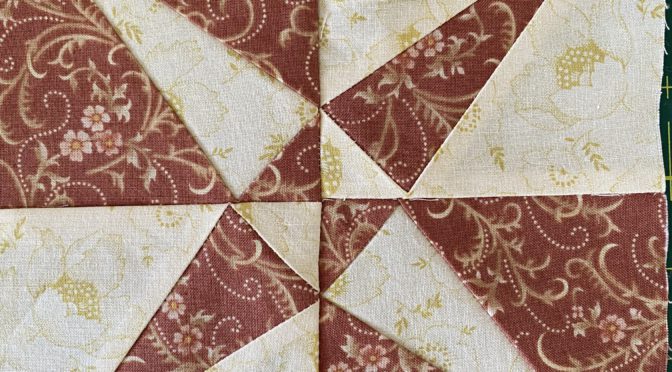
Sew the four completed squares together as a four patch with the two colours opposing each other. Ensure that all the triangles are meeting in the centre to make the ”crossed canoes”. In order to do this make sure that the points are ”kissing” each other and the centre seam is nesting. Do this by adding horizontal pins to the ”kissing points” and sewing as close as possible through where all the seams intersect.
Crossed Canoes Block Antique Inspired Made Easy susies-scraps.com
I am using my Singer 15 treadle from 1902. You may notice that my seams are a bit loose and I need to make some adjustments before I go on. Treadle Tinkering
Open the block. Press and trim if necessary.
Crossed Canoes Block Antique Inspired Made Easy susies-scraps.com
Now you can probably see it took much much longer to explain than it actually takes to do it!
I really hope you enjoy making these Crossed Canoes Blocks Antique Inspired Made Easy.
Here is how my blocks are coming along. I am very pleased with the results so far.
Hello Dear Friends and Readers, and a warm welcome to todays post! I’ve made some lovely scrappy blocks to share with you today. For some time now I have had some very lonely half square triangle blocks lying around. I wasn’t quite sure where to go with them? Although I do love Half Square Triangle Blocks, I felt these needed something…
I previously discussed Uneven Nine Patch Blocks Antique Style. Here is the link.
Recently, I created the Floral Coins Blocks. I enjoyed this project so much as there was only one unit to cut, but even despite that, it still makes a beautiful quilt. Here is the link.
The combination of the One Patch, vs the Uneven Nine Patch and my lonely half square triangle blocks, were my inspiration to this Uneven Four Patch. I have a box of 1 1/2” strips cut which I was anticipting being part of a Log Cabin Quilt…..one day. Well that hasn’t happened!!! So, I might as well use them. You could cut your own, or use a honeybun strips if you have some lying around.
I think this block has a lot of possibilities. When blocks which are assymetrical are used, this increases the possibility of design, I think. It increases the mathematical potential. Its still a four patch, it only has four pieces, but its uneven. And, you can use up a few scraps too!
BTW I hand dyed the background fabic. I think it helps highlight the beautiful flowers in the scraps. Here is how I did that.
That is how I came to make these blocks. All seams based on 1/4”.
Block size 5” x 5”
This is how I do it.
Uneven Four Patch Block Requirements
1 of 4 1/2” x 4 1/2” printed square
1 of 4 1/2” x 4 1/2” neutral square
1 of 1 1/2” x 4 “ strip
1 of 1 1/2” x 5” strip
Method
Take the two 4 1/2” squares. put them right side together. Draw a diagional line on the wrong side of the neutral square. Sew a 1/4” seam along each side of the line. Cut along the line.
Open the blocks. Press and trim to 4” x 4” square.
Take a 1 1/2” x 4” strip. Sew to the upper side of one block. You can chain these blocks through. I’m treadling along on my Singer 15 from 1902. She may be elderly but she still gorgeous!
Then sew the 1 1/2” x 5” strip to the adjacent side as pictured below. There it is. Still a four patch, but definitely uneven!
Here is how they are looking so far.
I think they have a lot of possibilities. They could be teamed with 5” x 5” Charm Squares. The strips could be continued to make a half Log Cabin blocks. They could be sashed, or left as they are or even set on point.
You can make a different Pinwheel Block like this…
Or a scrappy Spool Block variation…
Or just grouped together in a scrappy Snowball variation like this …
And many more. I’ll let you know how I put them together. BTW I would love to see how you put them together if you decide to make some!