Tag Archives: String Blocks

Vintage Style String Me Along

Vintage Style String Me Along

Hello Dear Friends and Readers and a warm welcome to today’s post. I have spent about one month in Western Australia and that time has been amazing and so interesting. If you follow me on FB or Insta you can see some of the photos there.

Now I am black home and it’s good to be here. My sewing room has been calling and I must say it is somewhat of a mess and needing a good tidy up! I thought I would start with a box of scraps which was doing nothing. A collection of all sorts of odd shapes and different fabric lines, chucked into the box from various different projects over time. In order to make some room and be able to get back to some basic machine stitching, i decided to make some string blocks with this fabric.

Vintage Style String Me Along susies-scraps.com

I sorted out the pieces and cut them very roughly into odd strips. Better pieces of fabric I cut into strips and added to my pile which may be used for a log cabin in the future. Lessons in Log Cabin Blocks It didn’t take that long and can be way more fun than hauling yardage. The piles of strips look very nice and my pile of rough strings gave a sense of achievement. As always, there is more fabric than anticipated and I’m pretty sure I can create at the very least, a baby quilt or a lap quilt.

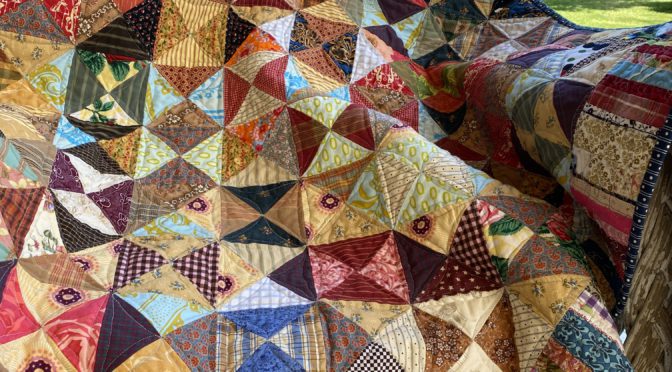
In the pile I also have two old thin pillow coverings, so I cut them up to use as the foundation for the string blocks. My vision is a vintage style looking quilt which is homey and full of delightful strings. Depression era quilts were sometimes made of strings of fabric in this manner in order to use what was already available and then recycled into a quilt top. This lead to some very pretty quilts with a lovey mixture of fabrics. They often used the fabric feedsack bags to make clothing and quilts. It is a great look. The way the blocks will be positioned will give plenty of interest.

Begining by placing a string in the centre of the foundation block on the diagonal, making sure that it overhangs the edges. Cover with another string, right sides down lining up the sewing edges as much as possible. Sew, making at least a 1/4” seam. Make two blocks at a time so that it keeps the flow going and doesn’t use as much thread. Press the fabric strip open. I use a wooden thing or finger press well before adding the next strip. I even used up old bobbin thread which is actually great because now my bobbins are cleaned up as well!

Vintage Style String Me Along susies-scraps.com

This is how it looks from the back before trimming. It may look a little distorted because the foundry=tion was very thin however that will not matter once the block is trimmed.

I remember PJ from Quilting time in Dixie saying that she used old thin sheets for the foundation blocks and that seemed like an excellent idea to me.

In order to keep this as simple as possible I used my regular 6” ruler to cut the fabric into 6” x 6” squares to use for the foundations. This made it very easy to trim the blocks after pressing. this is how it looks from the front before trimming.

Vintage Style String Me Along susies-scraps.com

I used my trusty old treadle to make these blocks. Having been out of use for a while she responded to a good oiling. That is one of the advantages of this machine. The maintenance is easy, just give a good oiling! Treadle Tinkering

Vintage Style String Me Along susies-scraps.com

I plan to put the blocks together like this. I really like the pattern and it looks good from every side. I hope you can feel inspired dot make some string blocks. Loads of fun. It doesn’t require over thinking which means that it progresses very quickly.

Vintage Style String Me Along susies-scraps.com

If you enjoyed this post, you may also like these other string projects.

Any String Goes – Pineapple Improvisational String Quilt Blocks

String Pot Holders or Trivets for Christmas

quilted christmas scrappy string stockings

Crazy Little Strings – Diamond Charms Quilt Block and Tutorial

Pink Strings Table Mat

String Feeder QAYG Bib

“End of Day” Quilters Basket – Free Tutorial

Thank you for joining me today and as always I wish you happpy stitching.

All the best, Susie.

© Susan Stuklis 2026

Any String Goes – Pineapple Improvisational String Quilt Blocks

Any String Goes – Pineapple Improvisational String Quilt Blocks

Hello dear friends and readers! If you are new to this blog, you might be curious about what sets susies-scraps.com apart. Well, my passion lies in creating things, but I am not in the business of selling anything, nor do I want to encourage you to make purchases. Instead, I enjoy devising simple, practical solutions for crafting items, particularly quilts. This blog is a labor of love, and you’ll find hundreds of projects to create, all available to you for free.

Today, I would like to share some thoughts on string blocks. I felt inspired to create new string blocks, as I have several buckets of strings that need to be utilized. I genuinely appreciate the fact that these strings are already cut and offer a wide variety of options. Additionally, I have some waste triangles on hand, which I save for projects like this.

To be honest, I never really envisioned myself making Pineapple Blocks. You might ask why. The reason is that I was not particularly drawn to the extensive cutting involved, the numerous sizes required, and the potential waste generated. Furthermore, there is a high likelihood of inaccuracy when creating Pineapple Blocks.

Pineapple Blocks are related to Log Cabin Blocks, with the distinguishing feature being the inclusion of triangles or strips in the corners. For further information on Log Cabin Blocks that may be helpful, please refer to “Lessons in Log Cabin Blocks“.

I understand that using a foundation is often preferred, whether it be paper or fabric, and there are pre-printed papers available for purchase that can facilitate highly accurate piecing.

However, today, we will liberate ourselves from all that and simply focus on using up some scraps. Given that we are working with strings and waste triangles, there won’t be any specific measurements involved—just repurposing strings.

While it’s true that stunning patterns can be created with Pineapple Blocks by strategically placing light and dark shades, today we have no rules—just our strings and sewing machines.

Remember to finger press or roller press as you progress.

The only guideline I am following today is using a consistent element for the center squares. Keep in mind that this is also optional, and you can choose the size. I have opted for 2 ½” x 2 ½” center squares.

So, let’s get started.

Block size: 10″ x 10″ (optional)

Seams are very approximate, at about 1/4″

Requirements for Any String Goes – Pineapple Improvisational String Quilt Blocks

Fabric strings of assorted lengths

Waste triangles from other projects (or strings can be used if preferred across the corners)

Scissors, small for trimming the lengths as you go.

Centre Squares – mine are mine are 2 ½” x 2 ½

TIP

For efficiency make at least two blocks at a time. Keep your containers of strings and triangles next to your machine. By all means use a foundation if you prefer. I have opted to go without.

Any String Goes - Pineapple Improvisational String Quilt Blocks susies-scraps.com
Any String Goes – Pineapple Improvisational String Quilt Blocks susies-scraps.com

Making the Any String Goes – Pineapple, Improvisational String Quilt Blocks

Beginning with the center square, add the first strip strip to one side of the square. Add a string to the opposite side then add two more strings to the other two sides. Trim as you go.

Any String Goes – Pineapple Improvisational String Quilt Blocks susies-scraps.com

Next round, place a waste triangle, right side down across the corner of the block make sure that after stitching and folding back, that the triangle will cover the corner of the block. Continue to add triangles to the other three corners in the same manner.

Any String Goes – Pineapple Improvisational String Quilt Blocks susies-scraps.com

After adding the triangles, turn the triangles back and trim off the waste from behind each triangle corner.

Any String Goes – Pineapple Improvisational String Quilt Blocks susies-scraps.com

Next round, add strips to each side of the block in the same manner. as the first round.

Continue doing the same thing until you reach the size block that you desire. Sliver trim to size. Press.

Any String Goes - Pineapple Improvisational String Quilt Blocks susies-scraps.com
Any String Goes – Pineapple Improvisational String Quilt Blocks susies-scraps.com

Happy strings don’t you think?
If you enjoyed this post, you may also like these posts using strings.

String Feeder QAYG Bib

Pink Strings Table Mat

String Pot Holders or Trivets for Christmas

quilted Christmas scrappy string stockings

Crazy Little Strings – Diamond Charms Quilt Block and Tutorial

Strings n Things

Happy stitching,

Susie

Copyright © 2023 Susan Stuklis

Pink Strings Table Mat

Pink Strings Table Mat

Hello Dear Friends and Readers, and a warm welcome to todays post and to a bright New Year for 2023. I am in the mood for string projects and I hope you will be too.

In today’s post I am sharing with you all this little, Pink Strings Table Mat It is a quick project. I have definitely enjoyed making and using all the potholders, trivets, dish mats, kettle quiltlets and coasters I have made over time. These are very useful household items and not to forget they can make lovely small gifts as well. This mat can be useful to protect a table top or even as a placemat if preferred. I really like the way all the strings play together to make a unique table mat. Using lots of fabric strings and a Quilt As You Go (QAYG) method gives the Pink Strings Table Mat a lot of structure and makes it extra sturdy.

A Quilt As You Go Project

If you are not familiar with Quilt As You Go methods, it is a way of quilting the project during construction rather than after. Some examples of this can be sewing an “X” on two layers of fabric with one layer of flannel or batting in between which is often done when making rag quilts. Another method is making a small potholder quilt and then quilting and binding it. This method is then repeated as many times as desired and then they are hand stitched all together to make a larger quilt. Because each small piece was already quilted then this is also a form of QAYG. In todays example I will show how the item is quilted at the same time as each piece of fabric is added to the fabric and batting base.

Tips on Fabric Strings

For more tips on using fabric strings, see the previous post of String Pot Holders or Trivets for Christmas

I will give the requirement to make one Pink Strings Table Mat.

My suggestion is making two at a time to make the process more efficient because you are chain piecing and saving thread. If you only want to make one then I suggest piecing some other blocks in between.

Seam allowance is variable.

Finished size 12” x 18”

Requirements to make the Pink Strings Table Mat

1 of backing fabric 14” x 20” (a fat quarter could be used)

1 of Batting piece 14” x 20”

Approximately 40 leftover fabric strings at least 14” long each using prints of pinks apricots browns teal greens and light greens

2 of width of fabric strips 2 1/4” wide for the binding

Today I am using a Singer 15 treadle which is 120 years old. Learn to Treadle

Pink Strings Table Mat susies-scraps.com

Making the Pink Strings Table Mat

Lay out the backing fabric right side down and top with the batting piece. Make sure that the two pieces are aligned and smooth out carefully with your hands so that it is nice and flat.

Beginning at the centre of the mat, lay down one fabric string on the mat so that it slightly overhangs each side of the mat right side facing up. Lay a second string right side down on top of the first string so the the edges on the right edge of the two strings are aligned as much as possible. sew along that edge using an approximate 1/4” seam allowance. It does not have to be accurate as long as the edges are contained. Open up the second string and press toward the batting. Add the next string in the same way, right side down on top of the second string. sew along the right edge. Open up and press toward the batting. Finger press or roller press along the seam to open it up.

Continue adding strings in the same manner. If you are making two as I did, then keep going to the next mat and interchanging between the two mats.

Pink Strings Table Mat susies-scraps.com

Keep going until the mat is completely covered to the ends of the mat.

Take to the cutting mat and use a rotary cutter and ruler to trim the mat so that it measures 12” x 18”. the mat is already quilted because it is a QAYG project.

Pink Strings Table Mat susies-scraps.com

Join the binding strips together using a 45 degree angle.

Attach the binding strips to the front edge of the mat.

Pink Strings Table Mat susies-scraps.com

Turn to the back and hand stitch in place. Quick Bind Every Time – Tutorial

Pink Strings Table Mat susies-scraps.com

Here is the two finished mats after the binding was attached.

Pink Strings Table Mat susies-scraps.com

Happy New Year!

Wishing you all a very Happy New Year. I hope you feel inspired to use up some of your leftover fabric strings.

If you enjoyed this post, you may also like some of these related projects.

Strings n Things

Crazy Little Strings – Diamond Charms Quilt Block and Tutorial

if you are a real fan of using up fabric strings you might also like this

“End of Day” Quilters Basket – Free Tutorial

If you are looking for larger table toppers here are two suggestions…

Wendy’s Way Snowball Table Quilt

Tea Time for Alice Mini Quilt

And a fun QAYG Hobo Bag Pattern

Happy sewing

Susie

© Susan Stuklis 2023

String Pot Holders or Trivets for Christmas

String Potholders or Trivets for Christmas

Hello Dear Friends and Readers, Good Morning and welcome to today’s post. This will be a very quick pre-Christmas post. I don’t think that we can have too many potholders or trivets at any time of the year, but especially at Christmas time when more than usual are probably required. Not only that, they make a lovely last minute and thoughtful gift. This is not a new idea as many others have done this before me.

The string potholders I have made over the years are undoubtably my favorites. Somehow they get better with wear. Each one is unique and because of the added fabric between the strings it makes them a bit more robust, and it’s still an awesome way to use that leftover fabric, which would normally be discarded. And as they are washed, they develop that lovely aged crinkly look, which I love.

Today I have made some Christmas potholders by using up fabric scraps in red green and cream. They don’t have to be Christmas fabrics per se, but they can just be scraps that reflect that theme. Please read all instructions before commencing.

Last year I used fabric strings to make these stockings quilted christmas scrappy string stockings

TIP

I suggest making two at a time. This saves a lot of thread, makes the whole process more efficient and allows for continuous piecing.

Now I know you might be thinking ,what with strings should I use? it’s really up to you how wide or thin you would like them to be. Actually using thin strips makes the article more robust because of all the fabric contained in the seams. So probably the most narrow would be 3/4 of an inch. Strings of between 3/4 of an inch and 1 1/2 inches are probably most ideal.

Requirements for String Potholders or Trivets

Fabric Strings Backing fabric and batting of similar size to the backing fabric. Binding Strips cut from the width of the fabric 2 1/4” wide.

TIP

If you are making a larger size ie: 10” or 12” square, a fat quarter for the backing is ideal as the leftovers can be used for the binding.

String Pot Holders or Trivets for Christmas susies-scraps.com

Making the Christmas String Potholders or Trivets

I think you know the drill it’s not complicated,

Choose a piece of backing fabric. It could be 6, 8, 10 or 12 in.² as an example …..it can be any size you like. Put the fabric right side down. Choose a matching size piece of batting and put it on top of the backing fabric. Make sure to smooth it down nicely. Now collect strings of fabric and beginning on the center diagonal using the longest strings, put one string of fabric right side up and a second string right side down, aligning the edges to one side of the first string. I am making two.

String Pot Holders or Trivets for Christmas susies-scraps.com

Bear in mind that the seam allowance can be variable, make it whatever suits the fabric you have. Sew along that those fabric edges through all the layers. Turn back the top string so that it now faces right side up.

String Pot Holders or Trivets for Christmas susies-scraps.com

Finger press and continue adding strings to each side of the center string until the entire piece is covered.

String Pot Holders or Trivets for Christmas susies-scraps.com

Once the whole piece is all covered, then use your rotary cutter and ruler to square it up. These squared up to 11 ½”.

String Pot Holders or Trivets for Christmas susies-scraps.com

Prepare a binding strip 2 1/4 inches in width. Fold in half length wise. Sew your binding strip to the right side of the finished potholder or trivet.

String Pot Holders or Trivets for Christmas susies-scraps.com

Join the ends together in your preferred method turn back to the wrong side and hand stitch in place for a lovely finish.

String Pot Holders or Trivets for Christmas susies-scraps.com

This project will use a surprising amount of leftover strings of fabric, making them into something useful and beautiful, and give you a sense of satisfaction.

These potholders can be made in any colours you choose. I hope you have a wonderful Christmas and consider making some of these as a quick project if you are short of time.

String Pot Holders or Trivets for Christmas susies-scraps.com

Merry Christmas, and best wishes for the festive season.

If you enjoyed this post, you may also like

Hexagon Star Snowflake Trivet

Diamond Stars Christmas Table Runner

String Feeder QAYG Bib

Susie

© Susan Stuklis 2022

Sashiko Free Motion Quilting For Antique Inspired Scrappy Broken Dishes Lap or Cot Quilt

Sashiko Free Motion Quilting for Antique Inspired Scrappy Broken Dishes Lap or Cot Quilt

Hello Dear friends and Readers, I recently finished a quilt for my little grandson. After much thought I decided to use a Sashiko style design for the quilting. I really couldn’t imagine how else to quilt it because of all of the intersecting angles of the quilt other than straight line quilting or hand quilting. I thought this would give the best effect for this patchwork pattern.

I started by doing a few blocks to secure the quilt top and then kept going to do the entire quilt. It does require frequent turning of the quilt to achieve the design, however I believe it was well worth it. I will show you a picture of the back of the quilt shortly so that you can see how the design looks.

I think this quilt should last the test of time with this secure quilting and the design style will mean it’s something he can keep for ever, if he so chooses.

Here is a link to the quilt top instructions.

Scrappy Broken Dishes Quilt – Antique Inspired

I used an electric Singer 201K with a free motion quilting foot.

Sashiko Free Motion Quilting for Antique Inspired Scrappy Broken Dishes Lap or Cot Quilt
susies-scraps.com
Sashiko Free Motion Quilting for Antique Inspired Scrappy Broken Dishes Lap or Cot Quilt
susies-scraps.com

In completing each Sashiko arched seam, I found that the challenge was to judge the length of the arch as it differs in length depending on which side of each triangle is being quilted.

In other words, because each triangle is an Isoscelles right angle triangle, the hypotenuse is significantly longer than the opposite and adjacent side of each triangle and the corner angles are much tighter.

Here is some triangle refresher in case you are interested.

https://www.mathsisfun.com/triangle.html

Sashiko Free Motion Quilting for Antique Inspired Scrappy Broken Dishes Lap or Cot Quilt
susies-scraps.com
Sashiko Free Motion Quilting for Antique Inspired Scrappy Broken Dishes Lap or Cot Quilt
susies-scraps.com

You may notice than my seams are way less than perfect. However, I think it got better as I went along. Improving quilting skills takes practice. I have to say that sometimes perfection really is the enemy of the good. Sometimes it just has to be done. The nice thing is that when the quilting was finished, even though there was a fair bit of difference in each seam, the overall pattern looks pretty good and has given the quilt a lot of strength and stability.

Here is a close up look at the back.

Sashiko Free Motion Quilting for Antique Inspired Scrappy Broken Dishes Lap or Cot Quilt
susies-scraps.com
Sashiko Free Motion Quilting for Antique Inspired Scrappy Broken Dishes Lap or Cot Quilt
susies-scraps.com

And then the whole of the back.

Sashiko Free Motion Quilting for Antique Inspired Scrappy Broken Dishes Lap or Cot Quilt
susies-scraps.com
Sashiko Free Motion Quilting for Antique Inspired Scrappy Broken Dishes Lap or Cot Quilt
susies-scraps.com

For the piano key border I quilted lots of loops to make it secure.

Sashiko Free Motion Quilting for Antique Inspired Scrappy Broken Dishes Lap or Cot Quilt
susies-scraps.com
Sashiko Free Motion Quilting for Antique Inspired Scrappy Broken Dishes Lap or Cot Quilt
susies-scraps.com

Here is the finished quilt.

Sashiko Free Motion Quilting for Antique Inspired Scrappy Broken Dishes Lap or Cot Quilt
susies-scraps.com
Sashiko Free Motion Quilting for Antique Inspired Scrappy Broken Dishes Lap or Cot Quilt
susies-scraps.com

It is such a nice feeling to finish a quilt, Isn’t it?

Hopefully he will get plenty of use from it.

Sashiko Free Motion Quilting for Antique Inspired Scrappy Broken Dishes Lap or Cot Quilt
susies-scraps.com
Sashiko Free Motion Quilting for Antique Inspired Scrappy Broken Dishes Lap or Cot Quilt
susies-scraps.com

If you enjoyed this post and are still seeking some inspiration, you may also like these.

Charmed by Monkeys Quilt

Pinwheel Medallion Quilt – Baby Quilt

Antique Nine Patch with Sashiko Quilt

Arkansas Cross Roads Quilt

Stars and Crosses Band Quilt Pattern

Happy quilting. What will you sew today?

Susie