Tag Archives: Simple Hand Quilting

Simple Approach to Hand Quilting

Simple Approach to Hand Quilting

Hello Dear Friends and Readers and warm welcome to today’s post. I had a great question recently from Judith, and I thought it warranted a post to explore the subject with a bit more depth.

Here is her comment and question.

“You do lovely work. Your quilt is beautiful!! I’m always concerned with how tight my sandwich layers are. When long arm quilting the quilt is always so taut. I have experimented with some hand quilting and the back is usually a little ripply. What is your technique to maintain a smooth back? “

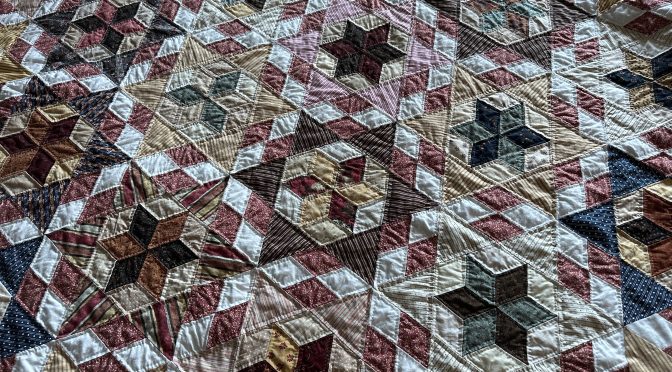
This question was in relation to this post. Hand Quilting Scrappy Thousand Pyramids

Please bear in mind that this is only my personal opinion and everyone is free to make their own mind up as to what works best for them economically and ergonomically.

I believe it is important to firstly acknowledge that having a quilt long arm quilted is very different to hand quilting or even Free Motion Quilting on a domestic machine at home. When a quilt is prepared for quilting on a long arm there is clearly an engineering advantage. On a long arm they are able to create a similar tension and tautness for all the layers of the whole quilt during the whole of the process. Then the work of the quilting is from one end of the quilt to the other.

It is possible to create this kind of set up for hand quilting with a hand quilting frame, in which the quilt top is quilted from one end to the other. This lady from sweetpetalstitchery shows step by step how to make a very economical simple hand quilting frame. she also gives full demonstration of how to attach all the layers to the frame. You may also see that her priority is to ensure that the backing is taught then the batting and quilt top are gently layered on top.

https://m.youtube.com/watch?v=FEHUiVevEsc

A large hand quilting frame will require a lot of room and is not so portable and it also requires sitting at the quilt frame.
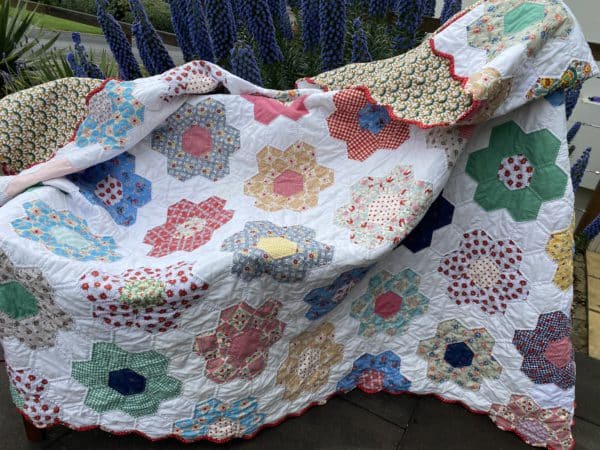
Bias Binding for Hexagon Quilt susies-scraps.com

About the Basting

I generally pin bast my quilt for quilting. I appreciate many hand quitters will thread baste their quilt. I leave plenty of room between the pins deliberately so that I am able to make fine adjustments during the quilting process to make sure that the front and back areas and smooth.

When I lay out the layers initially for pin basting I make sure that the backing and batting are several inches larger than the quilt top so that there is room for adjustments. I find the most important part of the pin basting is to make sure that the quilt is as perfectly centred on the backing in relation to the quilt top especially if the backing is pieced or has a pattern which requires more precision to make it align with the edges of the quilt top. Batting Day

Hand Quilting with a Hoop

For the quilting, I start from the centre of the quilt top and work my way out. I use a hoop. Each time I move the hoop I am checking the back with my hand to make sure that it is as smooth as the front. I am then able to adjust the front and back easily when necessary as the quilting progresses and the pins are removed. . I pretty much take the same approach but without the hoop for FMQ on the machine as well.

Hand Quilting Scrappy Thousand Pyramids susies-scraps.com

Save Time

I do not mean to sound lazy….. but as I am progressing with my hand quilting journey, I have realised that I do not want too much basting. The reason being it enables me to make gradual adjustments to keep all the layers smooth. As only a small amount that is within the hoop is being worked on at one time, it means minor adjustments can be made during the process.

This is the Hexagon Stars Diamond Circles Quilt – Part 5 Making the Columns which I am hand quilting at the moment.

Simple Approach to Hand Quilting susies-scraps.com

Protect the Edges

What I have realised is necessary, is to roll up the edges of the quilt, just enough to enclose the batting. The reason for this is because the quilt top is being turned and moved around during the quilting process when using a hoop. Therefore the batting may abrade onto the fabric and pill onto the quilt top and backing with the movement. For this to be easily achieved I have used a combination of quilting pins and binding clips just to keep those edges nice and tidy. I made this mistake which became particularly obvious because I bought a dark fabric for the backing and bamboo batting to keep the weight down.

Simple Approach to Hand Quilting susies-scraps.com

Simple and Portable Hand Quilting

Another reason that I enjoy this method is that the requirements are small and simple. It is very portable, and also I believe it is a good method for pieced quilts which have lots of bias seams and/or hand pieced tops.

Simple Approach to Hand Quilting susies-scraps.com

Joy in a Gentle Art

All in all, I find hand quilting with a hoop is a very gentle art which can be achieved during downtime. It is relaxing and while it’s not fast, the results are quite lovely. I do this of an evening. You may be wondering about lighting? I use a Bilby headlight which is often used for campers but I find it’s perfect for quilting!

Much of this technique is what I use for Free Motion Quilting as well. The quilt is lovely when it is puddled around while doing the quilting. However, Free Motion Machine quilting does require frequent checking of the back to make sure it remains flat. Free Motion Quilting – Part 4 – Begin FMQ

Simple Approach to Hand Quilting susies-scraps.com

Further information on Hand Quilting in this post All In Hand – Lessons In Hand Quilting

f you enjoyed this post, you may also

Great Granny Stars Hand Quilting Finish

Free motion quilting puffed daisies

Sashiko Clamshell Free Motion Quilting

Happy stitching,

Susie

© Susan Stuklis 2025

All In Hand – Lessons In Hand Quilting

All In Hand – Lessons In Hand Quilting

Hello Dear Friends and Readers, although I do love machine quilting, I am all about efficiency too. Whilst that may seem like an extreme contradiction, when it comes to hand quilting, I will explain my thoughts on why this idea could be challenged.

Before beginning, I would like to say that I am not an expert in hand quilting and my experience is limited. This is only the third quilt which I have hand quilted but by far the biggest. The look of hand quilting is unique and quite different to machine quilting. I do think it evokes a more traditional and romantic feel both in touch and appearance.

My interest in writing this post was peaked recently when I read a comment from a lady who was hand quilting a family quilt, that she only quilted it at times when she could make “perfect stitches”. I thought about that and it struck me that if one never practiced then how could one make perfect stitches? I had already commenced hand quilting this quilt a couple of months ago and I am glad that I decided to take the challenge. I thought, the only way to get better at it is by ”giving it a go”. After all, we are not talking sheep stations here. It’s a quilt.

Furthermore, finished is better than perfect. My stitches are not perfect, however, I think there is some improvement. I am able to get more stitches to the inch and that probably counts. I have 687 hexies to quilt, so that should be some good practice.

I decided to quilt this of an evening when I might be sitting down and relaxing. I calculated that if I did several hexies each day, it might be done in six months. I think that actually isn’t too bad considering I may have just been watching TV or relaxing. So there is the thing….it creates an efficiency from that time which I would have been sitting down anyway. I have discussed a similar thing about hand piecing previously in While We Wait

I do believe there are two tricks to this idea. The first is making the decision to do it. I think sometimes more time is wasted procrastinating about how to do it, than it actually takes to do it. Its easy to overthink it. The second is organising the project. When something is cut out and ready to piece it is easy to pick it up and go anytime. Same for the hand quilting. If the top is prepared with backing and batting and basted or pinned then it is much easier to do a little at more regular intervals.

In this instance because this top was hand pieced, I wanted to hand quilt it. Grandmother’s Flower Garden Quilt Like Grandma Used to Make

Anyhow these are the lessons I have learned so far.

All In Hand - Lessons In Hand Quilting. susies-scraps.com
All In Hand – Lessons In Hand Quilting. susies-scraps.com

Lessons In Preparation For Hand Quilting

Rightly or wrongly, I decided to baste the quilt with safety pins. Actually it was quite funny, when I was trying to buy lots of pins, the lady seemed not to want to sell them to me, she said you can only quilt one quilt at a time. I found myself explaining that I wanted to do more than one quilt, some machine quilting and some hand quilting so eventually I purchased a big bag of them.

I put plenty of pins into the top which was good is some respects as it is easy to remove them at each spot and then readjust the smoothing of the backing fabric if necessary.

Also, I bought some bulldog type clips, which I used to fold the backing edges to the front of the quilt to keep it organised and protect the edges of the quilt, until it is completed.

I left the papers in the hexies all around the perimeter to give it stability until I get to the edges.

I am using a quilting hoop which I bought second hand at a quilting market. I bought some Gutterman Hand Quilting thread. I bought this thread because there was actually not many to choose from due to supply chain issues from Covid. I chose a linen colour to give it a bit of depth and dimensionality.

Reviewing The Hand Piecing

Even though I believed my hand piecing to be okay for the English Paper Piecing and I did do locking stitches very regularly for every seam, I was disappointed that some of the seams were a bit weak when I put the quilt into the hoop for quilting, not all the time, but occasionally this has been exposed. I will be more careful next time. I used a polyester thread for the hand piecing, maybe that was not a good idea….I was using up thread I already had.

Requirements For Hand Quilting

One quilting hoop

Small scissors

Lots of basting pins (200+)

3 x spools of waxed hand quilting thread 50wt

Quilting needles – I chose the larger ones as I am not an accomplished hand quilter

A small bag to hold these tools. I am using this beautiful handpieced bag which was sent to me by my friend Ellie M. It’s just perfect for this use. See the photo below. Thank you Ellie!

Quilting Thimble – I am using one from the Thimblelady

Optional fingercot for the opposing hand

Optional Headlight for night time or low light situations

All In Hand - Lessons In Hand Quilting. susies-scraps.com
All In Hand – Lessons In Hand Quilting. susies-scraps.com

A Simple Hand Quilting Design

Keeping with a traditional design and in keeping with my original idea of making a Grandmother’s Flower Garden Quilt Like Grandma Used To Make, I decided just to quilt each hexagon approximately 1/4” away from each seam edge. I did not mark the quilt. I have just done it freehand. I started from somewhere near the centre of the quilt and I am gradually working my way outwards.

Threading The Quilting Needle

I decided, rightly or wrongly to use a double thread. to do this quilting. So in other words, tanking a length of thread, threading it and then put the two ends of the thread together and make a knot. I like the look of the thread being a bit thicker and once the needle is threaded it doesn’t fall off. The length is probably personal taste. Not too long or it becomes unwieldy and not too short as it is more knots and interruption. I found a length of about 3 feet then doubled and knotted to be about 18” long to be about right. I gather some people thread up a whole lot of seperate needles and have them prepared. I haven’t done that as I found that the thread can easily get tangled, so I just did one at a time as I have used it.

Using The Hoop

Starting at or near the centre of the quilt, I applied the hoop. I found that it takes a bit of practice to get it sitting nicely. I tried not to make it super tight as this does put unnecessary tension on the stitching lines where the hexies are joined. I found that I could centre about three of the hexies at a time which made it easier to quilt. It is harder to manipulate the needle near the edges of the hoop. I did not overtighten the top hoop screw as it makes it harder to get on and off each time and I did not want to put unnecessary tension on the seams.

All In Hand - Lessons In Hand Quilting. susies-scraps.com
All In Hand – Lessons In Hand Quilting. susies-scraps.com

Burying The Knots

One of the techniques which one needs to develop with hand quilting is burying the knots. I have done this by inserting the needle approximately 3/4 to 1” away from the start point. Then pulling the thread through until the knot ”pops” through the fabric and is buried into the quilt top, then the quilting stitches can begin. To end, the same procedure applies. When I have a bit more than the length of the needle of thread left, I knot the thread right near the quilt, and then take the next stitch into the fabric and have the needle exit about 3/4” away and then pull until the knot pops through the top of the fabric and is buried into the top of the quilt. Then, keeping a bit of tension on the thread, I cut the thread carefully near the quilt so that the end disappears inside the quilt.

Wearing The Thimble

The thimble is a matter of personal preference. I think that everyone needs to find the thimble that suits them. I tried a few before I found one that I like. Thimbles have indentations or dimples on them. They can be all over, or on the top or sides. These dimples are known as knurlings and they stop the needle from slipping. Here is an interesting article about thimbles.

nordicneedle.com

The one I am using is from Thimblelady. I settled on this one for the moment. I found I was able to more easily push the needle through the thicknesses with this particular thimble. This one has a bank of knurlings on one side.

Making The Quilting Stitches

All In Hand - Lessons In Hand Quilting. susies-scraps.com
All In Hand – Lessons In Hand Quilting. susies-scraps.com

With the needle threaded, the hoop applied and the thimble on, It is time to decide whether or not you also wish to use s finger cot or leather finger protector for the finger on the opposite hand which will be under the hoop. This is because the finger underneath will be used to ”feel” the needle emerging through the quilt. this opposing finger will develop a bit of a calous over time a finger protecter is not used. This is personal taste. I am not using one as I like th feel the tip of the needle coming through and it is easier to judge repositioning the needle t make the stitch.

Push the needle vertically into the quilt after burying the knot. With the opposing hand underneath, feel the tip of the needlecome through the quilt. It should be just through. now lay the needle down flat, and push the needle a short distance back through the quiltusing the thumb to depress the quilt at the same time to allow the needle to come through. accomplished quilters can make a few or several stitches like this with one pass of the needle. This action is known as rocking the needle. My limit is one to two stitches. That is okay as I am still leaning. Make sure that the threads are pulled through evenly top and bottom. that is the advantage of having the opposing hand underneath to feel that there is no free length of thread left behind.

All In Hand - Lessons In Hand Quilting. susies-scraps.com
All In Hand – Lessons In Hand Quilting. susies-scraps.com

Note to self: make sure the papers are removed before quilting. I realised afterwards that I have left a couple of papers in without even realising when I quilted those hexies. Maybe it was late…. It wasn’t hard to do. Just something to keep in mind! ???? They will stay there now forever.

All In Hand - Lessons In Hand Quilting. susies-scraps.com
All In Hand – Lessons In Hand Quilting. susies-scraps.com

Still a way to go but overall a very enjoyable activity. I have taken it on holidays which has turned out to be a godsend as it has been cold. …thank goodness for quilts . ????

If you have enjoyed this post, you may also like

Orange Peel Quilt Blocks Pattern

Orange Peel Quilt and Pattern

Periwinkle Blues Quilt – Part 2

Happy Stitchhing

Susie

© Susan Stuklis 2022