Tag Archives: Quilt As You Go

Vintage Style String Me Along

Vintage Style String Me Along

Hello Dear Friends and Readers and a warm welcome to today’s post. I have spent about one month in Western Australia and that time has been amazing and so interesting. If you follow me on FB or Insta you can see some of the photos there.

Now I am black home and it’s good to be here. My sewing room has been calling and I must say it is somewhat of a mess and needing a good tidy up! I thought I would start with a box of scraps which was doing nothing. A collection of all sorts of odd shapes and different fabric lines, chucked into the box from various different projects over time. In order to make some room and be able to get back to some basic machine stitching, i decided to make some string blocks with this fabric.

Vintage Style String Me Along susies-scraps.com

I sorted out the pieces and cut them very roughly into odd strips. Better pieces of fabric I cut into strips and added to my pile which may be used for a log cabin in the future. Lessons in Log Cabin Blocks It didn’t take that long and can be way more fun than hauling yardage. The piles of strips look very nice and my pile of rough strings gave a sense of achievement. As always, there is more fabric than anticipated and I’m pretty sure I can create at the very least, a baby quilt or a lap quilt.

In the pile I also have two old thin pillow coverings, so I cut them up to use as the foundation for the string blocks. My vision is a vintage style looking quilt which is homey and full of delightful strings. Depression era quilts were sometimes made of strings of fabric in this manner in order to use what was already available and then recycled into a quilt top. This lead to some very pretty quilts with a lovey mixture of fabrics. They often used the fabric feedsack bags to make clothing and quilts. It is a great look. The way the blocks will be positioned will give plenty of interest.

Begining by placing a string in the centre of the foundation block on the diagonal, making sure that it overhangs the edges. Cover with another string, right sides down lining up the sewing edges as much as possible. Sew, making at least a 1/4” seam. Make two blocks at a time so that it keeps the flow going and doesn’t use as much thread. Press the fabric strip open. I use a wooden thing or finger press well before adding the next strip. I even used up old bobbin thread which is actually great because now my bobbins are cleaned up as well!

Vintage Style String Me Along susies-scraps.com

This is how it looks from the back before trimming. It may look a little distorted because the foundry=tion was very thin however that will not matter once the block is trimmed.

I remember PJ from Quilting time in Dixie saying that she used old thin sheets for the foundation blocks and that seemed like an excellent idea to me.

In order to keep this as simple as possible I used my regular 6” ruler to cut the fabric into 6” x 6” squares to use for the foundations. This made it very easy to trim the blocks after pressing. this is how it looks from the front before trimming.

Vintage Style String Me Along susies-scraps.com

I used my trusty old treadle to make these blocks. Having been out of use for a while she responded to a good oiling. That is one of the advantages of this machine. The maintenance is easy, just give a good oiling! Treadle Tinkering

Vintage Style String Me Along susies-scraps.com

I plan to put the blocks together like this. I really like the pattern and it looks good from every side. I hope you can feel inspired dot make some string blocks. Loads of fun. It doesn’t require over thinking which means that it progresses very quickly.

Vintage Style String Me Along susies-scraps.com

If you enjoyed this post, you may also like these other string projects.

Any String Goes – Pineapple Improvisational String Quilt Blocks

String Pot Holders or Trivets for Christmas

quilted christmas scrappy string stockings

Crazy Little Strings – Diamond Charms Quilt Block and Tutorial

Pink Strings Table Mat

String Feeder QAYG Bib

“End of Day” Quilters Basket – Free Tutorial

Thank you for joining me today and as always I wish you happpy stitching.

All the best, Susie.

© Susan Stuklis 2026

Pink Strings Table Mat

Pink Strings Table Mat

Hello Dear Friends and Readers, and a warm welcome to todays post and to a bright New Year for 2023. I am in the mood for string projects and I hope you will be too.

In today’s post I am sharing with you all this little, Pink Strings Table Mat It is a quick project. I have definitely enjoyed making and using all the potholders, trivets, dish mats, kettle quiltlets and coasters I have made over time. These are very useful household items and not to forget they can make lovely small gifts as well. This mat can be useful to protect a table top or even as a placemat if preferred. I really like the way all the strings play together to make a unique table mat. Using lots of fabric strings and a Quilt As You Go (QAYG) method gives the Pink Strings Table Mat a lot of structure and makes it extra sturdy.

A Quilt As You Go Project

If you are not familiar with Quilt As You Go methods, it is a way of quilting the project during construction rather than after. Some examples of this can be sewing an “X” on two layers of fabric with one layer of flannel or batting in between which is often done when making rag quilts. Another method is making a small potholder quilt and then quilting and binding it. This method is then repeated as many times as desired and then they are hand stitched all together to make a larger quilt. Because each small piece was already quilted then this is also a form of QAYG. In todays example I will show how the item is quilted at the same time as each piece of fabric is added to the fabric and batting base.

Tips on Fabric Strings

For more tips on using fabric strings, see the previous post of String Pot Holders or Trivets for Christmas

I will give the requirement to make one Pink Strings Table Mat.

My suggestion is making two at a time to make the process more efficient because you are chain piecing and saving thread. If you only want to make one then I suggest piecing some other blocks in between.

Seam allowance is variable.

Finished size 12” x 18”

Requirements to make the Pink Strings Table Mat

1 of backing fabric 14” x 20” (a fat quarter could be used)

1 of Batting piece 14” x 20”

Approximately 40 leftover fabric strings at least 14” long each using prints of pinks apricots browns teal greens and light greens

2 of width of fabric strips 2 1/4” wide for the binding

Today I am using a Singer 15 treadle which is 120 years old. Learn to Treadle

Pink Strings Table Mat susies-scraps.com

Making the Pink Strings Table Mat

Lay out the backing fabric right side down and top with the batting piece. Make sure that the two pieces are aligned and smooth out carefully with your hands so that it is nice and flat.

Beginning at the centre of the mat, lay down one fabric string on the mat so that it slightly overhangs each side of the mat right side facing up. Lay a second string right side down on top of the first string so the the edges on the right edge of the two strings are aligned as much as possible. sew along that edge using an approximate 1/4” seam allowance. It does not have to be accurate as long as the edges are contained. Open up the second string and press toward the batting. Add the next string in the same way, right side down on top of the second string. sew along the right edge. Open up and press toward the batting. Finger press or roller press along the seam to open it up.

Continue adding strings in the same manner. If you are making two as I did, then keep going to the next mat and interchanging between the two mats.

Pink Strings Table Mat susies-scraps.com

Keep going until the mat is completely covered to the ends of the mat.

Take to the cutting mat and use a rotary cutter and ruler to trim the mat so that it measures 12” x 18”. the mat is already quilted because it is a QAYG project.

Pink Strings Table Mat susies-scraps.com

Join the binding strips together using a 45 degree angle.

Attach the binding strips to the front edge of the mat.

Pink Strings Table Mat susies-scraps.com

Turn to the back and hand stitch in place. Quick Bind Every Time – Tutorial

Pink Strings Table Mat susies-scraps.com

Here is the two finished mats after the binding was attached.

Pink Strings Table Mat susies-scraps.com

Happy New Year!

Wishing you all a very Happy New Year. I hope you feel inspired to use up some of your leftover fabric strings.

If you enjoyed this post, you may also like some of these related projects.

Strings n Things

Crazy Little Strings – Diamond Charms Quilt Block and Tutorial

if you are a real fan of using up fabric strings you might also like this

“End of Day” Quilters Basket – Free Tutorial

If you are looking for larger table toppers here are two suggestions…

Wendy’s Way Snowball Table Quilt

Tea Time for Alice Mini Quilt

And a fun QAYG Hobo Bag Pattern

Happy sewing

Susie

© Susan Stuklis 2023

String Pot Holders or Trivets for Christmas

String Potholders or Trivets for Christmas

Hello Dear Friends and Readers, Good Morning and welcome to today’s post. This will be a very quick pre-Christmas post. I don’t think that we can have too many potholders or trivets at any time of the year, but especially at Christmas time when more than usual are probably required. Not only that, they make a lovely last minute and thoughtful gift. This is not a new idea as many others have done this before me.

The string potholders I have made over the years are undoubtably my favorites. Somehow they get better with wear. Each one is unique and because of the added fabric between the strings it makes them a bit more robust, and it’s still an awesome way to use that leftover fabric, which would normally be discarded. And as they are washed, they develop that lovely aged crinkly look, which I love.

Today I have made some Christmas potholders by using up fabric scraps in red green and cream. They don’t have to be Christmas fabrics per se, but they can just be scraps that reflect that theme. Please read all instructions before commencing.

Last year I used fabric strings to make these stockings quilted christmas scrappy string stockings

TIP

I suggest making two at a time. This saves a lot of thread, makes the whole process more efficient and allows for continuous piecing.

Now I know you might be thinking ,what with strings should I use? it’s really up to you how wide or thin you would like them to be. Actually using thin strips makes the article more robust because of all the fabric contained in the seams. So probably the most narrow would be 3/4 of an inch. Strings of between 3/4 of an inch and 1 1/2 inches are probably most ideal.

Requirements for String Potholders or Trivets

Fabric Strings Backing fabric and batting of similar size to the backing fabric. Binding Strips cut from the width of the fabric 2 1/4” wide.

TIP

If you are making a larger size ie: 10” or 12” square, a fat quarter for the backing is ideal as the leftovers can be used for the binding.

String Pot Holders or Trivets for Christmas susies-scraps.com

Making the Christmas String Potholders or Trivets

I think you know the drill it’s not complicated,

Choose a piece of backing fabric. It could be 6, 8, 10 or 12 in.² as an example …..it can be any size you like. Put the fabric right side down. Choose a matching size piece of batting and put it on top of the backing fabric. Make sure to smooth it down nicely. Now collect strings of fabric and beginning on the center diagonal using the longest strings, put one string of fabric right side up and a second string right side down, aligning the edges to one side of the first string. I am making two.

String Pot Holders or Trivets for Christmas susies-scraps.com

Bear in mind that the seam allowance can be variable, make it whatever suits the fabric you have. Sew along that those fabric edges through all the layers. Turn back the top string so that it now faces right side up.

String Pot Holders or Trivets for Christmas susies-scraps.com

Finger press and continue adding strings to each side of the center string until the entire piece is covered.

String Pot Holders or Trivets for Christmas susies-scraps.com

Once the whole piece is all covered, then use your rotary cutter and ruler to square it up. These squared up to 11 ½”.

String Pot Holders or Trivets for Christmas susies-scraps.com

Prepare a binding strip 2 1/4 inches in width. Fold in half length wise. Sew your binding strip to the right side of the finished potholder or trivet.

String Pot Holders or Trivets for Christmas susies-scraps.com

Join the ends together in your preferred method turn back to the wrong side and hand stitch in place for a lovely finish.

String Pot Holders or Trivets for Christmas susies-scraps.com

This project will use a surprising amount of leftover strings of fabric, making them into something useful and beautiful, and give you a sense of satisfaction.

These potholders can be made in any colours you choose. I hope you have a wonderful Christmas and consider making some of these as a quick project if you are short of time.

String Pot Holders or Trivets for Christmas susies-scraps.com

Merry Christmas, and best wishes for the festive season.

If you enjoyed this post, you may also like

Hexagon Star Snowflake Trivet

Diamond Stars Christmas Table Runner

String Feeder QAYG Bib

Susie

© Susan Stuklis 2022

String Feeder QAYG Bib

String Feeder QAYG Bib

Hello Dear Friends and Readers, hoping that you are all fareing well.  Sometimes, there just isn’t time to make a whole quilt, or you feel like a quick but satisfying and basically free little project.  This may be the one for you!  Quilt As You Go method means an easy completion of the project too!

Feeders or bibs are great clothing accessories.  Like aprons they are excellent for protecting garments from soil whilst still allowing potentially messy activities to occur.  Feeding can definitely be one of them.  Today I am focusing on fabric strings which are absolutely ideal for this project.  Because of the amount of extra fabric involved in the seam allowances and extra stitching, this makes for a really beautiful, super absorbent  and durable feeder/bib.

I can speak from experience.  They really work well.

Yes!  You can use some scraps!  Take some strings of fabrics and left over batting, which you could easily discard and sew them into something really lovely.  Choose a colour of strings that you like, or mix them up and just go for it.

Makes for gorgeous and practical gift giving.

Here is a link about bibs

wikipedia.org Bib garment

susies-scraps.com
String Feeder QAYG Bib

Are you ready!  Let’s make some.

Ideally, make two at a time.  This is because you can chain piece the construction and its actually easier than cutting the threads each time.

Now you may be wondering about the pattern.  I have used a brown paper lunch bag for my templet.

Round off the corners of the lunch bag.  Cut out a small scoop for the neckline.

susies-scraps.com
String Feeder QAYG Bib

Requirements for the String Feeder QAYG Bib

The templet as shown above

Backing fabric piece 10” x 12”

Scrap of batting 10” x 12” (I used cotton)

Fabric strings assorted.  At least 10” long each

2 1/2” strip, approximately 40” long for the binding (for best results, this binding should be cut on the bias, this will make for easier attachment.

susies-scraps.com
String Feeder QAYG Bib

Method

Place the 10” x 12” piece of fabric right side down.  Put the batting piece on top.  Smooth out.

Beginning at the centre, put one strip right side up.  Add a second strip right side down, so that the edges line up.  Stitch approximately 1/4“ from the edge.

I am making two at a time.  Makes it easier.

Flip the top string down.  Finger press well.  Repeat with as many strips as you need to fill the space.

susies-scraps.com
String Feeder QAYG Bib

Once the pieces are covered with strips, it should look like this.  All quilted as you go.

susies-scraps.com
String Feeder QAYG Bib

Lay the templet on the finished piece.  Pin well.

susies-scraps.com
String Feeder QAYG Bib

Cut out following the pattern edge.

Fold the binding strip in half lengthwise, wrong side together.  Cut a length approx 7” long for the neckline.

Lay this length along the neckline front, raw edges together.   Pin and stitch slowly 1/4” from the edge.

susies-scraps.com
String Feeder QAYG Bib

Turn to the back.  Pin securely.  Top stitch slowly incorporating the curve.

Trim the ends to line up with he feeder.

Fold the remainder piece of binding in half lengthwise, right sides together.  Find the centre point and line it up with the centre of the base of the feeder, right sides together as with the neckline.  Pin to hold in place.

susies-scraps.com
String Feeder QAYG Bib


Stitch carefully 1/4“ from the edge around the feeder. Turn back to the wrong side.  Pin in place.  Fold the raw edges of the ties in 1/3rd the fold don’t the folded edge to meet the edge so that the raw edges are all incorporated.

susies-scraps.com
String Feeder QAYG Bib

Stitch close to the edge from the end of one tie all around to the end of the other tie.  Trim the ends a little if necessary.  Make a knot at the end of the ties.  Feeder is done.

susies-scraps.com
String Feeder QAYG Bib


Now I have some news.  It’s been a busy time at our home recently and we have a new little grandson.  Here is the dear little soul, wearing one of his new feeders.

susies-scraps.com
String Feeder QAYG Bib

I think he will grow into it! ????

If you enjpoyed this post, you may also like these other string projects.

Crazy Little Strings  Diamond Charms Quilt Block and Tutorial

Strings n Things

and some other QAYG projects

QAYG Backpack Quick and Go

QAYG Hobo Bag Pattern

Happy stitching,

Susie

© Susan Stuklis 2020


Hexagon Star Snowflake Trivet

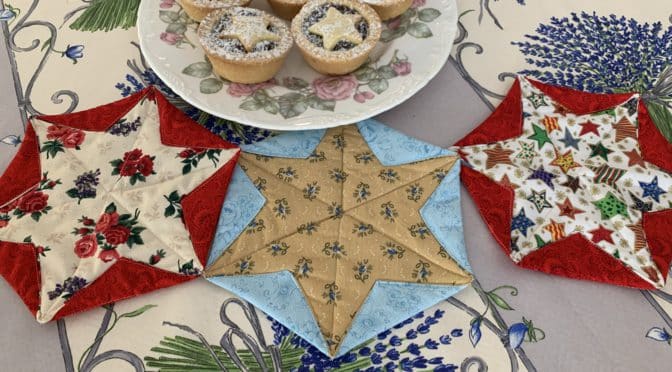
Hexagon Star Snowflake Trivet

‘Tis the season…..

Hello Dear Friends and Readers, Season’s Greetings and  best wishes to you all!

I just have to tell you, I’ve been busting to get to the sewing machine to make something!  Preparing for the Christmas rush is lovely but time consuming……
Anyhow  I wanted to share with you all a wonderful, last minute Christmas project/gift which you might enjoy for your Christmas table.  There are never enough trivets at this time of year and having some with a Christmas theme look wonderful on the table!

This is pretty much a Quilt As You Go project.

Once you have cut your hexagons it is quick and easy to sew.  As always you can make it with your scraps and it is perfect for left over batting pieces!  I don’t like to harp on, but pre-washed fabric is best.  When cutting Hexagons, the size refers to the length of each of the six sides of the hexagon.

Requirements for one Hexagon Star Snowflake Trivet

2 of 5“ hexagons, one dark, one light fabric

1 of 4” hexagon batting piece

Cut your own templates or download some, here is an example for the 4” hexagon.

Method

Put the Two hexagon fabric pieces right side together.  Make sure the edges are perfectly aligned.  Now place the piece of hexagon batting on top so that each point of the batting is exactly at the Centre of each side of the fabric hexagon.


Take to the machine and sew 1/4” from the edge all the way around leaving an opening on one side edge for turning. As you sew around make sure to catch a fraction of the corner of the hexagon batting into the seam to anchor it.

Clip the corners.  Turn to the right side  Use a chopstick or similar to push out all the points.  Turn under the opening 1/4” .   Make sure to press well at this point.
Beginning at the centre of each side quilt across the hexagon to the opposite side. Repeat for the other sides completing 3 lines of quilting.

Using the quilting lines as a guide, stitch between each point at the end of the quilting lines around the whole piece, following the lines of the underlying batting.  These will become your folding lines.   I have placed a yellow pin pointing to the spot I’m aiming for.

Here is a picture of the reverse so that it is easy for you to see the sewing lines.

Now, with right side facing you, turn down the corners of the hexagon so that it lines up with the internal hexagon batting and follows your fouling stitch lines.  Now the  snowflake star should  be visible. Try to make the folded seams as crisp as possible.

Top Stitch as close to the star edges as possible.

There you have it!  I am definitely going to have these scattered on my Christmas table, decorative and useful!

I wish you all a wonderful, safe, happy and healthy Christmas!

If you enjoyed this post, you may also like these useful items,

Pot-Holders Quilted Flower Pot

36 Patch Table Mat

Happy Day Microwave Bowl Holder Pattern

Quilted Flower Bowl & Tutorial

All the best,

Susie

© 2019 Susan Stuklis